1. Informació important de seguretat
Si us plau, llegiu atentament totes les instruccions abans de la instal·lació i l'ús. Conserveu aquest manual per a futures consultes.
- Utilitzeu sempre l'equip de seguretat adequat, com ara guants i protecció ocular, durant la instal·lació.
- Ensure the door is securely supported before making any modifications.
- Do not use power tools at excessive speeds, which could damage the door or hardware.
- Mantingueu les peces petites i els materials d'embalatge lluny dels nens per evitar perills d'asfixia.
- Si teniu dubtes sobre alguna part del procés d'instal·lació, consulteu un professional qualificat.
2. Producte acabatview
The VEVOR Keyed Entry Door Knob (Model 587ET-SS-1PK) is designed for secure and convenient access to your rooms. Featuring a durable all-metal construction and a satin nickel finish, it offers both reliability and a modern aesthetic.
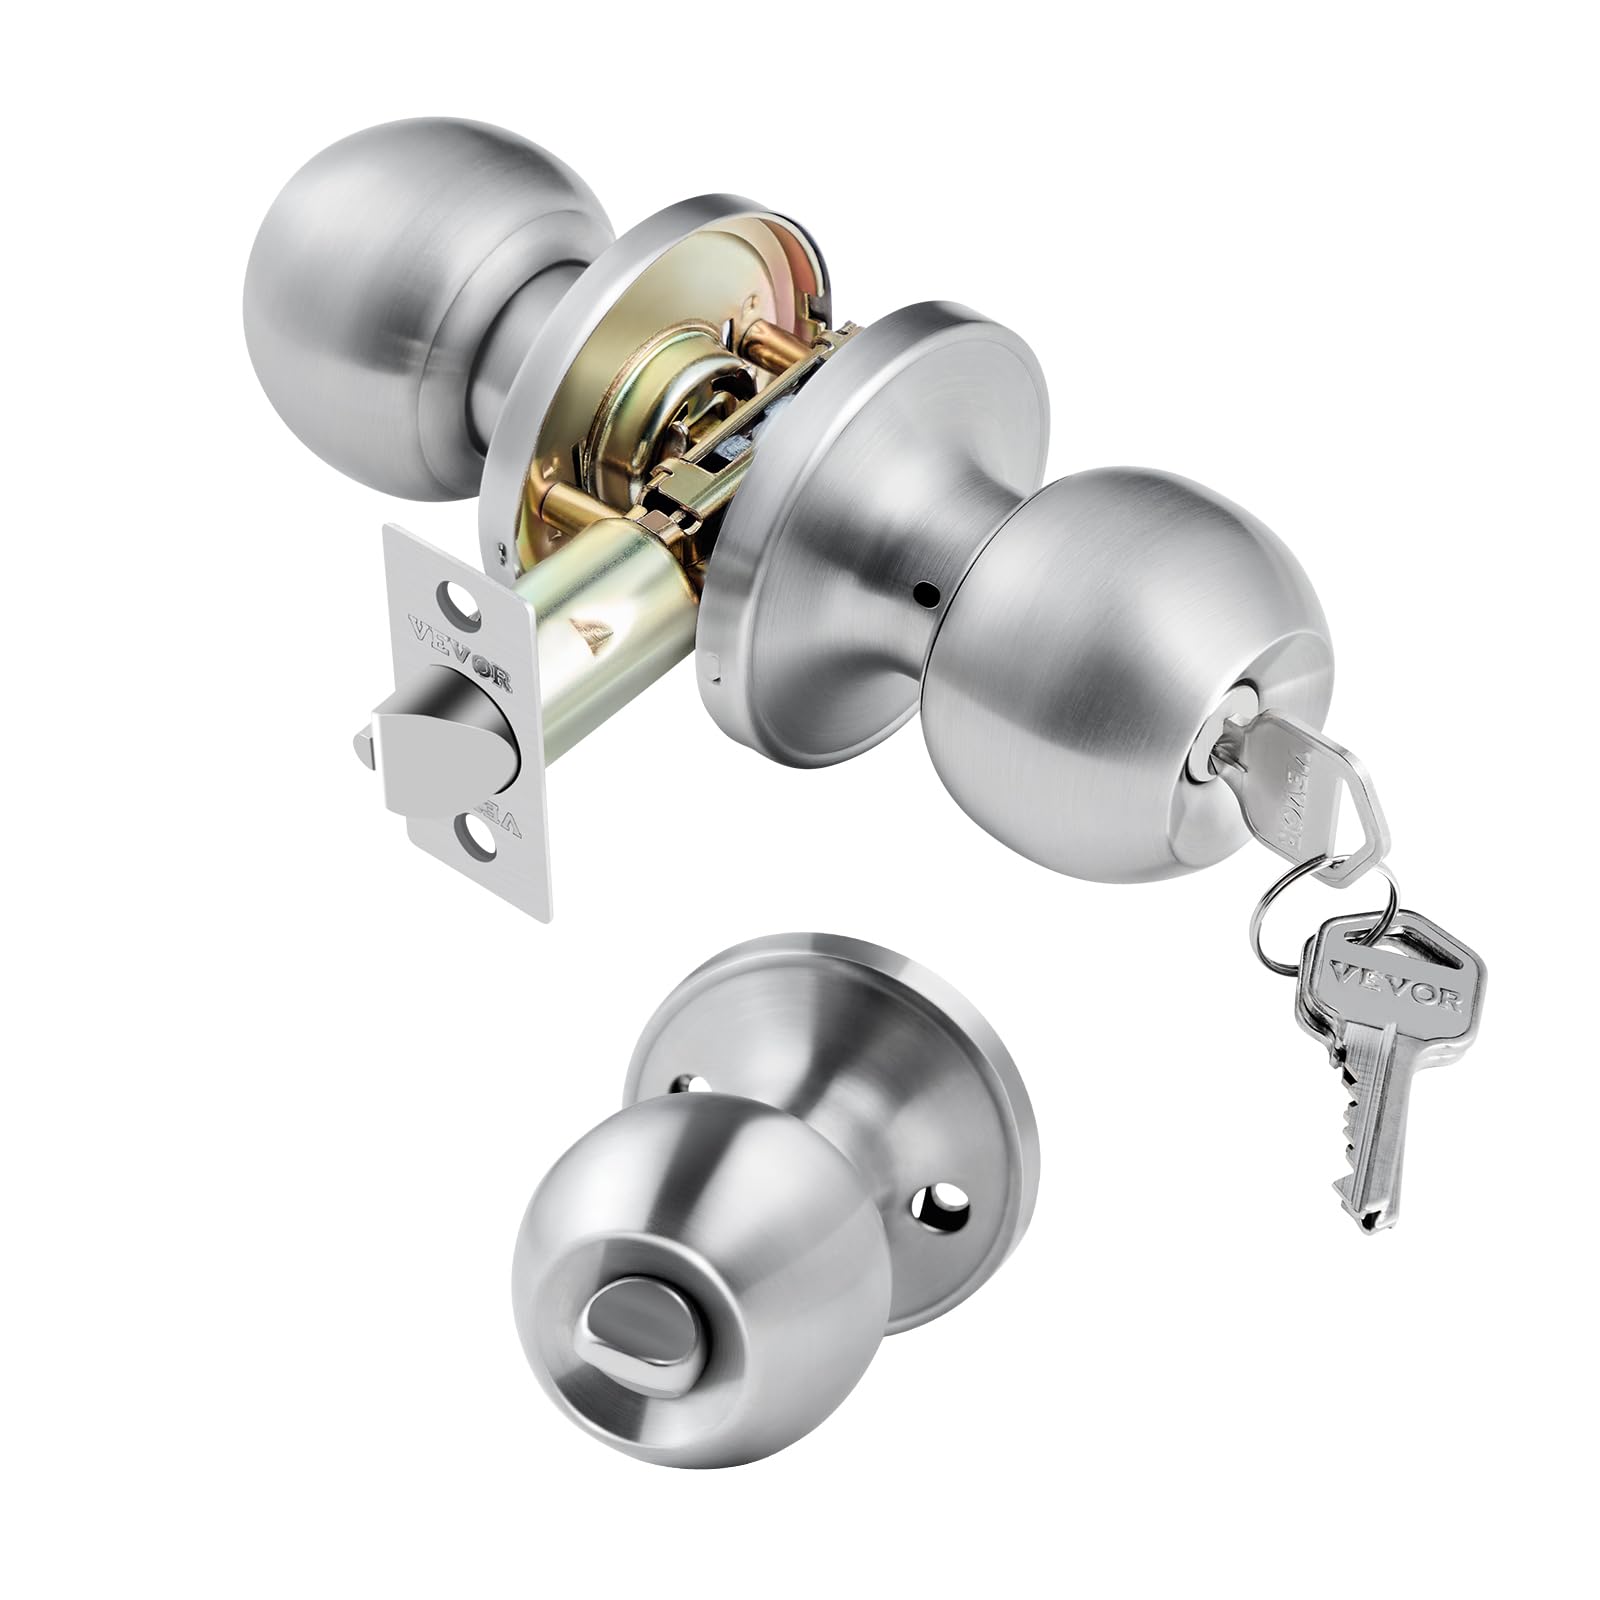
Un front view of the VEVOR Keyed Entry Door Knob in satin nickel finish.
Característiques principals:
- Àmplia compatibilitat: Fits doors 1-3/8" to 1-3/4" thick with an adjustable latch for 2-3/8" to 2-3/4" backset.
- Construcció totalment metàl·lica duradora: Crafted with a solid all-metal lock body for excellent corrosion and wear resistance.
- Dual Privacy Functions: Exterior unlocks with a traditional key; interior features a simple thumb-turn for privacy.
- Fàcil instal·lació: Requires only a screwdriver for quick setup.
- Adherència còmoda: Simple and stylish round ball design, easy to grip for all users.
Contingut del paquet:
- Exterior Door Knob Assembly
- Interior Door Knob Assembly
- Adjustable Latch Mechanism
- Placa de vaga
- Mounting Screws (pre-set in handle)
- Keys (2 or more)
- Maquinari d'instal·lació
3. Especificacions
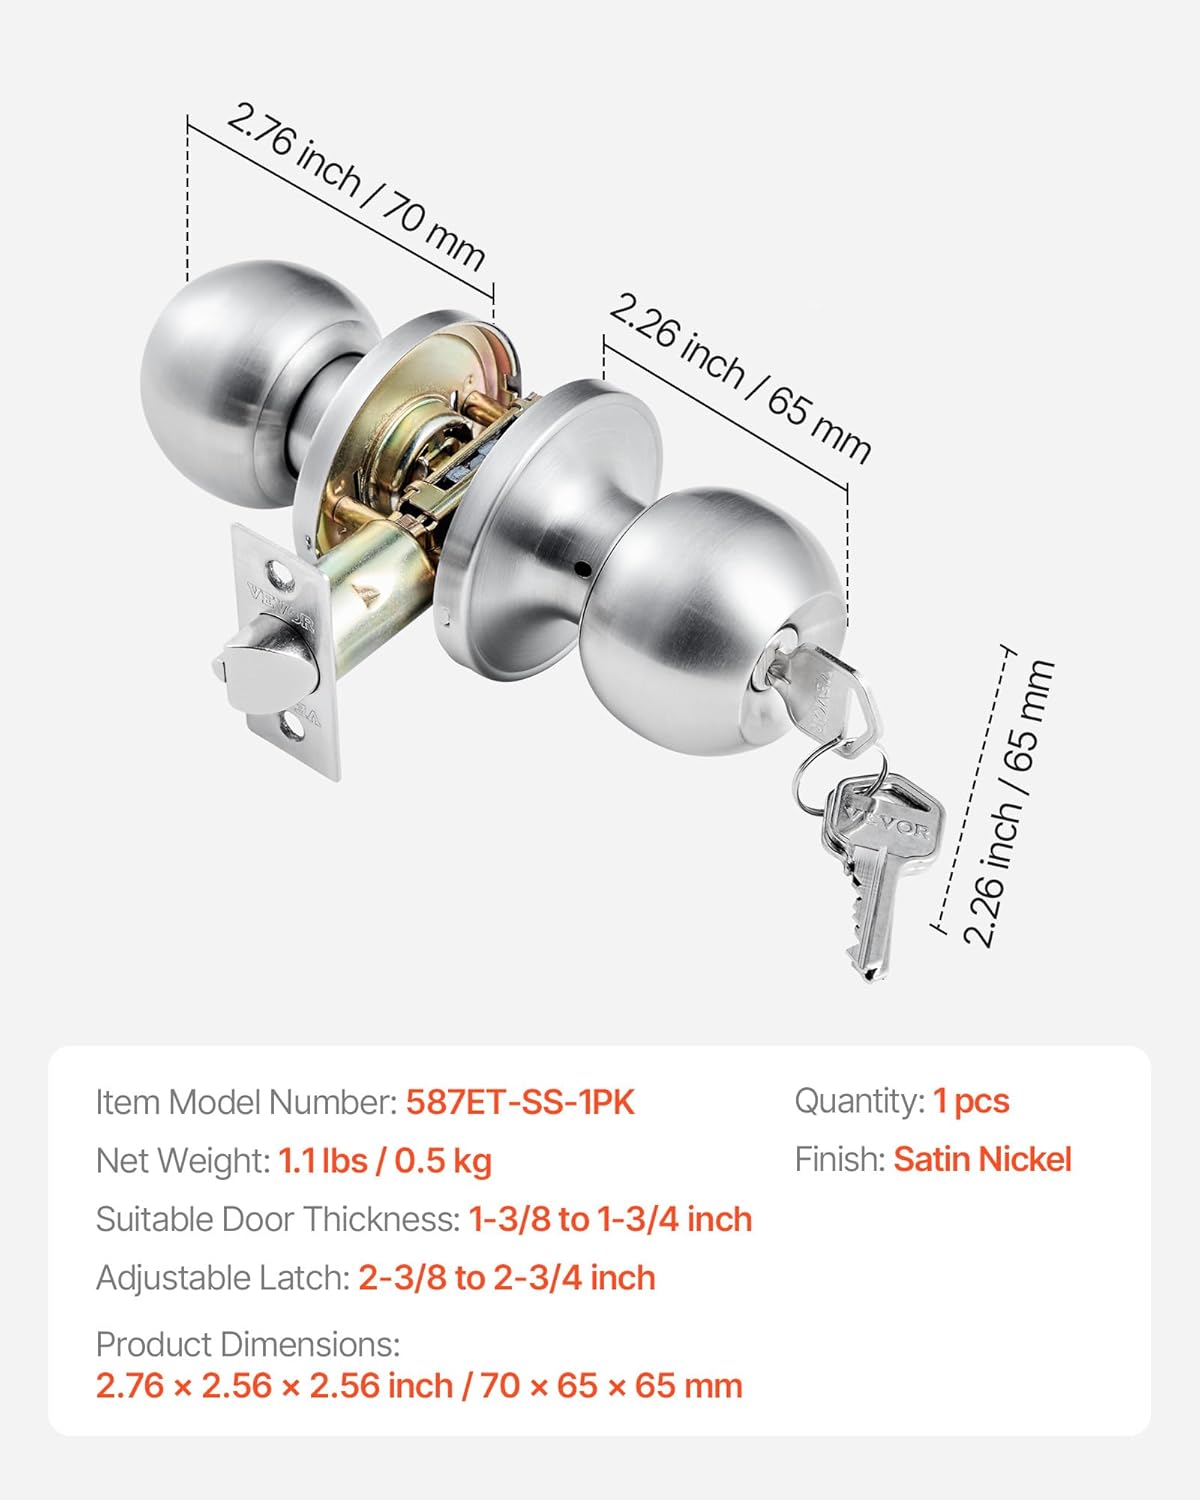
This diagram provides precise measurements of the door knob, including its diameter (2.76 inches / 70 mm), depth (2.26 inches / 65 mm), and key length. It also lists key specifications such as model number, quantity, suitable door thickness, adjustable latch size, net weight, and finish.
| Especificació | Detall |
|---|---|
| Número de model | 587ET-SS-1PK |
| Marca | VEVOR |
| Color | Níquel setinat |
| Acabat exterior | Metall |
| Tipus de bloqueig | Keyed Mortise Lock |
| Gruix de porta adequat | 1-3/8" a 1-3/4" (35 mm a 45 mm) |
| Retorn de tancament ajustable | 2-3/8" a 2-3/4" (60 mm a 70 mm) |
| Dimensions del producte | 6.69"L x 3.82"W (approx. 70mm x 65mm for knob diameter) |
| Pes de l'article | 1.1 lliures (0.5 kg) |
| Material del mànec | Metall |
| UPC | 197988693789 |
4. Compatibility and Door Preparation
Before installation, ensure your door meets the compatibility requirements for thickness and backset. This door knob is designed for most standard doors.

This image illustrates the door knob's compatibility with door thicknesses ranging from 1-3/8 inches to 1-3/4 inches, and highlights the adjustable latch for backsets of 2-3/8 inches to 2-3/4 inches.

This image helps in selecting the correct door lock size by illustrating different door types (wood, steel, glass, composite) and providing critical measurements for the lock hole (vertical alignment) and appropriate handle position (2-3/8" to 2-3/4" backset), along with door thickness compatibility.
Door Requirements:
- Gruix de la porta: 1-3/8 inches to 1-3/4 inches (35mm - 45mm).
- Part posterior: Adjustable for 2-3/8 inches or 2-3/4 inches (60mm or 70mm).
- Diàmetre creuat: Standard 2-1/8 inch (54mm) diameter.
- Edge Bore: Standard 1 inch (25mm) diameter.
5. Instruccions d'instal·lació
Installation is straightforward and requires minimal tools. Please note that screws are pre-set in the handle and should be removed before starting installation.
Eines necessàries:
- Tornavís Phillips
- Cinta mètrica
- Pencil (optional, for marking)
Guia pas a pas:

A detailed six-step visual guide for installing the entry door knob. It covers installing the latch, attaching the faceplate, mounting the exterior knob, inserting internal components, securing screws, and completing the installation.
- Instal·leu el tancament: Insert the latch into the door hole. Ensure the latch bolt is facing the correct direction (beveled edge towards the door frame). Note: Keep the latch hole vertical.
- Attach the Faceplate: Secure the latch faceplate to the door edge with the provided screws.
- Mount the Exterior Knob: Insert the exterior knob assembly through the door, aligning the spindle with the latch mechanism.
- Insert Interior Components: Place the screw guide, locking rod, and spindle into the interior knob assembly.
- Assegureu els botons: Align the interior knob assembly with the exterior knob. Insert and tighten the screws securely. (A 6-shaped tool may be included to remove the ball, making it easier to tighten the screws if needed).
- Prova de funcionament: Once all screws are tightened, test the knob's operation from both the interior (thumb-turn) and exterior (key) to ensure smooth locking and unlocking.

Step 1 shows the door knob components separated for installation. Step 2 demonstrates using a screwdriver to secure the latch mechanism into the door frame.
6. Funcionament
The VEVOR Keyed Entry Door Knob provides secure access with dual locking mechanisms.

The top image shows the exterior side of the door knob with a key inserted for keyed entry. The bottom image displays the interior side with a thumb-turn mechanism for easy locking and unlocking from inside.
- Exterior Access: To unlock the door from the outside, insert the provided key into the keyhole and turn it. To lock, turn the key in the opposite direction and remove it.
- Interior Access: To lock the door from the inside, simply turn the thumb-turn mechanism on the interior knob. To unlock, turn the thumb-turn back to its original position.

A hand demonstrates the comfortable grip of the round ball door knob, designed for ease of use by all ages.
7. Manteniment
Proper maintenance ensures the longevity and smooth operation of your door knob.
- Neteja: Clean the satin nickel finish with a soft, damp drap. Eviteu netejadors abrasius, dissolvents o productes químics agressius, ja que poden danyar l'acabat.
- Lubricació: Periodically apply a small amount of graphite lubricant or a silicone-based spray to the latch mechanism and keyway to ensure smooth operation. Do not use oil-based lubricants as they can attract dust and grime.
- Cargols de tensió: Over time, screws may loosen. Periodically check and tighten all mounting screws to maintain stability and security.
8. Solució De Problemes
If you encounter any issues with your VEVOR Keyed Entry Door Knob, refer to the following common problems and solutions:
| Problema | Causa possible | Solució |
|---|---|---|
| Knob is loose | Els cargols de muntatge estan solts. | Tighten the mounting screws on both sides of the door knob. |
| Key is difficult to turn or sticks | Keyway is dirty or mechanism needs lubrication. | Apply graphite lubricant or silicone spray into the keyway. Do not force the key. |
| Latch bolt does not retract fully | Latch mechanism is misaligned or dirty. | Check for obstructions. Ensure the latch is installed vertically. Lubricate the latch mechanism. |
| La porta no es tanca correctament | Strike plate is misaligned or door frame is warped. | Adjust the strike plate position. Check if the door frame is plumb. |
9. Garantia i Suport
Els productes VEVOR estan dissenyats per a la durabilitat i el rendiment. Per obtenir informació específica sobre la garantia, consulteu la targeta de garantia inclosa amb la compra o visiteu el lloc web oficial de VEVOR. weblloc.
If you require further assistance, have questions, or need to report a problem, please contact VEVOR customer support through their official channels. Provide your product model number (587ET-SS-1PK) and purchase details for faster service.
Assistència en línia: Visita www.vevor.com per a preguntes freqüents, registre de productes i informació de contacte.


