1. Introducció
The Leviton ESL01-1LW Lever Edge Rocker Slide Dimmer Switch is designed for controlling dimmable LED/CFL and incandescent/halogen bulbs up to 150 Watts. This device supports both single-pole (one location) and 3-way (two locations) installations. It features an intuitive slide-action for full-range dimming and innovative lever terminals for simplified wiring, ensuring a secure and efficient installation process.
2. Informació de seguretat
ADVERTIMENT: To avoid fire, shock, or death; turn off power at the circuit breaker or fuse and test that power is off before wiring! This device must be installed in accordance with all national and local electrical codes.
- For use with 120V AC, 60Hz circuits only.
- Do not use with non-dimmable bulbs.
- Aquest producte pot contenir productes químics coneguts per l'estat de Califòrnia per causar càncer i defectes de naixement o altres danys reproductius. Rentar-se les mans després de la manipulació.
- Assegureu-vos que totes les connexions del cablejat estiguin segures i aïllades correctament.
- Si no esteu segur de qualsevol part d’aquestes instruccions, consulteu un electricista qualificat.
3. Contingut del paquet
Verifiqueu que tots els components estiguin presents abans de començar la instal·lació:
- One Leviton ESL01-1LW Lever Edge Rocker Slide Dimmer Switch - White
4. Especificacions
| Característica | Especificació |
|---|---|
| Número de model | ESL01-1LW |
| Tipus de muntatge | Regulador de lliscament |
| Marca | Leviton |
| Material | Policarbonat (PC) |
| Tipus de terminal | Lever Edge (Push-in) |
| Valoració actual | 5 Amps |
| Vol. Operatiutage | 120 Volts |
| Wattage | 150 Watts (LED/CFL), 600 Watts (Incandescent/Halogen) |
| Dimensions del producte | 1.65 x 1.8 x 4.55 polzades |
| Pes de l'article | 4.2 unces |
| Tipus de canvi | Unipolar o de 3 vies |
| Color | Blanc |
| Compliment | Llistat UL |
The dimmer's shallow depth allows for easier installation in various junction boxes.

Image: This image displays the precise dimensions of the Leviton ESL01-1LW dimmer switch, showing its height, width, and depth for installation planning.
5. Instal·lació i configuració
Seguiu aquests passos per a una instal·lació segura i correcta:
- Apagueu l'alimentació: Localitza el quadre de disjuntors i desconnecta l'alimentació del quadre de commutació on treballaràs. Verifica que l'alimentació estigui apagada utilitzant un voltimetre.tage provador.
- Elimina l'interruptor existent: Traieu amb cura la placa de paret i descargoleu l'interruptor existent de la caixa de connexió. Desconnecteu els cables de l'interruptor antic.
- Identificar els cables: Identify the Line (hot), Load, Ground, and Traveler wires (if applicable for 3-way installations). This dimmer does not require a neutral wire for operation.
- Prepareu els cables: Strip approximately 1/2 inch (12.7 mm) of insulation from each wire end. The dimmer includes a strip gauge on the back for reference.
- Connect Wires using Lever Edge Terminals:
- Cable de terra (verd): Insert the bare copper ground wire into the green Lever Edge terminal.
- Line/Load Wires (Black/Red): Insert the Line (hot) wire into the black Lever Edge terminal. Insert the Load wire into the TRAV1 (red) terminal. For 3-way installations, refer to the wiring diagrams below for traveler connections.
The Lever Edge terminals are color-coded for easy identification and accept 12 gauge and 14 gauge solid or stranded copper wire. Push the wire firmly into the terminal until you hear an audible 'click', confirming a secure connection. No exposed metal parts ensure added safety.

Image: This image shows a hand inserting a wire into the Lever Edge terminal of the dimmer switch, illustrating the quick and secure wiring method.
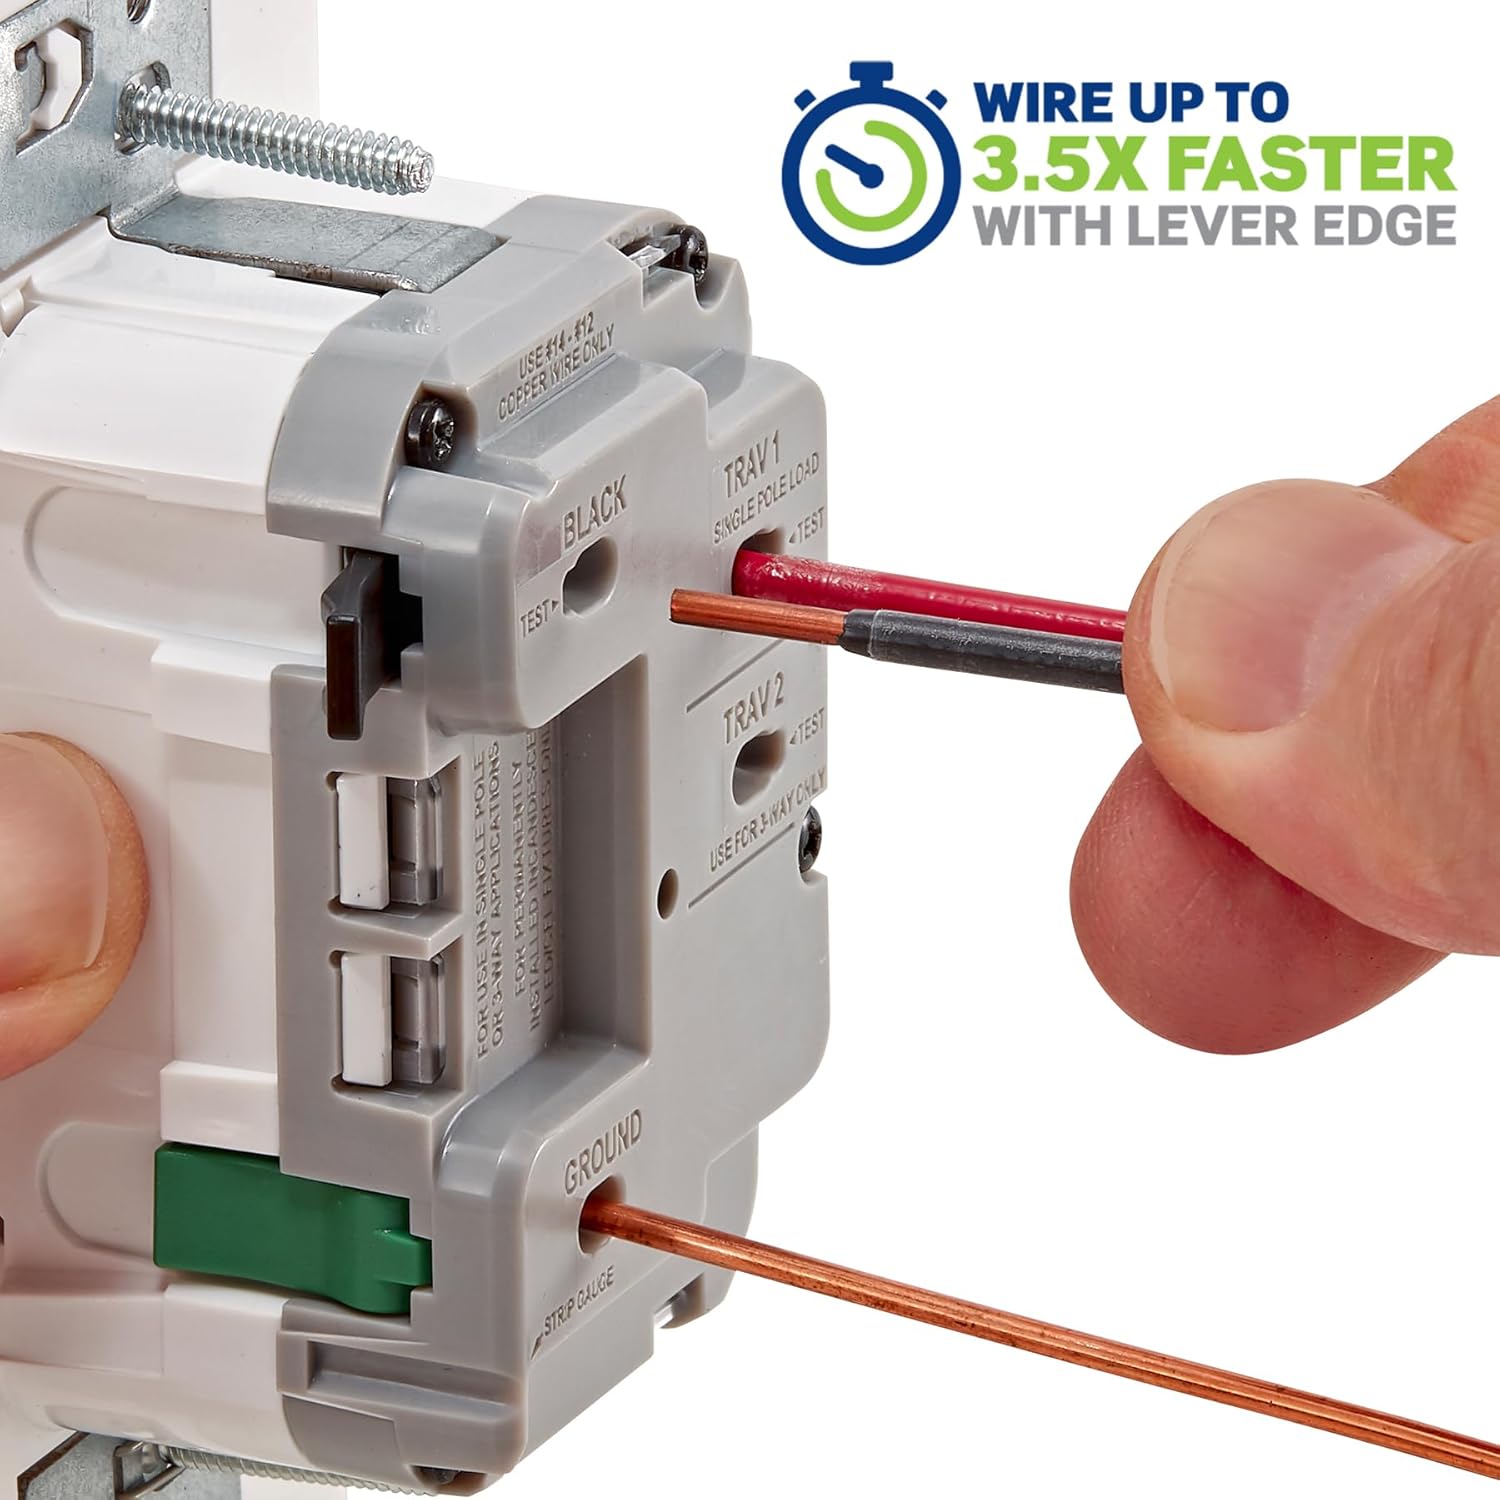
Image: This image visually demonstrates the three simple steps of Lever Edge wiring: Push the wire, Click the lever, and the connection is Done.

Image: This image provides a detailed back view of the dimmer switch, clearly labeling the color-coded Lever Edge terminals for Black (Line), TRAV1 (Load/Traveler), TRAV2 (Traveler), and Ground connections.
- Regulador d'intensitat de muntatge: Carefully push the wired dimmer into the wall box. Secure it with the mounting screws provided.
- Instal·leu la placa de paret: Attach the decorative wall plate (sold separately) over the dimmer. The dimmer is designed with a tongue and groove alignment for quicker trim-out on multi-gang installations.
- Restaura l'alimentació: Torna al quadre de disjuntors i torna a engegar l'alimentació.
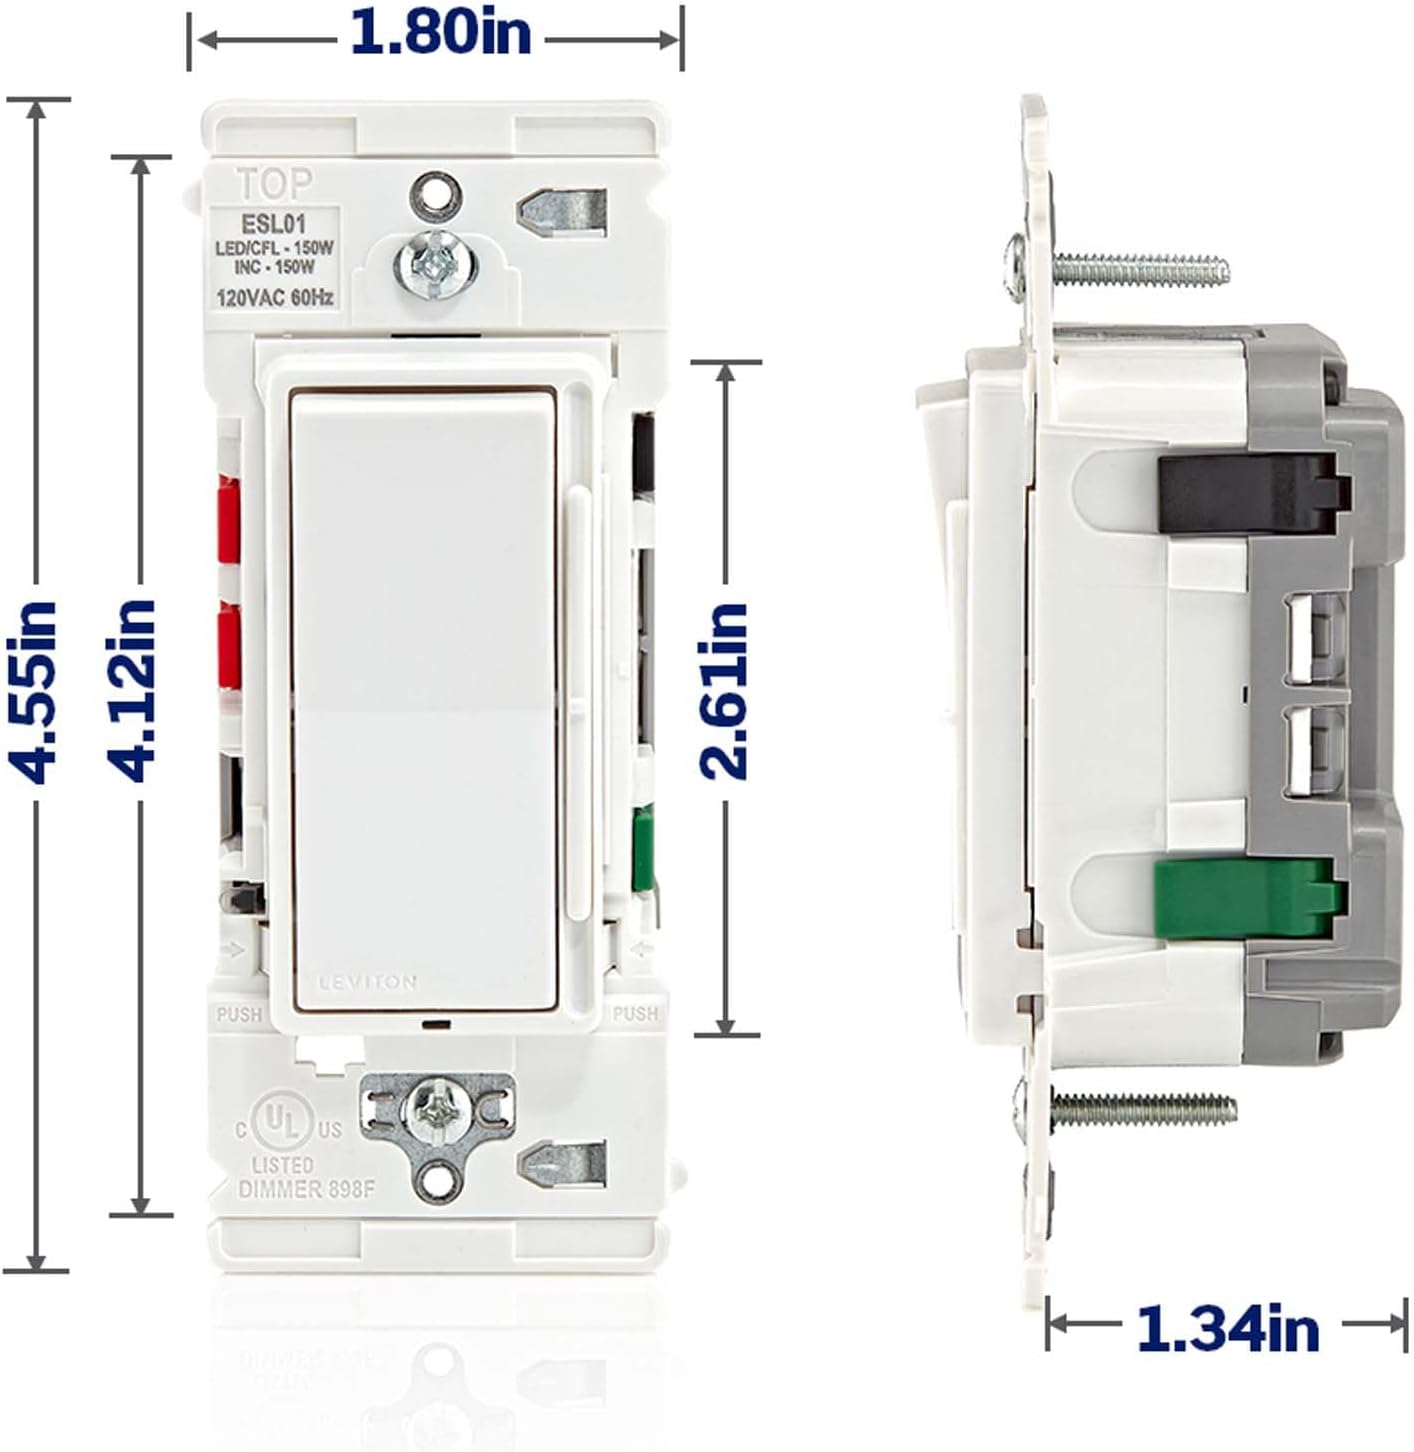
Image: This image illustrates the visual upgrade from a traditional toggle switch to the modern Leviton Lever Edge Rocker Slide Dimmer Switch.
6. Funcionament
The Leviton ESL01-1LW dimmer switch provides both ON/OFF control and smooth dimming functionality.
- Activar/desactivar: Press the top of the rocker switch to turn the lights ON to the previously set brightness level. Press the bottom of the rocker switch to turn the lights OFF.
- Dimecres: Move the vertical slide control up to increase the light brightness. Move the slide control down to decrease the light brightness. The separate ON/OFF rocker switch ensures that your preferred dimming level is maintained when the lights are turned off and on again.

Image: This image highlights the key operational features of the dimmer switch, including the ON/OFF rocker, the integrated slider for dimming, and the setup button.
7. Adjusting Dimming Performance
The dimmer includes a setup button to fine-tune its performance with various dimmable LED/CFL bulbs, helping to prevent flickering and optimize the dimming range.
- Botó de configuració: An easily accessible setup button allows for adjustments to customize performance, such as setting the minimum dim level and maximum bright levels. This ensures superior dimming performance and compatibility with a wide range of LED bulbs.
- Consult the detailed instructions provided with the dimmer for specific steps on adjusting these settings.
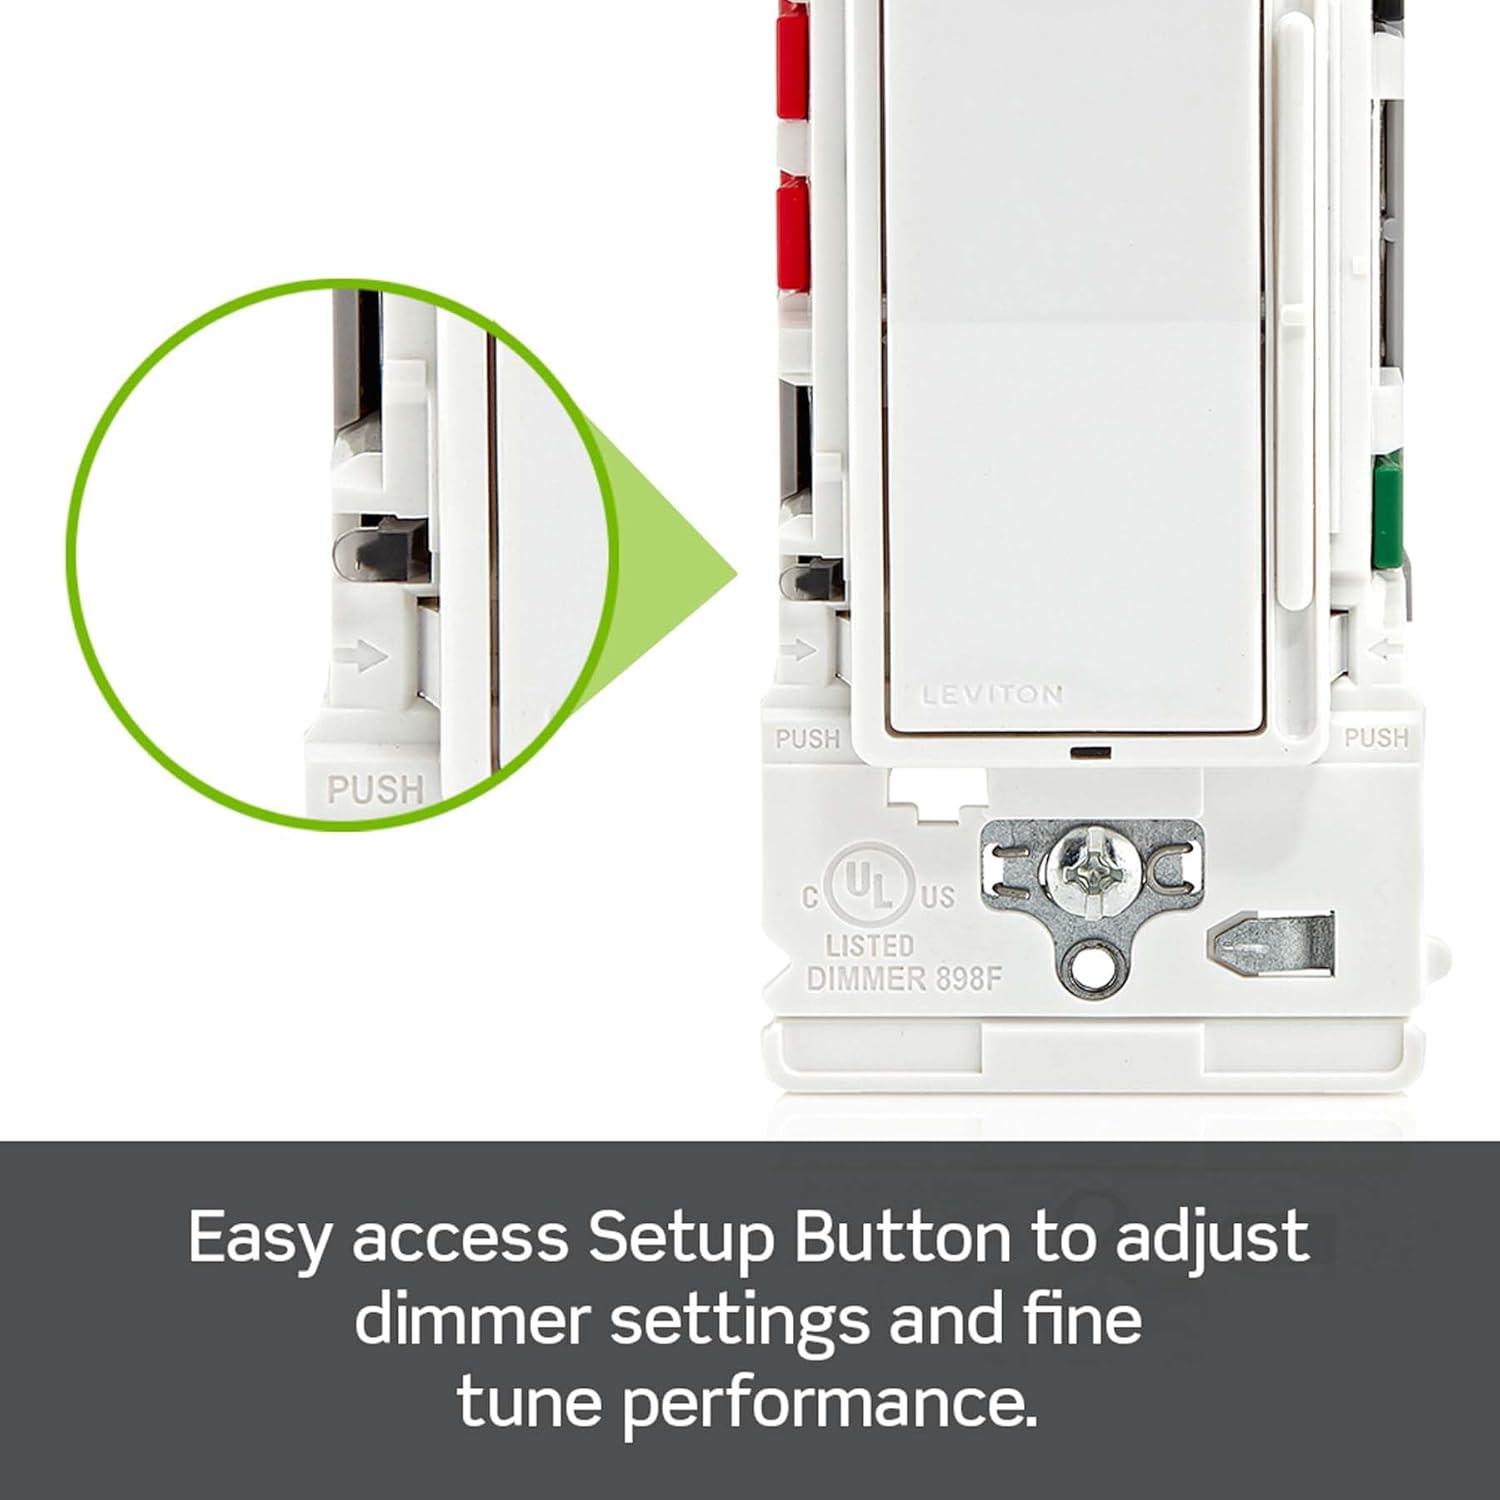
Image: This close-up image shows the location of the easy access setup button on the dimmer switch, used for adjusting dimming settings.
8. Esquemes de cablejat
8.1. Single Pole Installation
A single-pole installation controls lights from one location.
- Connecteu el Línia (calenta) cable a la NEGRE terminal.
- Connecteu el Carrega cable a la TRAV1 terminal.
- Connecteu el Terra cable a la VERD terminal.
- El TRAV2 terminal is not used in a single-pole configuration.

Image: This diagram illustrates the wiring connections for a single-pole installation, showing the dimmer controlling a light from one location.
8.2. 3-Way Installation
A 3-way installation controls lights from two separate locations. This requires the Leviton dimmer switch and a standard 3-way switch.
- At the dimmer location: Connect the Línia (calenta) cable a la NEGRE terminal. Connecteu el Carrega cable a la TRAV1 terminal. Connecteu el Terra cable a la VERD terminal.
- Connecteu els dos Viatger wires between the dimmer's TRAV1 i TRAV2 terminals and the corresponding traveler terminals on the standard 3-way switch.
- At the 3-way switch location: Connect the common terminal of the 3-way switch to either the Line or Load, depending on which box the power source enters. Connect the two traveler wires to the remaining two terminals. Connect the Ground wire.

Image: This diagram illustrates the wiring connections for a 3-way installation, showing the dimmer and a standard 3-way switch controlling a light from two locations.
9. Manteniment
The Leviton ESL01-1LW dimmer switch requires minimal maintenance.
- Neteja: To clean the dimmer switch, gently wipe it with a soft, damp drap. No utilitzeu netejadors abrasius, dissolvents ni productes químics agressius, ja que poden danyar l'acabat o els components interns.
- Inspecció: Periodically inspect the dimmer and wall plate for any signs of damage or loose connections. If any issues are found, turn off power at the circuit breaker before attempting to address them.
10. Solució De Problemes
If you encounter issues with your dimmer switch, refer to the following troubleshooting guide:
| Problema | Causa possible | Solució |
|---|---|---|
| Els llums no s'encenen | No power to the switch Cablejat incorrecte Bulbs are faulty or non-dimmable | Check circuit breaker and ensure power is restored. Verify all wiring connections are secure and correct (refer to Section 5 & 8). Replace bulbs with known working, dimmable types. |
| Lights flicker or hum | Bombetes incompatibles Dimming range not optimized Connexions soltes | Ensure bulbs are specifically designed for dimming and compatible with LED/CFL dimmers. Adjust the minimum and maximum dimming levels using the setup button (refer to Section 7). Turn off power and check all wire connections for tightness. |
| Dimmer does not respond to slide control | Mal funcionament intern Problema de potència | If troubleshooting steps do not resolve the issue, contact Leviton customer support. Verify power is supplied to the switch. |
11. Garantia i Suport
For technical assistance, warranty information, or to inquire about replacement parts, please contact Leviton customer support directly. You can also visit the official Leviton weblloc web per obtenir recursos addicionals i informació sobre el producte.
Leviton Customer Support: Refer to the contact information provided in your product packaging or on the official Leviton weblloc.
Recursos en línia: Visit the Leviton Store on Amazon


