1. Introducció
Thank you for choosing the SINGER Heavy Duty 6335M Sewing Machine. This machine is engineered for durability and performance, designed to handle a wide range of fabrics, including heavy materials like denim. With its robust construction and powerful motor, it provides reliable and efficient sewing for various projects. This manual provides essential information for the safe operation, setup, maintenance, and troubleshooting of your new sewing machine. Please read it thoroughly before use.
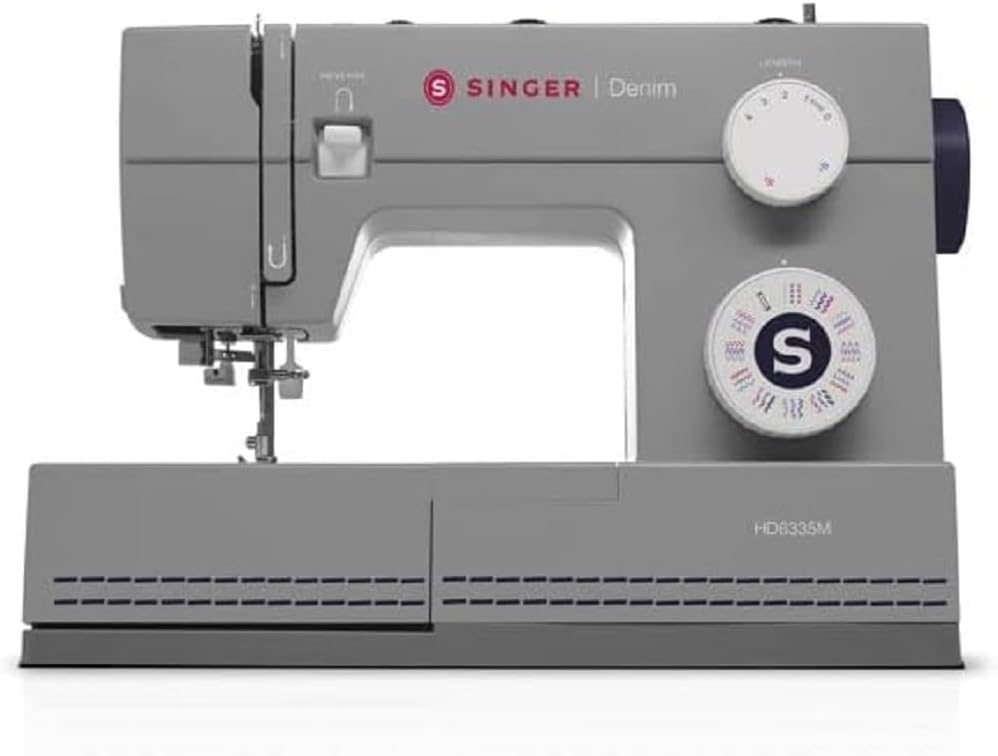
Figure 1: The SINGER Heavy Duty 6335M Sewing Machine. This image shows the overall design of the machine, highlighting its grey color and the prominent SINGER branding.
2. Instruccions de seguretat
Seguiu sempre les precaucions de seguretat bàsiques quan utilitzeu aparells elèctrics per reduir el risc d'incendi, descàrrega elèctrica o lesions a les persones.
- Llegiu totes les instruccions abans d'utilitzar la màquina.
- Mantingueu els dits allunyats de totes les parts en moviment. Es requereix una cura especial al voltant de l’agulla de la màquina de cosir.
- Desendolleu sempre la màquina de cosir de la presa de corrent quan traieu les cobertes, lubriqueu o quan feu qualsevol altre ajust de servei de l'usuari esmentat al manual d'instruccions.
- Never operate the sewing machine if it has a damaged cord or plug, if it is not working properly, if it has been dropped or damaged, or dropped into water.
- No deixeu caure ni introduïu cap objecte a cap obertura.
- No utilitzar a l'aire lliure.
- No opereu on s'utilitzen productes en aerosol (esprai) o on s'administra oxigen.
- Per desconnectar, gireu tots els controls a la posició d'apagat i, a continuació, traieu l'endoll de la presa.
- No desconnecteu estirant del cable. Per desconnectar, agafa l'endoll, no el cable.
3. Contingut del paquet
Upon unpacking your SINGER Heavy Duty 6335M, please verify that all components are present. The standard package typically includes:
- SINGER Heavy Duty 6335M Sewing Machine
- Controlador de peu
- Cable d'alimentació
- Standard Accessories (e.g., various presser feet, needles, bobbins, seam ripper, lint brush, screwdriver)
- Coberta de pols suau
- Manual d'instruccions (aquest document)
Note: Specific accessories may vary by region or package. Refer to your product packaging list for exact contents.
4. Configuració
4.1 Connexió d'alimentació
- Col·loqueu la màquina sobre una superfície plana i estable.
- Connect the foot controller plug to the machine's receptacle.
- Connecteu el cable d'alimentació a l'entrada d'alimentació de la màquina i després a una presa de corrent adequada.
- Engegueu l'interruptor d'alimentació, que normalment es troba al lateral de la màquina.
4.2 Enrotllament de la bobina
Proper bobbin winding ensures smooth stitching.
- Col·loqueu una bobina de fil al portacarret.
- Guieu el fil a través del guiafils superior i al voltant del disc tensor de la bobina.
- Col·loqueu una bobina buida a l'eix de la bobinadora.
- Enrotlleu el fil al voltant de la bobina unes quantes vegades i, a continuació, empenyeu el cargol de la bobina cap a la dreta.
- Press the foot controller gently to start winding. Stop when the bobbin is full.
- Tallar el fil i treure la bobina.
4.3 Inserting the Bobbin
The SINGER Heavy Duty 6335M features a top drop-in bobbin system for easy access.
- Obriu la placa de la coberta de la bobina.
- Insert the full bobbin into the bobbin case, ensuring the thread unwinds in the correct direction (usually counter-clockwise).
- Guide the thread through the tension spring and into the thread guide channel.
- Pull out about 6 inches of thread and close the bobbin cover.
4.4 Enfilar el fil superior
Correct upper threading is crucial for balanced stitches.
- Aixequeu el aixecador del peu premsador.
- Col·loqueu una bobina de fil al portacarret.
- Guieu el fil a través del guiafils superior.
- Bring the thread down the right channel, around the tension discs, and up the left channel.
- Hook the thread into the take-up lever from right to left.
- Bring the thread down through the guides to the needle.
- Use the built-in needle threader (if available) or manually thread the needle from front to back.

Figure 2: Threading the needle. This image illustrates the process of threading the needle, showing the thread being guided through the needle eye.
4.5 Drawing Up the Bobbin Thread
- Subjecteu el fil superior lleugerament amb la mà esquerra.
- Turn the handwheel towards you to lower the needle into the needle plate and then raise it.
- The upper thread will catch the bobbin thread, forming a loop. Pull the loop up through the needle plate opening.
- Estireu els dos fils (superior i de la bobina) per sota del peu premsatelas i cap a la part posterior de la màquina.
5. Instruccions de funcionament
5.1 Selecció de puntades
Your SINGER Heavy Duty 6335M offers 32 built-in stitches. Use the stitch selector dial to choose the desired stitch pattern. Refer to the stitch chart on the machine for visual guidance.
5.2 Stitch Length and Width Adjustment
Adjust stitch length and width using the corresponding dials to suit your fabric and project needs. Longer stitches are generally for thicker fabrics, while shorter stitches are for finer details.
5.3 Sewing Speed Control
The sewing speed is controlled by the foot controller. Press gently for slower speeds and apply more pressure for higher speeds. The machine is capable of high-speed sewing for efficient work.
5.4 Sewing Heavy Fabrics
This machine is specifically designed for heavy-duty sewing, including multiple layers and denim fabrics.
- Use appropriate heavy-duty needles (e.g., denim needles) for thick materials.
- Adjust the presser foot pressure if your machine has this feature (refer to specific machine details).
- Ensure proper thread tension for heavy fabrics to prevent skipped stitches or thread breakage.
5.5 Costura amb braç lliure
Remove the accessory storage compartment to reveal the free arm. This feature is ideal for sewing cylindrical items like cuffs, sleeves, and pant hems.
5.6 Buttonhole Sewing
The machine supports easy buttonhole creation.
- Attach the one-step buttonhole foot.
- Insert the button into the back of the buttonhole foot.
- Select the buttonhole stitch on the stitch selector dial.
- Baixeu la palanca de l’obturador.
- Begin sewing; the machine will automatically create the buttonhole to the size of your button.

Figure 3: Buttonhole foot in position. This image shows the buttonhole presser foot attached to the machine, positioned over fabric, ready for automatic buttonhole stitching.
6. Manteniment
Un manteniment regular garanteix la longevitat i el rendiment òptim de la teva màquina de cosir.
6.1 Neteja
- Desconnecteu sempre la màquina abans de netejar-la.
- Traieu la placa de l'agulla i la caixa de la bobina.
- Use the lint brush (included with accessories) to remove lint and dust from the feed dogs and bobbin area.
- Netegeu l'exterior de la màquina amb un drap suau i sec. No utilitzeu productes químics agressius ni netejadors abrasius.
6.2 Lubricació
Your SINGER Heavy Duty 6335M is designed to require minimal lubrication. Refer to the full instruction manual for specific oiling points if necessary. Over-oiling can attract lint and cause issues.
6.3 Substitució de l'agulla
Replace needles frequently (after every 8-10 hours of sewing or when bent/dull) to prevent skipped stitches and fabric damage.
- Apagueu i desconnecteu la màquina.
- Afluixeu l'agulla clamp cargol.
- Traieu l'agulla vella.
- Introduïu una agulla nova amb el costat pla mirant cap a la part posterior de la màquina, empenyent-la cap amunt fins al fons.
- Apretar l'agulla clamp cargol de manera segura.
7. Solució De Problemes
Aquesta secció tracta problemes comuns que podeu trobar.
| Problema | Causa possible | Solució |
|---|---|---|
| Machine not sewing | Machine not plugged in; power switch off; bobbin winder engaged. | Check power connection; turn power switch on; disengage bobbin winder. |
| Puntades saltades | Incorrect needle size/type; bent or dull needle; improper threading; incorrect tension. | Change needle to correct type/size; replace needle; re-thread machine correctly; adjust tension. |
| Thread breaking (upper) | Improper threading; tension too tight; poor quality thread; burr on needle plate or bobbin case. | Re-thread machine; loosen upper tension; use good quality thread; check for burrs and smooth them. |
| Thread breaking (bobbin) | Improperly wound bobbin; bobbin inserted incorrectly; lint in bobbin case. | Re-wind bobbin evenly; re-insert bobbin correctly; clean bobbin case area. |
| La tela no s'alimenta | Feed dogs lowered; lint in feed dogs; presser foot pressure too low. | Raise feed dogs; clean feed dogs; increase presser foot pressure. |
For more detailed troubleshooting, please refer to the comprehensive manual available on the SINGER weblloc o contacteu amb el servei d'atenció al client.
8. Especificacions
| Característica | Detall |
|---|---|
| Número de model | HD6335M |
| Marca | Cantant |
| Puntades | 32 punts incorporats |
| Velocitat | High Speed Capability |
| Tipus de braç | Braç lliure |
| Dimensions del producte | 22A x 45A x 34A cm |
| Dimensions del paquet | 44.8 x 34 x 21.8 cm |
| Pes del paquet | 7.9 quilos |
| Color | Gris |
9. Garantia i Suport
9.1 Garantia del producte
The SINGER Heavy Duty 6335M Sewing Machine comes with a Garantia del fabricant de 2 anysAquesta garantia cobreix els defectes de materials i de fabricació en condicions d'ús normal. Si us plau, conserveu el comprovant de compra per a reclamacions de garantia.
9.2 Atenció al client
For technical assistance, service, or to inquire about replacement parts, please contact SINGER customer support. You can find contact information and additional resources, including a digital version of this manual and FAQs, on the official SINGER weblloc: www.singer.com.
EU replacement parts availability is guaranteed for 2 years.


