1. Introducció
Thank you for choosing the Bestier Modern Crystal Raindrop Chandelier. This elegant lighting fixture is designed to enhance the ambiance of your dining room, bathroom, bedroom, or living room with its unique crystal glass design. This manual provides detailed instructions for safe installation, proper operation, and effective maintenance of your new chandelier.

Image 1.1: The Bestier Modern Crystal Raindrop Chandelier, showcasing its design and crystal elements.
2. Informació de seguretat
Please read all instructions carefully before beginning installation. Failure to follow these instructions may result in electrical shock, fire, or other hazards that could cause injury or property damage.
- ADVERTIMENT: Risk of electrical shock. Disconnect power at the circuit breaker or fuse box before installation or servicing.
- Totes les connexions elèctriques han de complir els codis locals, les ordenances o el Codi Elèctric Nacional (NEC). Consulteu un electricista qualificat si no esteu familiaritzat amb el cablejat elèctric.
- Utilitzeu ulleres i guants de seguretat durant la instal·lació.
- Ensure the mounting surface can support the weight of the fixture (approximately 16.61 pounds or 7.55 kg).
- No supereu la potència màximatage specified for the bulbs (240 watts total, 6 E12 bulbs).
- Mantingueu els materials inflamables allunyats de la làmpada.
- Aquest aparell està dissenyat només per a ús interior.
3. Contingut del paquet
Carefully unpack all components and check for any damage. Retain all packaging materials until you are certain the product is fully assembled and operational. If any parts are missing or damaged, contact customer support.
- Chandelier Frame (Metal)
- Crystal Elements (Various shapes and sizes)
- Mounting Hardware (Canopy, Chain, Screws, Wire Nuts)
- Manual d'instruccions (Aquest document)
- Nota: Les bombetes E12 no estan incloses i s'han de comprar per separat.
4. Especificacions
| Marca | Bestier |
| Model | D17xH31 |
| Dimensions de l'aparell | Diameter 17 inches x Height 31 inches |
| Dimensions de la coberta | Diameter 5 inches x Height 2 inches |
| Cadena per penjar ajustable | Max Length 40 inches |
| Base del bulb | 6 x E12 (Bulbs not included) |
| Wat màxtage | 240 Watts (40W per bulb max) |
| Voltage | 110 Volts |
| Material | Cristall, metall |
| Tipus d'acabat | Polit |
| Color d’ombra | Plata |
| Pes de l'article | 16.61 lliures (7.55 kg) |
| Tipus de muntatge | Hanging, Hung |
| Mètode de control | Push Button (via wall switch) |
| Muntatge obligatori | Sí |
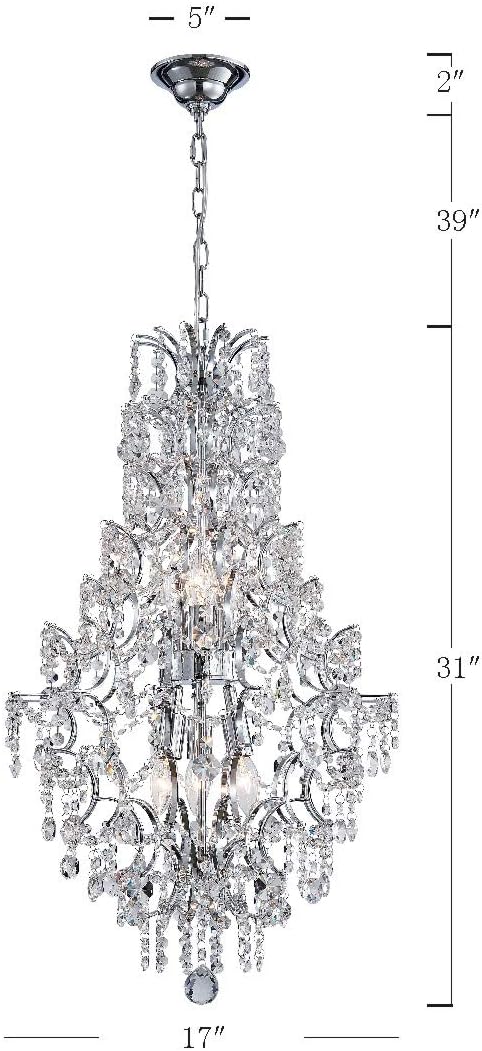
Image 4.1: Dimensional diagram of the chandelier, indicating its height, diameter, and canopy size.
5. Configuració i instal·lació
Professional installation is recommended. If you are performing the installation yourself, ensure you have the necessary tools and follow all safety precautions.
5.1 Preinstal·lació
- Apagueu l'alimentació: Locate the circuit breaker or fuse box and turn off the power to the junction box where you will install the fixture.
- Prepara la zona: Clear the work area and ensure you have a stable ladder or platform.
- Unpack components: Traieu amb cura totes les peces de l'embalatge. Col·loqueu-les sobre una superfície neta i suau per evitar ratllades.
- Identify parts: Refer to the package contents list to ensure all parts are present.
5.2 Muntatge de l'aparell
- Fixeu el suport de muntatge a la caixa de connexions amb els cargols proporcionats. Assegureu-vos que estigui ben fixat.
- Determine the desired hanging height for the chandelier. Adjust the chain length by removing links as needed.
- Thread the electrical wires through the chain and canopy.
- Secure the chain to the mounting bracket.
5.3 Connexions elèctriques
- Connect the bare copper ground wire from the fixture to the ground wire from the junction box (usually green or bare copper) using a wire nut.
- Connecteu el cable blanc del dispositiu al cable blanc (neutre) de la caixa de connexions amb una femella.
- Connecteu el cable negre del dispositiu al cable negre (calent) de la caixa de connexions amb una femella.
- Introduïu amb cura tots els cables a la caixa de connexió.
- Raise the canopy to the ceiling and secure it to the mounting bracket with the provided screws.
5.4 Attaching Crystal Elements
This step requires patience and care. It is often easier to attach the crystals after the main fixture is mounted but before bulbs are installed. Refer to the diagram provided with your specific crystal set for placement.
- Identify the different types and sizes of crystal elements.
- Attach each crystal strand or individual crystal to the designated hooks or loops on the chandelier frame.
- Handle crystals carefully to avoid fingerprints or damage. Wearing clean cotton gloves can help.
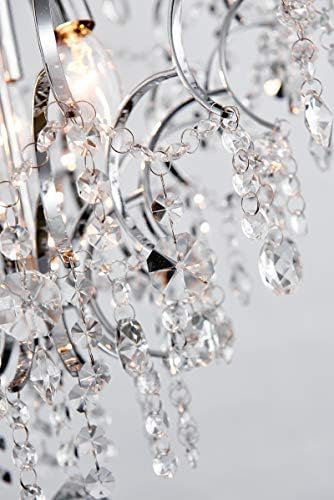
Imatge 5.1: Una imatge detallada view of the crystal elements, showing their attachment points and intricate design.
5.5 Bulb Installation
- Ensure power is still off.
- Screw six (6) E12 base bulbs into the sockets. Do not overtighten.
- Comproveu que el wat totaltage no supera els 240 watts.
- Compatible bulb types include Dimmable, Energy-saving, LED, and Halogen bulbs.
6. Instruccions de funcionament
Once installation is complete and all safety checks are performed:
- Restaura l'alimentació: Torneu a connectar l'alimentació a l'interruptor o a la caixa de fusibles.
- Activar/Desactivar: Operate the chandelier using your standard wall switch.
- Atenuació (opcional): If you have installed dimmable E12 bulbs and connected the fixture to a compatible dimmer switch, you can adjust the light intensity using the dimmer control.
7. Manteniment
Regular maintenance will help preserve the beauty and functionality of your chandelier.
- Neteja:
- Always turn off power and allow the fixture to cool before cleaning.
- Dust the metal frame with a soft, dry cloth.
- For crystals, use a soft, lint-free cloth dampened with a mild glass cleaner or distilled water. Avoid abrasive cleaners or harsh chemicals.
- Do not spray cleaner directly onto the fixture; spray onto the cloth first.
- Substitució de bombetes:
- Apagueu l'alimentació a l'interruptor.
- Deixeu que les bombetes es refredin completament abans de tocar-les.
- Unscrew the old bulb and replace it with a new E12 base bulb of the correct wattage (max 40W per bulb).
- Inspecció: Reviseu periòdicament totes les connexions i els elements de muntatge per assegurar-vos que es mantinguin segurs.
8. Solució De Problemes
Si teniu problemes amb el vostre llum de sostre, consulteu els següents problemes i solucions habituals:
| Problema | Causa possible | Solució |
|---|---|---|
| La llum no s’encén. |
|
|
| Els llums parpellegen. |
|
|
| Chandelier hangs unevenly. |
|
|
9. Garantia i Suport
For warranty information or technical support, please refer to the contact details provided at the point of purchase or visit the official Bestier weblloc web. Conserveu el rebut de compra com a comprovant de compra.
Atenció al client: Please contact your retailer or visit www.bestier.net per a l'assistència.


