Instruccions importants de seguretat
Please read these instructions carefully before operating your ONKYO A-912 Integrated Amplificador. Conserveu aquest manual com a referència futura.
- Font d'alimentació: Connecteu la unitat només a una font d'alimentació de CA del volumtage indicat al panell posterior.
- Ventilació: Assegureu-vos que hi hagi una ventilació adequada. No bloquegeu les obertures de ventilació. Deixeu prou espai al voltant de la unitat per a un flux d'aire adequat.
- Aigua i humitat: No exposeu la unitat a la pluja, la humitat, les goteges o les esquitxades. No col·loqueu objectes plens de líquids, com ara gerros, a sobre de la unitat.
- Calor: No col·loqueu la unitat a prop de fonts de calor com ara radiadors, registres de calor, estufes o altres aparells (inclosos amplificadors) que produeixen calor.
- Manteniment: No intenteu atendre aquest producte vosaltres mateixos. Consulteu tots els serveis a personal de servei qualificat.
- Neteja: Desendolleu la unitat de la presa de corrent abans de netejar-la. Feu servir un drap sec per netejar-la.
Contingut del paquet
Comproveu que el vostre paquet contingui els elements següents:
- ONKYO A-912 Integrat AmpUnitat lificadora
- Cable d'alimentació CA
- Manual d'usuari (aquest document)
Controls del panell frontal
The front panel provides access to essential controls for operating your ampmés viu.

Imatge: Frontal view of the ONKYO A-912 Integrated Amplifier. This image displays the power button, input selector, volume control, tone adjustments, and headphone jack.
- Botó d'encesa: Gira el ampmés viu encès o apagat.
- Selector d'entrada: Allows you to choose the audio source (e.g., CD, Tuner, Line, Phono).
- Control de volum: Ajusta el volum de sortida general.
- Controls de greus/aguts: Ajusta la resposta de freqüència baixa i alta.
- Control d'equilibri: Ajusta el balanç del canal esquerre/dret.
- Auriculars Jack: Per connectar auriculars.
Connexions del panell posterior
El panell posterior allotja tots els terminals d'entrada i sortida per connectar els components d'àudio.
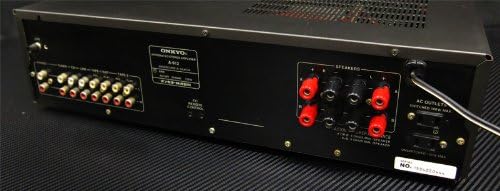
Imatge: Part posterior view of the ONKYO A-912 Integrated Amplifier. This image shows the speaker terminals, various RCA input jacks (CD, Tuner, Line, Phono), and the AC power inlet.
- Terminals d'altaveus: Connect your passive speakers here. Ensure correct polarity (+ to + and - to -).
- Input Jacks (CD, Tuner, Line, Phono): Connect your audio source components using RCA cables. The Phono input is specifically for turntables.
- Terminal terrestre: For connecting the ground wire from a turntable, if applicable.
- Entrada de CA: Connect the supplied AC power cord here.
Guia de configuració
1. Connexió d'altaveus
Connect your speakers to the speaker terminals on the rear panel. Ensure that the positive (+) terminal on the amplifier connects to the positive (+) terminal on the speaker, and the negative (-) terminal on the amplifier connects to the negative (-) terminal on the speaker. Use high-quality speaker wire for optimal sound.
2. Audio Component Connection
Connect your audio source components (e.g., CD player, tuner, turntable) to the corresponding input jacks on the rear panel using RCA audio cables. For a turntable, connect it to the 'Phono' input and ensure the ground wire (if present) is connected to the ampterminal de terra del lifter.
3. Connexió d'alimentació
Once all audio connections are made, connect the supplied AC power cord to the AC inlet on the amplifier's rear panel, then plug the other end into a wall outlet.
Instruccions de funcionament
Encès/Apagat
Premeu el botó d'engegada del panell frontal per engegar el amplifier on or off. The power indicator will illuminate when the unit is on.
Selecció d'una font d'entrada
Rotate the Input Selector knob on the front panel to choose the desired audio source (e.g., CD, Tuner, Line, Phono) that you have connected.
Ajust de volum
Turn the large Volume control knob clockwise to increase the volume and counter-clockwise to decrease it.
Ús dels controls de to
Use the Bass and Treble knobs to fine-tune the low and high frequencies of the audio output to your preference. The Balance knob adjusts the relative volume between the left and right speakers.
Ús d'auriculars
Plug your headphones into the Headphone Jack on the front panel. This will typically mute the main speaker output.
Cura i Manteniment
- Neteja: Netegeu la unitat amb un drap suau i sec. No utilitzeu productes de neteja abrasius, ceres ni dissolvents.
- Ventilació: Ensure that the ventilation openings are not blocked by dust or debris. Periodically clean them if necessary.
- Emmagatzematge: Si guardeu la unitat durant un període prolongat, desendolleu-la de la presa de corrent i tapeu-la per protegir-la de la pols.
Resolució de problemes
Si tens problemes amb el teu amplifier, refer to the following table for possible causes and solutions.
| Problema | Causa possible | Solució |
|---|---|---|
| Sense poder | Cable d'alimentació no connectat; Presa de corrent no activa | Ensure power cord is securely plugged in; Check wall outlet with another device. |
| Sense so | Incorrect input selected; Speaker wires loose; Volume too low; Headphones connected | Select correct input source; Check speaker connections; Increase volume; Disconnect headphones. |
| So distorsionat | Source component issue; Speaker impedance mismatch; Volume too high | Check source component; Ensure speakers match amplifier impedance; Reduce volume. |
| Soroll de brunzit | Ground loop; Loose connections; Nearby interference | Ensure proper grounding for turntable; Check all cable connections; Move unit away from other electronic devices. |
Especificacions
- Marca: Onkyo
- Model: A-912
- Fabricant: Onkyo
- Dimensions del paquet: 45.5 x 35 x 14.9 cm
- Pes de l'article: 7.19 kg
- Bateries necessàries: No
- ASIN: B00FRBU74G
- Primera data disponible: 10 d'octubre de 2013
Garantia i assistència al client
For warranty information or technical assistance, please refer to the warranty card included with your product or visit the official Onkyo weblloc web. Conserveu el rebut de compra com a comprovant de compra per a reclamacions de garantia.