

BOTORRO RSPRO Rowing Machine

PARTS LIST
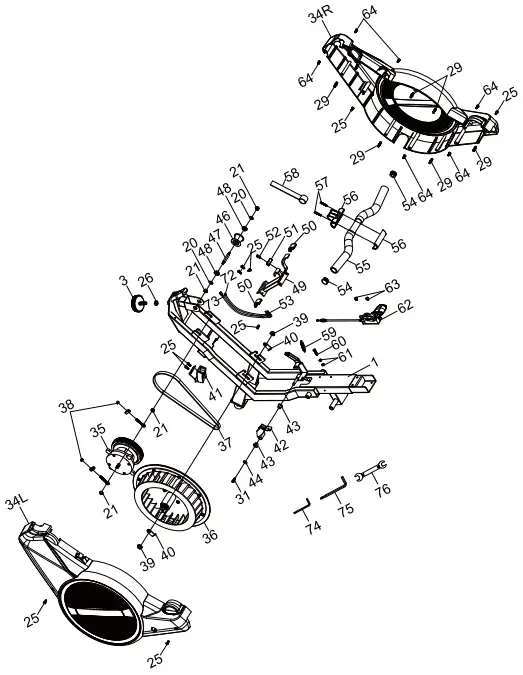

| NO. 1 | NAME
Main Frame |
SPEC. |
1 |
| 2 | Front Stabilizer | 1 | |
| 3 | Cushion Pad | 5 | |
| 4 | Decorative Cover L/R | 1/1 | |
| 5
6 7 8 9 10 |
Monitor Mounting Tube Monitor
Monitor Fixing Plate Tablet Holder Pedal L/R Slide Rail |
1
1 1 1 1/1 1 |
|
| 11 | Rear Stabilizer | 1 | |
| 12 | Tube PIUQ | 1 | |
| 13 | Fixing Plate | 1 | |
| 14
15 16 17 18 19 |
Seat
Roller Mounting Frame Decorative Cover Fixing Plate Transportation Wheel Round Head Hexagon Socket Screw |
M8″40 |
1
1 1 1 2 2 |
| 20 | Flat Washer |  8″17″1.5 8″17″1.5 |
27 |
| 21 | Nylon Nut | M8 | 10 |
| 22 | Round Head Hexagon Socket Screw | M8*16 | 17 |
| 23
24 25 26 27 |
Arc Washer
Tube Plug Flat Head Philips Self-tapping Screw Nut Round Head Hexagon Socket Screw |
8•20·1.s
ST5″16 M10 M6″15 |
2
4 15 5 1 |
| 28 | Flat Washer | 6″17″1.5 |
1 |
| 29 | Tube Plug | 7 | |
| 30 | Bushing | 2 | |
| 31 | Flat Head Screw | M5″15 | 5 |
| 32
33
36 |
Round Head Hexagon Socket Screw Round Head Hexagon Socket Screw Left Cover
Coil Spring Box Flywheel |
M8″70 M12″140 | 1
4 1/1 1 1 |
| Transmission Belt | 1 | ||
| 38 | Fastener | 2 |
| NO. | NAME | SPEC. | QTY. |
| 39 | Flange Nut | ||
| 40 | Fixing Plate | ||
| 41 | Fixing Bracket | 5 | |
| 42 | Fixing Bracket | 1/1 | |
| 43 | Bushing | ||
| 44 | Flat Washer | ||
| 45 | Data Wire | ||
| 46 | Ribbon Pulley | ||
| 47 | Pulley Shaft | 1/1 | |
| 48 | Sleeve | ||
| 49 | Handle Bracket | ||
| 50 | Fixing Plate | ||
| 51 | Decorative Cover | ||
| 52 | Flat Head Philips Screw | ||
| 53 | Sensor Bracket | ||
| 54 | Tube Plug | ||
| 55 | Handle | 1 | |
| 56 | Decorative Cover | 2 | |
| 57 | Round Head Self-tapping Screw | Ma*40 | 2 |
| 58 | Ribbon | *17*1.5 |
27 |
| 59 | Tension Spring | M8 | 10 |
| 60 | Externa l Hexagon Screw | Ma*15 | 17 |
| 61 | Nut | *20·1 .5 |
2 |
| 62 | Resistance Lever | 4 | |
| 63 | Countersunk Philips Screw | ST5•15 | 15 |
| 64 | Round Head Philips Self-tapping Screw | M10 | 5 |
| 65 | External Hexagon Partially Threaded Screw | M6*15 | |
| 66 | Liner | q,6•1r1.5 | |
| 67 | Bearing | 7 | |
| 68 | Liner | 2 | |
| 69 | Upper Seat Roller | M5*15 | 5 |
| 70 | Lower Seat Roller | M8.70 | |
| 71 | Hexagon Socket Screw | M12*140 | 4 |
| 72 | Sensor Wire A | 1/1 | |
| 73 | Sensor Wire B | ||
| 74 | Allen Wrench | ||
| 75 | Allen Wrench | ||
| 76 | Open-end Wrench | 2 |
IMPORTANT PRECAUTIONS
PLEASE KEEP THIS MANUAL FOR FUTURE REFERENCE
- It is important to read this entire manual carefully before assembling and using the rower. It can be ensured to use this equipment safely and efficiently only if assembled, maintained and used properly. It is your responsibility to ensure that all users of the equipment are informed of all warnings and precautions.
- Before starting any exercise program, please consult your doctor to determine if you have any physical or health conditions that could create a risk to your health and safety, or prevent you from using this equipment. Your doctor’s advice is essential if you are taking medicines about heart rate, blood pressure or cholesterol.
- Be aware of your body’s signals. Incorrect or excessive exercise can damage your health. Stop exercising at once if you experience any of the following symptoms: pain, tightness in your chest, irregular heartbeat, extreme shortness of breath, feeling light-headed, dizziness or nausea. If you have experienced any of these symptoms, please consult your doctor before continuing with your exercise program.
- Keep children and pets away from the equipment. The equipment is only used for adults.
- Put the rower on solid and flat ground when you use it, also, you can consider using an exercise mat under the machine to protect your floor or carpet. For safety, the equipment should have at least 0.5 meters of free space all around it.
- Ensure that all nuts and bolts are tightened securely before using this equipment. Safe usage of the equipment can only be maintained if it is examined regularly for damage or wear.
- Always use the equipment as indicated. Please stop using it immediately, if you find any defective components while assembling or checking the equipment, or hear any abnormal noise from the equipment during use it. Do not use the equipment until the problem has been rectified.
- Wear suitable sport clothes when using the equipment. Avoid wearing loose clothes which may get caught in the equipment, or it may restrict the movement to continue normally.
- This machine is only used for indoor.
- The equipment is not applicable to therapy.
- Must be careful when lifting and moving the equipment. Always use proper lifting technique, and seek assistance if necessary.
- Check the integrity of guards and safety devices regularly.
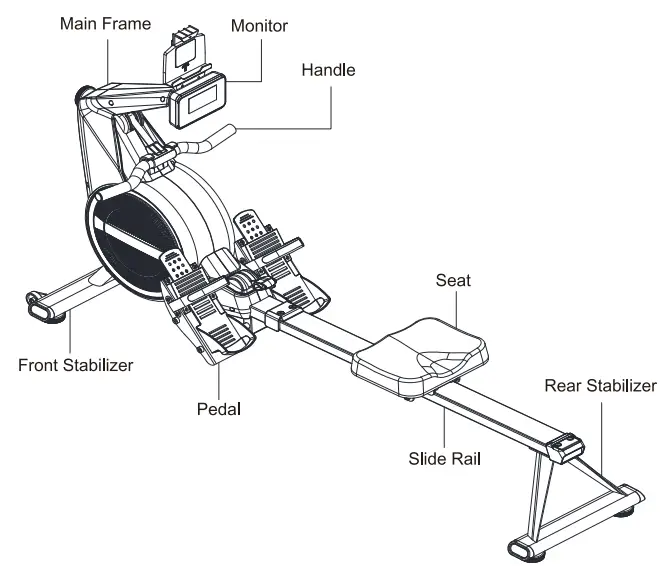
GENERAL DIAGRAM
TOOLS KIT

ASSEMBLY INSTRUCTION
STEP 1
- Assemble the Transportation Wheel (No.18) onto the Front Stabilizer (No.2) with 2 PCS Round Head Hexagon Socket Screws (No.19), Flat Washers (No.20) and Nylon Nuts (No.21 ).
- Assemble 2 PCS Cushion Pads (No.3) onto the Front Stabilizer (No.2), 1 PCS Cushion Pad onto the Main Frame (No.1 ).
- Assemble the Front Stabilizer (No.2) onto the Main Frame (No.1) with 3PCS Round Head Hexagon Socket Screws (No.22), 2PCS Arc Washers (No.23) and 1 PCS Flat Washer (No.20).

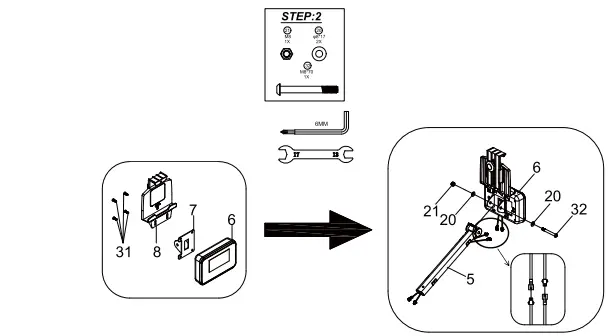
STEP 2
- Assemble the Transportation Wheel (No.18) onto the Front Stabilizer (No.2) with 2 PCS Round Head Hexagon Socket Screws (No.19), Flat Washers (No.20) and Nylon Nuts (No.21 ).
- Assemble 2 PCS Cushion Pads (No.3) onto the Front Stabilizer (No.2), 1 PCS Cushion Pad onto the Main Frame (No.1 ).
- Assemble the Front Stabilizer (No.2) onto the Main Frame (No.1) with 3PCS Round Head Hexagon Socket Screws (No.22), 2PCS Arc Washers (No.23) and 1 PCS Flat Washer (No.20).
STEP 3
- Assemble the Transportation Wheel (No.18) onto the Front Stabilizer (No.2) with 2 PCS Round Head Hexagon Socket Screws (No.19), Flat Washers (No.20) and Nylon Nuts (No.21 ).
- Assemble 2 PCS Cushion Pads (No.3) onto the Front Stabilizer (No.2), 1 PCS Cushion Pad onto the Main Frame (No.1 ).
- Assemble the Front Stabilizer (No.2) onto the Main Frame (No.1) with 3PCS Round Head Hexagon Socket Screws (No.22), 2PCS Arc Washers (No.23) and 1 PCS Flat Washer (No.20).

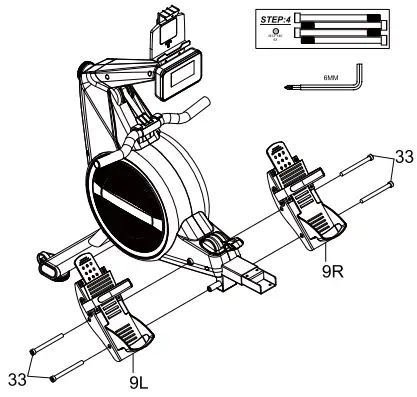
STEP4
Assemble the Pedal UR (No.9) onto the Main Frame (No.1) with 4 PCS Round Head Hexagon Socket Screws (No.33).
STEP 5
- Assemble the Rear Stabilizer (No.11) onto the Slide Rail (No.10) with 2PCS Round Head Hexagon Socket Screws (No.22) and 2PCS Flat Washers (No.20). Do not tighten them fully in this step.
- Assemble the Tube Plug (No.12) and Fixing Plate (No.13) onto the Slide Rail (No.10) with 4PCS Round Head Hexagon Socket Screws (No.22) and 4PCS Flat Washers (No.20).
- Tighten the 2PCS Round Head Hexagon Socket Screws (No.22) fully in Step 5.1.
- Assemble the Cushion Pads (No.3) onto the Rear Stabilizer (No.11 ).
- Insert the Seat (No.14) into the Slide Rail (No.10).

STEP6
Assemble the Decorative Cover (No.16) and Slide Rail (No.10) onto the Main Frame (No.1) with 6 PCS Round Head Hexagon Socket Screws (No.22) and 6PCS Flat Washers (No.20). Installation Complete

STORAGE METHOD
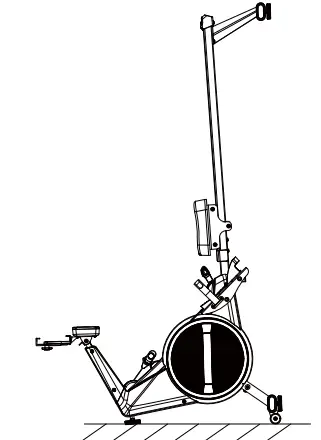
TRAINING INSTRUCTIONS
Use this Rowing Machine will help build your shape and strengthen your body, also with a healthy diet it will help you lose weight.
- WARM-UP STAGE
Warm-up can help reduce the risk of cramps or muscle damage. Stretching exercise is recommended as shown below. Each stretch should be about 30 seconds. Please proceed stretching according to your body condition.–lf you feel painful, please stop.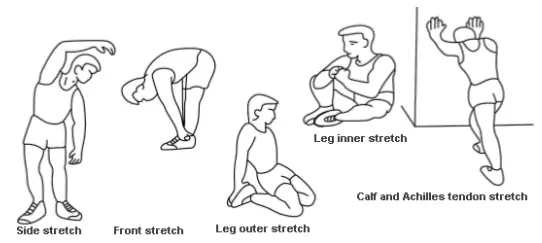
- EXERCISE STAGE
Effort is needed. Your body will be more flexible after regular exercising for a period. It’s very important to exercise with your own steady and acceptable cadence. The intensity of the exercise should allow you to reach the target heart rate range. Refer to the left image, find your age group on the x-coordinate, and then up to find your target heart rate range.
The target heart rate is suggested to last for at least 12 minutes to reach the exercise goal. It’s suggested to +/- exercise according to the condition of your body. It’s suggested to increase the intensity step by step.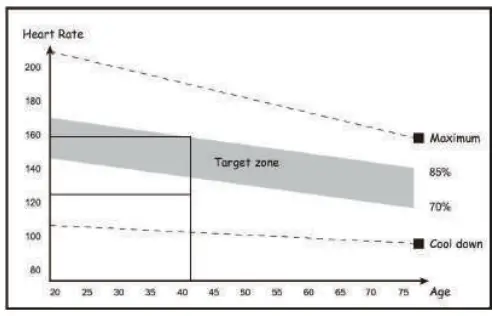
- CALM DOWN STAGE
After exercise, repeat the stretching like we do in the warm-up stage. It can help relax your body. It’s suggested to last for about 5mins. Please do the stretching according to the condition of your body. Do not force your muscle.
After the training intensity is adopted, it’s suggested to train for at least 3 times a week. - INSHAPE
A certain training intensity is required. It means pressure on your leg’s muscle. Please try your best to exercise within the intensity that your body can handle. Keep your heart rate in the target zone and do stretch after training. - LOSE WEIGHT
The important factors are your exercise frequency and intensity. Work harder, burn more calories. We want to improve our health by training. The difference is the training goal.
MONITOR INSTRUCTION
- DISPLAY OF DATA
- TIME
The workout time. It can count up or count down after you set a target.* - COUNT
The strokes you made. It can count up or count down after you set a target.* - DISTANCE
The distance rowed. It can count up or count down after you set a target.* - CAL
The calories burned. I can count up or count down after you set a target.* - SPM
Strokes per minute.
- TIME
- GENERAL BUTTON INSTRUCTIONS
MODE
1. Press to toggle between SCAN mode and individual continuous display of each data point.*
2. Press and hold to zero all data.
SET
Press to increase/decrease the exercise target values.*
RESET Press to reset the exercise target values .* * Please see “3. The display logic of the monitor and two startup ways” for more details.
- THE LOGIC OF DATA DISPLAY AND TWO STARTUP WAYS
- Logic of Data Display
The monitor will be turned on when starting exercise or pressing any buttons and will automatically enter the SCAN mode. At this time, “SCAN” will blink on the left side. It will display Time, Count, Distance, Calories and SPM sequentially every few seconds. Pressing MODE key while in SCAN mode will exit the SCAN mode, and it will display currently selected data continuously. Pressing MODE key again will let the monitor sequentially display the next data, until it returns back to the SCAN mode and enter another cycle. - Two Startup Ways
You could start rowing directly to turn on the monitor and let the data count up. Or you could press any button to start the monitor and then set target Time, Count, Distance and Calories before starting. To set target values, please press MODE key to exit SCAN mode and let it display certain data continuously. When monitor displays Time, Count, Distance or Calories continuously, pressing the UP/DOWN key could increase/decrease the target value. Pressing Reset key could zero the data you are setting. You could set target Time, Count, Distance and Calories together or individually. The target values you set will count down to zero after starting rowing.
NOTE- If the battery symbol on the display lights up or the displayed content fades, please replace the battery.
- The monitor will automatically shut off if there is no signal received after 2 minutes.
- When you stop exercising for 4 seconds, the display will stop calculating and a “STOP” will be displayed on the screen. When you continue exercising, the display will automatically start calculating and the “STOP” will disappear.
- Logic of Data Display
SPECIFICATIONS
|
FUNCTION |
SCAN | Every 6 Seconds |
| TIME | 0:00- 99:59 | |
| COUNT | 0-9999 Strokes | |
| DISTANCE | 0.00-99.99 Miles or 0-9999 Meters | |
| CALORIES | 0-9999 Cal | |
| SPM | 0-999 Strokes/Min | |
| BATTERY TYPE | 2pcs of SIZE -AA or UM-3 | |
| OPERATING TEMPERATURE | 0°C – +40°C | |
| STORAGE TEMPERATURE | -10°C – +60°C | |
APP
- Search “KINOMAP” in the mobile app store to download the app.

- Please scan the QR code for Bluetooth connection instructions.

FCC WARNING
This device complies with Part 15 of the FCC Rules. Operation is subject to the following two conditions: (1) this device may not cause harmful interference, and (2) this device must accept any interference received, including interference that may cause undesired operation. Changes or modifications not expressly approved by the party responsible for compliance could void the user’s authority to operate the equipment.
NOTE: This equipment has been tested and found to comply with the limits for a Class B digital device, pursuant to Part 15 of the FCC Rules. These limits are designed to provide reasonable protection against harmful interference in a residential installation. This equipment generates, uses and can radiate radio frequency energy and, if not installed and used in accordance with the instructions, may cause harmful interference to radio communications. However. there is no guarantee that interference will not occur in a particular installation.
If this equipment does cause harmful interference to radio or television reception which can be determined by turning the equipment off and on, the user is encouraged to try to correct the interference by one or more of the following measures:
- Reorient or relocate the receiving antenna.
- Increase the separation between the equipment and receiver
- Connect the equipment into an outlet on a circuit different from that to which the receiver is connected.
- Consult the dealer or an experienced radio/TV technician for help
RF Exposure Statement
To maintain compliance with FCC’s RF Exposure guidelines, this equipment should be installed and operated with minimum distance of 20cm the radiator your body. This device and its antenna(s) must not be co-located or operation in conjunction with any other antenna nr transmitter.
ISED CANADA STATEMENT:
This device contains licence-exempt transmitter(s)/receiver(s)/ that comply with Innovation Science and Economic Development Canada’s licence-exempt RSS(s). Operation is subject to the following two conditions:
- This device may not cause interference and
- This device must accept any interference, including interference that may cause undesired operation of the device.
Radiation Exposure: This equipment complies with Canada radiation
exposure limits set forth for an uncontrolled environment. To maintain compliance with IC’s RF Exposure guidelines,
This equipment should be. installed and operated with a minimum distance of 20cm the radiator your body. This device and its antenna(s) must not be co-located or operate in conjunction with any other antenna or transmitter.
NING BO RUI QI SHANG MAO YOU XIAN GONG SI
Tel: 1-888-828-2521
Email: support@botorrofi.com
Documents / Resources
 | RSPRO Rowing Machine |
References
- User Manualmanual.tools