BOSE BT2-C5 Audio Streaming Module
Installation Guide

PRODUCT SAFETY & DISCLAIMER
READ ALL INSTRUCTIONS CAREFULLY BEFORE INSTALLING, FAILURE TO DO SO MAY CAUSE PERSONAL INJURY OR DAMAGE TO PRODUCT AND/OR PROPERTY
- This installation guide is provided as a GENERAL installation guide, some vehicles vary and may require additional steps. We do not accept responsibility for third party labor charges or modifications. Exercise due-diligence when installing this product.
- We do not accept any responsibility for vehicle damage or personal injury resulting from the installation of this product.
- Careless installation and operation can result in equipment damage
Requirement
1997-04 Corvette AM/FM/CD and AM/FM/TAPE RADIOS WITH AUX BUTTON
Introduction
The BT2-C5 module adds music streaming capabilities to C5 Theftlock CD or Tape radios (Bose and non-Bose). User has the option to install this module behind radio cavity OR (if pre-wired), to the 10-pin CD plug in trunk/hatch. Irrespective of install location, the BT2-C5 replaces factory 12-disc changer (if present).- If vehicle has a CD changer and you wish to retain it; Purchase our BTA-C5 instead.
Alert: The BT2-C5 supports music streaming via Bluetooth, but does NOT support hand-free calls (HPF). Purchase our BT3-C5 for hands-free and music streaming. For more, see frequently asked question at the end of this guide.
Installation
1: Install at radio
![]() Selecting “install at radio” option means the module is to be connected to the 20-pin plug/connector behind the dash/radio. If vehicle has a 12-disc CD changer in trunk/hatch, it must be disconnected from the 10-pin plug in trunk or hatch.
Selecting “install at radio” option means the module is to be connected to the 20-pin plug/connector behind the dash/radio. If vehicle has a 12-disc CD changer in trunk/hatch, it must be disconnected from the 10-pin plug in trunk or hatch.
Before getting started, we highly recommend disconnecting the negative battery terminal. If vehicle has a 12-disc changer, please disconnect it from the 10-pin plug in trunk/hatch
- Remove radio from dash to gain access to the factory plug Click links below for help removing radio: https://www.youtube.com/watch?v=Gcrlufo1ctc https://www.youtube.com/watch?v=WTbWYNJTSDs
- With radio removed, release the 20-pin black/gray plug by pressing down on black release tab (See Fig. 1)

- Connect 20-pin black/gray plug (from step 2), to matting 20-pin socket (white) on installation harness (See Fig. 2).

- Connect installation harness 20-pin black/gray plug (See Fig. 3) to radio 20-pin socket vacated in step 3

Connect installation harness 16-pin plug (See Fig. 4) to module 16-pin connector (See Fig. 5)
Alert: Ensure the 16-pin plug is fully seated and locked in place

Tuck and secure any extra wires away from moving parts and skip to Pairing on page 6
2: Install in trunk/hatch
![]() Selecting this option means the module is to be connected/installed to the 10-pin “CD” plug in trunk/hatch and also requires routing the accessory wire (red) from trunk/hatch to fuse panel in passenger foot well.
Selecting this option means the module is to be connected/installed to the 10-pin “CD” plug in trunk/hatch and also requires routing the accessory wire (red) from trunk/hatch to fuse panel in passenger foot well.
We highly recommend disconnect negative battery terminal
- Locate factory 10-pin CD plug in trunk or hatch area (See Fig. 6)
Alert: if vehicle has a 12-disc CD changer (See Fig.7); it must be disconnected. To retain CD changer, purchase our BTA-C5 instead.
- Connect factory 10-pin CD plug (See Fig. 6) to installation harness mating 10pin socket (white) (See Fig. 8)

- Route installation harness RED accessory wire (See Fig. 9) to a 12V accessory (switched) supply in vehicle. Alert: The 10-pin CD plug does not have a switched 12V wire. (Do not connect red wire to battery supply)

Where to get 12V Switched power in C5 Corvette
We have 3 suggestions as to where to connect the installation harness red accessory (switched) wire:
- 1997-03 vehicles include a 3-pin plug under passenger toe board/near BCM (may be covered in black duct tape) — See Fig. 10 Yellow wire is ACC (Switched). If vehicle does not have 3-pin plug (e.g. 2004); go to suggestions #2 &. #3 below.

Alert: 2004 C5 does not have a 3-pin power plug. - Convertibles: It is also possible to get 12V “switched” power from factory antenna wiring behind passenger trunk area. Simply pull carpet away and locate 3-pin wire plug (orange, pink, black) (See Fig. 11). The pink wire is switched and will power module when radio is turned on/off. Tap/splice installation harness red wire (See Fig. 9) to pink on 3-pin plug.

- Fuse #11, 22, 23 from interior fuse box under passenger toe board

The mini-tap circuit seen in Fig. 12 is included for this purpose.

Add-a-fuse tap wiring instructions
- Strip 1/4- 3/8″ insolation from accessory wire (See Fig. 9)
- Insert stripped wire into blue butt connector (See Fig. 13)
- Hold wire in place and crimp (crimping tool, plyers etc.) After crimping, verify crimp integrity by pulling on wire.
- Go to fuse box (See Fig. 13) and remove factory fuse #11 or #22
If either fuse slot is empty (ha no fuse); skit to step 6. - Insert factory fuse to empty slot on add-a fuse tap (See Fig. 13)
- Insert add-a-fuse blades into fuse box slot #11 or #22 vacated in step 4
Alert: If vehicle fuse slot #11, #22 etc. was empty, the empty fuse slot on add-afuse circuit remains empty (See Fig. 13). - Reconnect battery negative terminal.
Pairing
Pairing process varies among devices but the basic steps are the same. This process is done upon initial install and will not have to be repeated.
- Turn ignition and radio “ON”
- From your Bluetooth enabled device, turn the Bluetooth ON and search for Bluetooth devices.
- When a list of available Bluetooth devices appears on your Bluetooth device, select “DisCarSt” (See Fig. 15)
- Confirmation “tone” is heard on car speakers.
- The unit will automatically enter the BT Audio source and you can now start streaming audio from your Bluetooth enabled device.
Note: If the mobile phone doesn’t support SSP (Simple Secure Pairing) Profile, please enter the pass code of “0000”

Notes:
- Supports multiple phone pairings but connects to one phone at a time. If for some reason phone fails to pair, ensure no other has paired and unpair it.
- If needed, Bluetooth name (ID) shown above can be changed on most Android and iPhones. To change, open Bluetooth settings, properties, rename.
Warning: Caller ID, song name etc. are not shown on radio screen.
Bluetooth operation
- Turn ignition to “ACC”, turn the radio ON
- Press “TAPE/AUX” OR “CD/AUX” button on radio (See Fig. 16) to enter Bluetooth mode. (See Fig. 17)

- Open streaming application (e.g., Spotify, Deezer, Apple music etc.)
- The application should now be heard on car speakers or adjust volume.
- To track up; press the radio SEEK > or NEXT button
- To track back; press the radio < SEEK or PREV button (See Fig. 18)

- If correct operation is confirmed, re-install radio/panels.
Feature comparison
Bluetooth Hands-free calls + audio streaming (A2DP)–See table 1. Audio streaming (no Hands-free) and AUX- See Table2
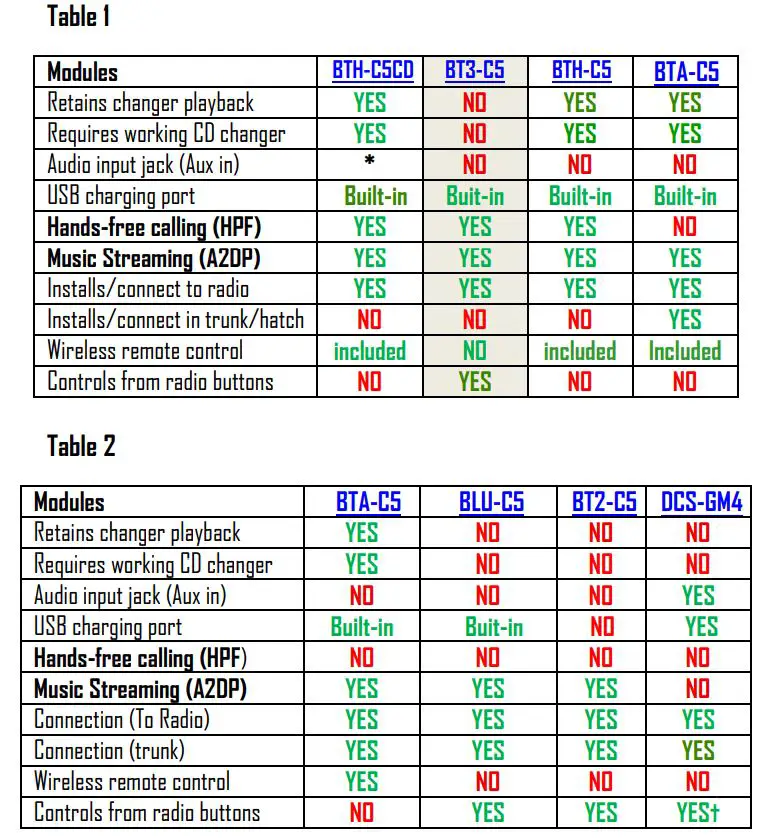
*Optional (Select from product order page)
** Google Voice recognition possible with optional remote control for devices that support TRSS (only for modules installed at radio)
Frequently asked questions & troubleshooting
- Does the BT2-C5 require a 12-disc CD changer to work? NO; If vehicle has a 12-disc changer it must be disconnected or purchase our BTA-C5 to retain it.
- I did not receive a microphone. Does the BLU-C5 not support Bluetooth hands-free calls? NO; BT2-C5 module supports Bluetooth streaming only (A2DP). For Bluetooth hands-free purchase our BTH-C5CD or BT3-C5
- Can I install the BT2-C5 without removing radio? YES; but only if vehicle has a 10-pin “CD” plug (See Fig. 6) in trunk/hatch. To install BLU-C5 without removing radio, select trunk/hatch install options from drop down. See question 6.
- Does installing the BT2-C5 disable the CD player built-into radio? NO. The BT2-C5 adds music streaming to existing system and does not interfere with operation of the CD player built-into radio. Separate 12-disc CD changer (if present) must be disconnected or purchase our BTA-C5
- Is it possible to install the BT2-C5 at the radio instead of trunk/hatch? YES; select “Installs at radio” from options in drop-down and follow installation 1 on page 2.
- I am installing the BT2-C5 in the trunk. Why do I need to route an accessory wire if the CD plug already has a power supply wire? Can I just connect red wire to the 12V wire on the 10-pn CD plug? Short answer is NO. There is no accessory (switched) wire on the 10-pin “CD” plug and because of that; all installs in trunk/hatch requires running included accessory wire (red) to fuse panel under passenger toe board or tapping antenna wire in trunk (convertibles). This module will not work as described if accessory wire (red) is connected to 12V battery supply (always on) which also risk battery drainage.
- Is it easier to remove radio to install module or run accessory wire to passenger toe board? It is probable easier (faster) to run accessory wire to toe board. Removing radio is more time consuming. Please weigh these options when deciding on install location. Please also check that your vehicle has a 10-pin CD plug prior to ordering.
- How do I remove radio from dashboard? Please click video links below for help removing radio: https://www.youtube.com/watch?v=Gcrlufo1ctc https://www.youtube.com/watch?v=WTbWYNJTSDs
- With ignition “OFF”, radio remain powered but not able to stream, why is that? This was an issue with older modules and is the case with modules installed in trunk/hatch, however this new version works with GM Retain Accessory Power (RAP) which allows radio to remain powered for up to 10 minutes after ignition switch is turned OFF or by opening driver’s door. All installs to the radio remain powered up and until the radio PWR button is switched OFF or RAP enabled. If module is connected to the 10-pin plug in a convertible vehicle, this functionality is retained by tapping into pink antenna wire in trunk as explained on page 4. Unfortunately, trunk/hatch installs is powered only when ignition is in the ON or “ACC position except for tapping into pink antenna wire (Convertibles)
- This module does not support hands-free calls, so what happens when the phone rings? When phone rings, streaming mutes; call number announced on car speakers (must be enabled on phone). Answer call using handset as customary. When call ends streaming resumes.
- I’ve connected module at the radio, but when in “Bluetooth” mode I hear both streaming and CD changer. What could be wrong? For the BT2-C5 to work as described, the 12-disc changer in trunk/hatch must be disconnected. Please go to trunk/hatch and disconnect 10-pin plug from CD changer.
- How do I know if vehicle has BOSE? Check the speaker grills for logo. See Fig.24

Disclaimer
- This product has no affiliation with GM
- When possible, professional installation is recommended
For additional questions, email support@discountcarstereo.com
© 1995-Oct-24 Discount Car Stereo, Inc. All rights reserved. Information in this document is subject to change without notice. Other products and companies referred to herein are trademarks or registered trademarks of their respective companies or mark holders.
Documents / Resources
 |
BOSE BT2-C5 Audio Streaming Module [pdf] Installation Guide BT2-C5 Audio Streaming Module, BT2-C5, Audio Streaming Module, Streaming Module, Module |