BITMAIN AntMiner S21 Imm Server

Specifications
- Product: S21 Imm. Server
- Manufacturer: BITMAIN TECHNOLOGIES INC.
- Website: www.bitmain.com
Product Overview
- The S21 Imm. server is one of BITMAIN’s latest Immersion-Cooling server products. This guide focuses on the S21 Imm. server but can be used as a reference for other server operations as well.
Server Components
- The server components include the front view and back view which are essential for understanding the layout and operation of the server.
Cooling System Requirements
Requirements of Cooling Oil
- The cooling system requires specific cooling oil for optimal performance. Ensure you use the recommended cooling oil as specified by the manufacturer.
Maintenance Requirements of Cooling System
- Regular maintenance of the cooling system is crucial to ensure efficient cooling. Follow the maintenance requirements outlined in the user manual to keep the system in good working condition.
Setting up the Server
Setting up the Server
- Follow the step-by-step instructions provided in the user guide to properly set up the server. Make sure to connect the equipment to an earthed mains socket-outlet for safety.
Configuring the Server
- After setting up the server, configure it according to your requirements. Refer to the user manual for detailed configuration instructions.
Monitoring your Server
- Regularly monitor your server to ensure it is functioning correctly. Use the monitoring tools provided to keep track of server performance.
Server Disassembly and Installation
Control Panel Disassembly and Installation
- When disassembling or installing the control panel, follow the instructions provided in the user manual carefully to avoid any damage to the server.
Power Supply Disassembly and Installation
- Properly disassemble and install the power supply unit as per the guidelines outlined in the user manual to maintain safe operation.
Hash Board Disassembly and Installation
- For hash board disassembly and installation, refer to the specific instructions provided in the user manual to prevent any damage to the components.
Environmental Requirements
Basic Environmental Requirements
- Ensure that the server room meets the climatic, site, and electromagnetic environmental conditions specified in the user manual for optimal performance.
Other Environmental Requirements
- Consider mechanical active substances and corrosive gas exposure in the environment when placing and operating the server.
Warranty
- Refer to the warranty section in the user guide for information on product warranty coverage and terms.
Overview
The S21 Imm. server is one of BITMAIN’s latest Immersion-Cooling server product. This guide set S21 Imm. as an example introduce various operations in details, and other server operation are the same.

Caution
- Please refer to the layout above to place your goods in usage in case of any damage.
- The equipment must be connected to an earthed mains socket‐outlet. The socket‐outlet shall be installed near the equipment and shall be easily accessible.
- When the equipment is power off, be sure to power off all power inputs.
- DO NOT remove any screws and cables tied on the product.
- The equipment is intended to be immersed in insulating oil cooling environment during operation.
- Do not plug or remove the device when it is powered on.
- The equipment relies on the PDU being powered down to disconnect the power
- Please operate servers with heat-resist gloves in case of high oil temperature.
- Please note that the actual server shall prevail.
Server components
The main components and controller front panel of S21 Imm. server are shown in the following figure:


Power Supply

NOTE
- Power supply APW11M is part of S21 Imm. server. For detailed parameters, please refer to the specifications below.
- One ANTWIRE-P33 power cord is needed and should be connected to PDU.
- The device is powered through a PDU with above listed power cable. Don’t plug in or detach the connector.
- A readily accessible disconnect device that can simultaneously disconnect L1, L2, and L3 must be incorporated externally to the product.
Server Specification

Table 1-1 Product Glance


Table 1-2 Detailed Characteristics of Product
Notes
- (1-1): The Hashrate value, Power on wall, and Power efficiency on wall are all typical value.
The actual Hashrate value fluctuates by ±3%, and the actual Power on wall and Power
efficiency on wall fluctuate by ±5%. - (1-2): Inlet oil temperature.
(1-3): The Hashrate value, Power on wall, and Power efficiency on wall in Normal Energy
Mode (NEM)
- (1-4): The Hashrate value, Power on wall, and Power efficiency on wall in High Energy
Mode (HEM)
- (2-1): Caution: Wrong input voltage may cause server damage.
- (2-2): The height includes a 44mm handle.
- (2-3): When the mining machine is operating, this parameter must be strictly met.
Cooling System Requirements
Requirements of cooling oil
When purchasing cooling oil, it is recommended to focus on the relevant parameters in Table 2-1. If the requirements are not met, it is recommended to consider refilling and replacing the cooling oil as appropriate.
- The primary focus during regular inspection of cooling oil should be the total acid number (TAN). It is not recommended to use the cooling oil when the TAN value is below 0.05 mgKOH/g.
- To ensure compatibility between the cooling oil and the components of the mining machine, it is recommended to use a synthetic oil with a simple composition as the coolant.

Table 2-1 Requirements of cooling oil
Maintenance Requirements of Cooling System
The miner needs to be completely submerged in the cooling oil, and the oil level must be 2-5 cm higher than the upper surface of miner as shown in the figure below. The side of the miner with the handle is the oil outlet, while the opposite side is the oil inlet. The direction of oil flow must be from the oil inlet to the oil outlet, which means it flows from the bottom to the top in the figure.
The operational sequence for setting the miner is as follows: First, completely immerse the miner in the cooling oil. Before powering on the miner, it is essential to check the oil flow and ensure that the oil inlet temperature meets the requirements specified in the table 1-2. Then, connect the power cable and network cable. If it does not meet the requirements in the table 1-2, do not power on the mining machine.
As the core unit of the container cooling system, it is recommended to regularly track and record the cooling oil, at least once a year (TAN value should be tested every six months).
When using the cooling oil, the TAN value, conductivity, and related index parameters of the cooling oil must be regularly tested and recorded. When the requirements in Table 2-1 are exceeded, or there are abnormal changes, new cooling oil that meets the requirements must be replaced in time.
Setting up the Server
NOTE
- The file IPReporter.zip is supported by Microsoft Windows only.
Setting up the Server
To set up the server:
- Go to the following site:
https://file12.bitmain.com/shop-product/firmware/IP%20Reporter.zip.
If the link is invalid, please visit the official firmware download page (https://service.bitmain.com/support/download) and select as shown in the image to download IPReporter.zip.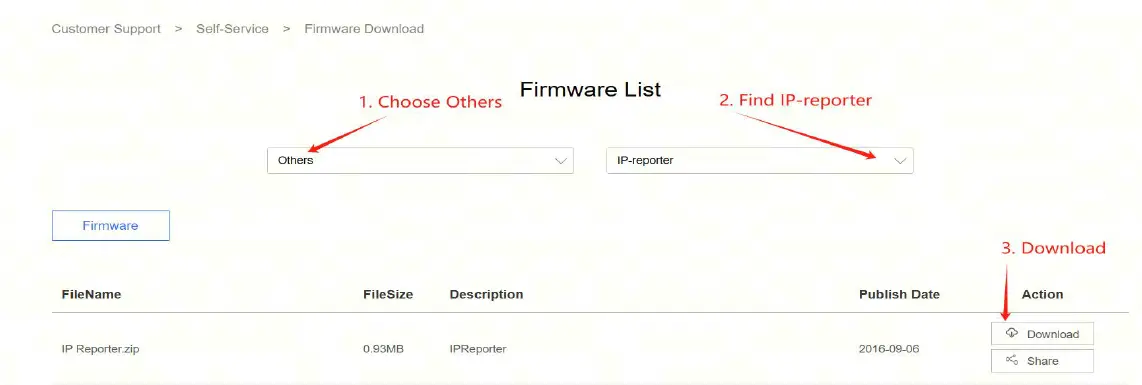
- Download the following file: IPReporter.zip.
- Extract the file.
NOTE: The default DHCP network protocol distributes IP addresses automatically - Right-click IPReporter.exe and run it as Administrator.
- Select one of the following options:
- Shelf, Step, Position – suitable for farm servers to mark the location of the servers.
- Default – suitable for home servers.
- Click Start.

- On the control panel, click the IP Report button. Hold it down until it beeps (about 5 seconds).
 The IP address will be displayed in a window on your computer screen.
- In your web browser, enter the IP address provided.
- Proceed to login using root for both the username and password.
- In the Protocol section, you can assign a Static IP address (optional).
- Enter the IP address, Subnet mask, gateway and DNS Server.
- Click “Save”.
- Click https://support.BITMAIN.com/hc/en-us/articles/360018950053 to learn more about gateway and DNS Server.

Configuring the Server
Setting up the Pool
To configure the server:
- Click Settings as below.

- Set the options according to the following table:
Note:
There are two working modes of S21 Imm. server: Normal mode and Sleep mode. The server enters the sleep mode under the condition that the control board is powered while hashboards are not powered.
- Click Save after the configuration.
Monitor your Server
To check the operating status of your server:
- Click dashboard marked below to check the server status (taking S21 Imm. 301T in HEM as an example).

- Monitor your server according to the descriptions in the following table:
Option Description Number of chips Number of chips detected in the chain. Frequency ASIC frequency setting. Real Hashrate Real-time hashrate of each hash board (GH/s). Inlet Temp Temperature of the inlet (°C). Outlet Temp Temperature of the outlet (°C). Chip state One of the following statuses will appear: ● The Green Icon – indicates normal
● The Red Icon– indicates abnormal
- Monitor your server according to the LED indicator light:
Status Fault Indicator(RED) Normal Indicator(GREEN) Normal OFF ON Over temperature ON OFF Network disconnection ON OFF
Administering your Server
Checking your Firmware Version
To check your firmware version:
- Enter the backstage of your server, find the firmware version on the bottom.
- Firmware Version displays the date of the firmware your server uses. In the examples below, the server is using firmware version 20241113150917.

Upgrading your System
Make sure that the S21 Imm. server remains powered during the upgrade process. If power fails before the upgrade is completed, you will need to return it to Bitmain for repair.
To upgrade the server’s firmware:
- In System, click Firmware Upgrade.
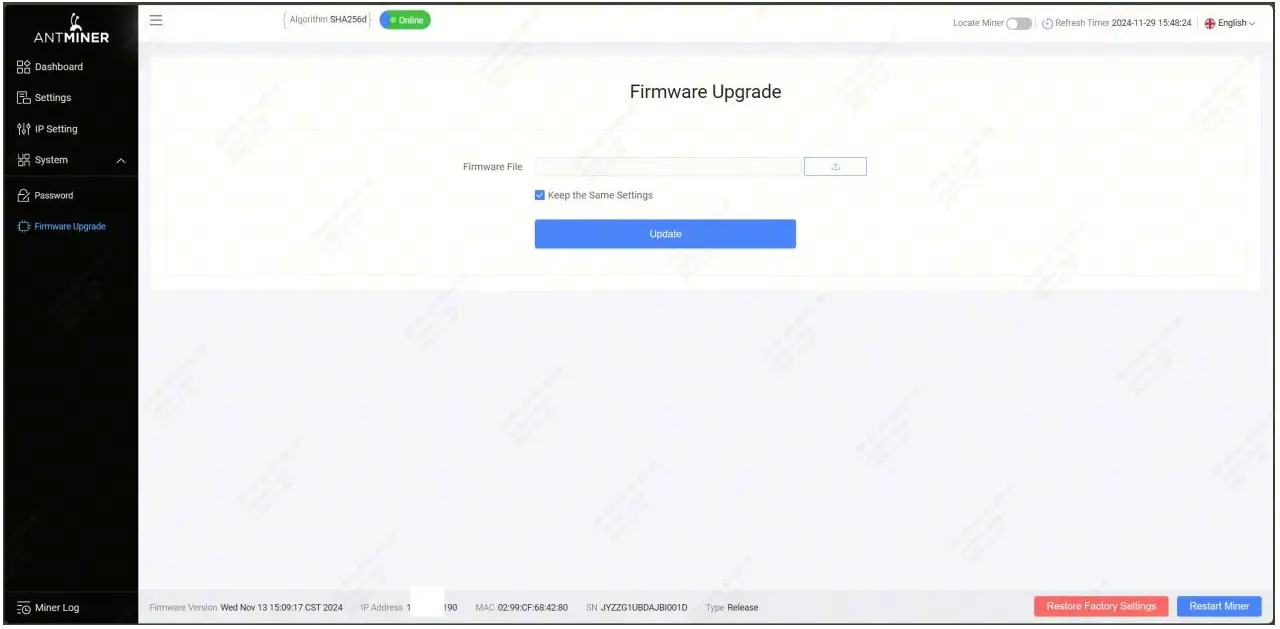
- For Keep Settings:
- Select “keep settings” to keep your current settings (default).
- Unselect “keep settings” to reset the server to default settings.
- Click the
 button and navigate to the upgrade file. Select the upgrade file, then click Update.
 - When the upgrade is completed, restart the server and it will turn to the setting page.

Modifying your Password
To change your login password:
- In System, click the Password tab.
- Set your new password, then click Save.

Restoring Initial Settings
To restore your initial settings:
- Turn on the server and let it run for 5 minutes.
- On the controller front panel, press and hold the Reset button for 10 seconds.
Resetting your server will reboot it and restore its default settings. The red LED will automatically flash once every 15 seconds if the reset is operated successfully.
Error Code
Here is the server error code and the corresponding reasons and suggestions:
| Error Code | Reason | Suggestion |
| R:1 | Average total hashrate is low | Update the firmware to the latest version, replace the power supply, or return to factory for repair |
| R1:1 | Chain1 is broken or has low hashrate | Check if chain1 connection is normal, update the firmware to the latest version, replace the hashboard, or return to factory for repair |
| R2:1 | Chain2 is
broken or has |
Check if chain2 connection is normal, update the firmware to the latest version, replace the |
| low hashrate | hashboard, or return to factory for repair | |
| R4:1 | Chain3 is broken or has low hashrate | Check if chain3 connection is normal, update the firmware to the latest version, replace the hashboard, or return to factory for repair |
| R8:1 | Chain4 is broken or has low hashrate | Check if chain4 connection is normal, update the firmware to the latest version, replace the hashboard, or return to factory for repair |
| J1:1 | Chain1 has bad ASIC | Update the firmware to the latest version, replace the power supply, or return to factory for repair |
| J2:1 | Chain2 has bad ASIC | Update the firmware to the latest version, replace the power supply, or return to factory for repair |
| J4:1 | Chain3 has bad ASIC | Update the firmware to the latest version, replace the power supply, or return to factory for repair |
| J8:1 | Chain4 has bad ASIC | Update the firmware to the latest version, replace the power supply, or return to factory for repair |
| N:1 | Average total hashrate exceeds the sale hashrate too much | Update the firmware to the latest version |
| N:2 | Frequency is reduced too much | Update the firmware to the latest version |
| V:1 | Power initialization error or power output voltage error | Check power output wiring, update the firmware to the latest version, replace the power supply, or return to factory for repair |
| V:2 | Power supply is not calibrated | Update the firmware to the latest version, replace the power supply, or return to factory for repair |
| J:8 | The number of hashboards is less than the design | Check if the hashboard connection is normal, or replace the hashboard |
| P:1 | High temperature protection | Check if the environment temperature is normal, or check if the gel on the hashboard is effective |
| P:2 | Low temperature protection | Check if the environment temperature is normal |
| J1:4 | Chain1 EEPROM data error | Redo the factory test for chain1 |
| J2:4 | Chain2 EEPROM data error | Redo the factory test for chain2 |
| J4:4 | Chain3 EEPROM data error | Redo the factory test for chain3 |
| J8:4 | Chain4 EEPROM data error | Redo the factory test for chain4 |
| J:6 | Temperature sensor error | Check if the hashboard connection is normal, update the firmware to the latest version, replace the hashboard, or return to factory for repair |
| M:1 | Memory allocation error | Update the firmware to the latest version, replace the control board, or return to factory for repair |
| J1:2 | The number of chain1 chips is less than the design | Check if chain1 connection is normal, update the firmware to the latest version, replace the hashboard, or return to factory for repair |
| J2:2 | The number of chain2 chips is less than the design | Check if chain2 connection is normal, update the firmware to the latest version, replace the hashboard, or return to factory for repair |
| J4:2 | The number of chain3 chips is less than the design | Check if chain3 connection is normal, update the firmware to the latest version, replace the hashboard, or return to factory for repair |
| J8:2 | The number of chain4 chips is less than the design | Check if chain4 connection is normal, update the firmware to the latest version, replace the hashboard, or return to factory for repair |
| L1:1 | Chain1 voltage or frequency exceeds the limit | Update the firmware to the latest version, or return to factory for repair |
| L2:1 | Chain2 voltage or frequency exceeds the limit | Update the firmware to the latest version, or return to factory for repair |
| L4:1 | Chain3 voltage or frequency exceeds the limit | Update the firmware to the latest version, or return to factory for repair |
| L8:1 | Chain4 voltage or frequency exceeds the limit | Update the firmware to the latest version, or return to factory for repair |
| L:2 | Cannot find the mixed level | Update the firmware to the latest version, or return to factory for repair |
| L1:2 | Chain1 voltage or frequency mismatch | Update the firmware to the latest version, or return to factory for repair |
| L2:2 | Chain2 voltage or frequency mismatch | Update the firmware to the latest version, or return to factory for repair |
| L4:2 | Chain3 voltage or frequency mismatch | Update the firmware to the latest version, or return to factory for repair |
| L8:2 | Chain4 voltage or frequency mismatch | Update the firmware to the latest version, or return to factory for repair |
| N:4 | Network connection is lost | Check if the network connection is normal |
Server Disassembly and Installation
Control Panel Disassembly and Installation
- Remove the 2 upper cover screws of the server, as shown in the figure:

- Remove the one upper covers and unplug a total of 5 cables on the control board, including the operation board arrangement cables, the control board power supply cables and the power supply voltage regulating cables, as shown in the figure:

- Remove 2 screws from the front cover of the control panel, remove the front cover, and push the control panel along the chute, as shown in the figure:

- The installation steps are opposite to the disassembly steps, and it can be install in the steps of the opposite above order.
Power Supply Disassembly and Installation
- Remove the upper cap according to the above method.
- Unplug the 2 cables connected to the control board and remove the 4 copper screws, as shown in the figure:

- Remove the power supply and chassis fixing screws, as shown in the figure:

- Take out APW power supply, as shown in the figure:

- The installation steps are opposite to the disassembly steps, and it can be install in the steps of the opposite above order.
Hash Board Disassembly and Installation
- Remove the upper cap according to the above method.
- Remove 4 screws as shown in the figure:

- Pull out the cable of the hash board, unscrew two screws on the copper bar, and the hash board can be pulled out, as shown in the figure:

- Remove the cables and screws, the rest of the hash board can be extracted, as shown in the figure:

- The installation steps are opposite to the disassembly steps, and you can install in the steps of the opposite above order.
Environmental Requirements
- Please ensure that your server operates in accordance with the following environmental requirements.
Basic Environmental Requirements
Climatic Conditions
| Descriptions | Requirements |
| Operating Temperature, °C | -20-45 |
| Operating Humidity, RH | 10-90%(non-condensing) |
| Storage Temperature, °C | -20-70 |
| Storage Humidity, RH | 10-90%(non-condensing) |
| Altitude, m | <2000 |
Table 5-1 Requirements of climatic conditions
Site Requirements of the Server Running Room
Please ensure that the server operating room is kept away from industrial pollution sources:
- For heavy pollution sources such as smelters and coal mines, maintain a distance of more than 5 km.
- For moderate pollution sources such as chemical industries, rubber, and electroplating industries, maintain a distance of more than 3.7 km.
- For light pollution sources such as food factories and leather processing factories, maintain a distance of more than 2 km. If unavoidable, choose a site in the perennial upwind direction of the pollution source.
Please do not set up your location within 3.7 km of the seaside or a saltwater lake. If this is unavoidable, ensure that the structure is as airtight as possible and equipped with air conditioning for cooling.
Please clean your server when the machine surface is found to be heavily dusted (it is recommended to check once a month).
Please click https://support.bitmain.com/hc/en-us/articles/115004520173-How-to-cle an-and-dust-the-ANTMINER to get more information about how to clean your server.
Electromagnetic Environmental Conditions
Please keep your site away from transformers, high-voltage cables, transmission lines, and high-current equipment. For example, there should be no high-power AC transformers (>10KA) within 20 meters, and no high-voltage power lines within 50 meters. Additionally, keep your site away from high-power radio transmitters; for example, there should be no high-power radio transmitters (>1500W) within 100 meters.
Other Environmental Requirements
- The server running room shall be free of explosive, conductive, magnetically conductive and corrosive dust. The requirements of mechanical active substances are shown below.
Mechanical Active Substances
| Mechanical Active Substance | Requirement |
| Sand, mg/m3 | ≤30 |
| Dust (suspended), mg/m3 | ≤0.2 |
| Dust (deposited) , mg/ m2h | ≤1.5 |
Table 5-2 Requirements of mechanical active substances
Corrosive Gas
| Corrosive Gas | Unit | Concentration |
| H2S | ppb | < 3 |
| SO2 | ppb | < 10 |
| Cl2 | ppb | < 1 |
| NO2 | ppb | < 50 |
| HF | ppb | < 1 |
| NH3 | ppb | < 500 |
| O3 | ppb | < 2 |
| Note: ppb (part per billion) refers to the unit of concentration, 1ppb stands for the volume ratio of part per billion. | ||
Table 5-3 Requirements of corrosive gas
Regulations
Federal Communications Commission (FCC)
FCC Notice:
This device complies with part 15 of the FCC Rules. Operation is subject to the following two conditions: (1) This device may not cause harmful interference, and (2) this device must accept any interference received, including interference that may cause undesired operation.
Note:
This equipment has been tested and found to comply with the limits for a Class A digital device, pursuant to part 15 of the FCC Rules. These limits are designed to provide reasonable protection against harmful interference when the equipment is operated in a commercial environment. This equipment generates, uses, and can radiate radio frequency energy and, if not installed and used in accordance with the instruction manual, may cause harmful interference to radio communications. Operation of this equipment in a residential area is likely to cause harmful interference in which case the user will be required to correct the interference at his own expense.
Caution:
Changes or modifications not expressly approved by the party responsible for compliance could void the user’s authority to operate the equipment.
Industry Canada
- CAN ICES-003(A) / NMB-003(A)
European Community
Warning: Operation of this equipment in a residential environment could cause radio interference.
- UAB Bitmain Development Lithuania Vilnius, Bistrycios g.40-21
EU WEEE
Disposal of Waste Equipment by Users in Private Household in the European Union:
 This symbol on the product or on its packaging indicates that this product must not be disposed of with your other household waste. Instead, it is your responsibility to dispose of your waste equipment by handling it over to a designated collection point for the recycling of waste electrical and electronic equipment. The separate collection and recycling of your waste equipment at the time of disposal will help to conserve natural resources and ensure that it is recycled in a manner that protects human health and the environment. For more information about where you can drop off your waste equipment for recycling, please contact your local city office, your household waste disposal service or the shop where your purchased the product.
Taiwan ROHS

FCC Supplier’s Declaration of Conformity
Supplier’s Declaration of Conformity
- Trade Name:

- Model Number: S21 Imm.
Responsible Part—U.S. Contact Information
- Company: Bitmain Technologies Delaware Limited
- Street Address: 100 Spectrum Center Drive, Suite 1255 City,
- State: City of Irvine, State of CA – California
- Zip Code: CA 92618
- Telephone number: +1 949-381-9884
- Internet contact information: https://www.bitmain.com/
FCC Compliance Statement
This device complies with Part 15 of the FCC Rules. Operation is subject to the following two conditions:
- This device may not cause harmful interference
- this device must accept any interference received, including interference that may cause undesired operation.
EU Declaration of Conformity
- Manufacturer’s Name: BITMAIN DEVELOPMENT PTE. LTD.
- Manufacturer’s Address: 1 Raffles Place, #36-01 One Raffles Place, Singapore 048616
For the following equipment
- Trade Mark:
- Product: Server
- Model No.: S21 Imm.
is herewith confirmed to comply with the requirements set out in Directive 2014/35/EU, Directive 2014/30/EU, and Directive 2011/65/EU. Compliance with 2014/35/EU and 2014/30/EU are evaluated by applying the following standards:
- Safety standard: EN 62368-1:2014+A11
- EMC standard: EN 55032:2015+A11:2020(Class A); EN 55032: 2015;
- EN 55035: 2017; EN 55035: 2017+A11:2020
- EN IEC 61000-3-2: 2019; EN 61000-3-3: 2013+A1:2019
This declaration of conformity is issued under the sole responsibility of the manufacture.
Warranty
- A 365-day warranty is provided starting from the shipping date. BITMAIN will cover shipping costs when shipping a replacement unit within the warranty period.
- The warranty only applies to the original purchaser who purchased the machine directly from BITMAIN. Once the miner is resold, warranty coverage becomes the responsibility of the re-seller.
- If the user fails to use the product per the given instructions, specifications, and conditions provided or changes the function settings of the unit without BITMAIN’s prior consent, BITMAIN will not be liable for any damage arising therefrom.
- Click https://service.bitmain.com/support/policy for a complete list of the Terms & Conditions that apply to all orders placed on https://shop.bitmain.com.
Note
- Only new machines are eligible for a 365-day warranty; used machines are not included.
FAQ
- Q: Can I use a different cooling oil than the one recommended?
- A: It is highly recommended to use the specified cooling oil to maintain optimal performance and prevent damage to the server components.
- Q: What should I do if I encounter issues during server setup?
- A: Refer to the troubleshooting section of the user manual for guidance on resolving common setup issues. If problems persist, contact customer support for assistance.
Documents / Resources
 |
BITMAIN AntMiner S21 Imm Server [pdf] User Guide S21, AntMiner S21 Imm Server, AntMiner S21, Imm Server, Server |