1. Giriş
This manual provides essential information for the M5Stack ATOMS3R Compact ESP32-S3 Development Kit. The ATOMS3R is a highly integrated, compact programmable controller designed for various embedded smart device applications. It features an ESP32-S3 main controller, a 0.85-inch color IPS screen, and multiple integrated sensors and expansion capabilities.
Please read this manual thoroughly before operating the device to ensure proper usage and to maximize its potential.
2. Məhsul bitdiview
The M5Stack ATOMS3R is built around the ESP32-S3-PICO-1-N8R8 main controller, offering built-in WiFi, 8MB onboard FLASH, and 8MB PSRAM. Its compact size (24x24x12.9mm) makes it ideal for space-constrained projects.
2.1 Əsas Xüsusiyyətlər
- ESP32-S3-PICO-1-N8R8 main controller with integrated WiFi.
- 8MB onboard FLASH and 8MB PSRAM for enhanced performance.
- 0.85-inch color IPS screen (128x128px) for visual feedback.
- Programmable button located beneath the screen.
- Integrated 3-axis BMM150 geomagnetic sensor and 6-axis BMI270 attitude sensor.
- Type-C interface for power supply and firmware downloads.
- HY2.0-4P expansion port (Port.A) for I2C/GPIO/ADC/UART.
- Six GPIO and power pins reserved at the bottom for easy expansion.
- Enhanced 3D antenna for improved wireless performance and stability.
- Infrared (IR) emission function.
2.2 Komponentin İdentifikasiyası
The following image illustrates the main components and interfaces of the ATOMS3R development kit.

Şəkil təsviri: This diagram shows the M5Stack ATOMS3R from an angled top-front perspective, highlighting its key features. Labels point to the 0.85-inch IPS LCD screen, the internal button, the USB-C port for power and programming, the HY2.0-4P Port.A for expansion, and the six external GPIO pins. It also indicates the internal BMI270 and BMM150 sensors, IR LED, and the ESP32-S3-PICO controller with 8MB Flash and 8MB PSRAM. Dimensions are noted as 24x24x12.9mm.
A closer look at the pinout and expansion ports:
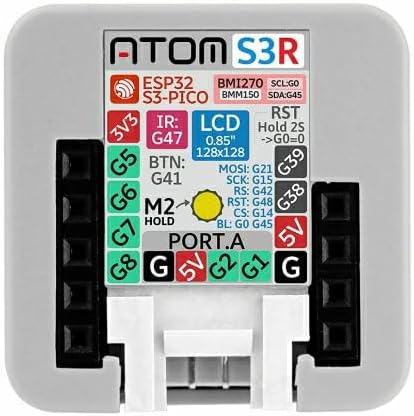
Şəkil təsviri: Bu şəkil yuxarıdan-aşağıya təqdim edir view of the M5Stack ATOMS3R, clearly showing the pinout configuration. Labels indicate the 3V3, 5V, and Ground (G) pins, as well as specific GPIO pins (G1, G2, G5, G6, G7, G8, G38, G39, G41, G42, G45, G47, G48). It also details the connections for the LCD (MOSI, SCK, RS, CS, BL), IR LED, and the button (BTN). The Port.A connector is visible at the bottom center.
3. Qutuda nə var
Paketi açarkən aşağıdakı elementi tapmalısınız:
- 1x M5Stack ATOMS3R Development Kit
The ATOMS3R is typically packaged as shown:
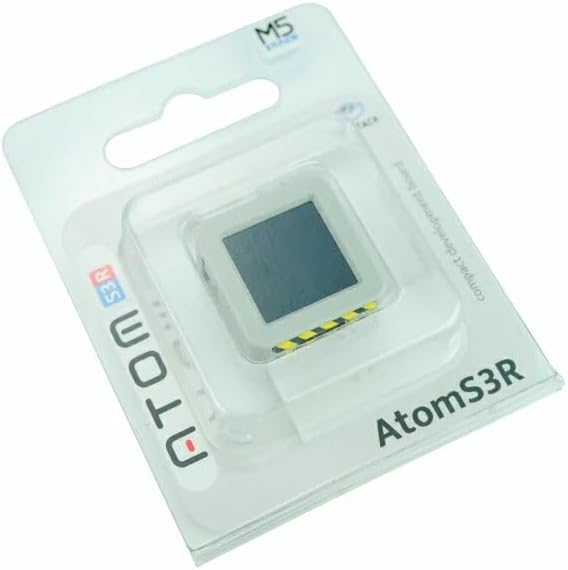
Şəkil təsviri: The M5Stack ATOMS3R is shown in its clear blister packaging, with the device visible through the plastic. The packaging features the 'ATOM S3R' branding and the M5Stack logo.
4. Quraşdırma
4.1 Cihazın enerji təchizatı
The ATOMS3R is powered via its USB Type-C port. Connect a standard USB Type-C cable to the device and to a 5V power source (e.g., a computer USB port or a USB wall adapter).

Şəkil təsviri: This image displays the bottom side of the M5Stack ATOMS3R, clearly showing the USB Type-C port for power and data, and the HY2.0-4P Port.A connector for external peripherals. A yellow and black striped warning label is visible near the USB-C port.
4.2 Proqram Təminatı Mühitinin Qurulması
The ATOMS3R supports various development environments. Choose one based on your preference and project requirements:
- Arduino IDE: For C/C++ programming. You will need to install the ESP32 board support package for Arduino. Refer to the official M5Stack documentation for detailed installation instructions.
- UIFlow: A web-based graphical programming platform, ideal for beginners. Access UIFlow through your web browser and connect your ATOMS3R.
- Micropython: For Python-based programming. You will need to flash the Micropython firmware onto the device and use a serial terminal or IDE to interact with it.
Detailed guides for setting up each environment can be found on the official M5Stack websayt: M5Stack Documentation.
4.3 Firmware Download
Firmware can be downloaded to the ATOMS3R via the USB Type-C interface. Depending on your chosen development environment, specific tools (e.g., ESP-IDF, Arduino IDE uploader, UIFlow desktop IDE) will be used for this process.
5. Əməliyyat Təlimatları
5.1 Əsas əməliyyat
- Güc Aktivdir: Connect the ATOMS3R to a 5V power source via the USB Type-C port. The device will power on automatically.
- Ekran: The 0.85-inch IPS screen will display information as programmed.
- Proqramlaşdırıla bilən düymə: A button is located beneath the screen. Its function is determined by the loaded firmware. Typically, a short press might trigger an event, while a long press (e.g., 2 seconds) might initiate a reset or enter a specific mode.
5.2 Using Expansion Ports and Pins
- Port.A (HY2.0-4P): This port provides I2C, GPIO, ADC, and UART capabilities. It is compatible with M5Stack's Grove-compatible units for easy expansion.
- Bottom GPIO Pins: Six GPIO and power pins are exposed at the bottom of the device, allowing for custom connections to breadboards or other peripherals. Refer to the pinout diagram in Section 2.2 for specific pin assignments.
5.3 Integrated Sensors
- BMM150 Geomagnetic Sensor: Provides 3-axis magnetic field data, useful for compass applications.
- BMI270 Attitude Sensor: Provides 6-axis inertial measurement unit (IMU) data (3-axis gyroscope and 3-axis accelerometer), useful for motion sensing and orientation tracking.
Accessing data from these sensors requires appropriate libraries and programming within your chosen development environment.
6. Spesifikasiyalar
| Xüsusiyyət | Detal |
|---|---|
| Əsas Nəzarətçi | ESP32-S3-PICO-1-N8R8 |
| Flash Yaddaş | 8MB onboard |
| PSRAM | 8MB onboard |
| Ekran | 0.85-inch Color IPS Screen (128x128px) |
| Simsiz Bağlantı | Wi-Fi (802.11bgn) |
| Sensorlar | BMM150 (3-axis geomagnetic), BMI270 (6-axis attitude) |
| İnterfeys | USB Type-C, HY2.0-4P (Port.A), 6x GPIO/Power Pins |
| Əməliyyat sistemi dəstəyi | Arduino, UIFlow, Micropython |
| Ölçülər (UxGxY) | 0.95 x 0.95 x 0.5 düym (24 x 24 x 12.9 mm) |
| Çəki | 0.24 unsiya (təxminən 6.8 q) |
| Rəng | Ağ |
7. Giderme
7.1 Cihaz işə düşmür
- Ensure the USB Type-C cable is securely connected to both the ATOMS3R and the power source.
- Verify that the power source (e.g., computer USB port, wall adapter) is functional and providing 5V.
- Başqa bir USB Type-C kabelini sınayın.
7.2 Firmware Upload Issues
- Confirm that the correct drivers for the ESP32-S3 are installed on your computer.
- Select the correct COM port in your development environment (Arduino IDE, etc.).
- Ensure the correct board type (e.g., ESP32-S3 Dev Module) is selected in your IDE.
- Check for any error messages in the IDE's output console.
7.3 Screen Not Displaying
- Verify that your code includes the necessary display initialization and drawing commands.
- Ensure the display library is correctly configured for the 0.85-inch IPS screen.
7.4 Wi-Fi Bağlantı Problemləri
- Double-check your Wi-Fi SSID and password in your code.
- Ensure the ATOMS3R is within range of your Wi-Fi access point.
- Confirm that your Wi-Fi network is operating on a 2.4GHz band, as ESP32-S3 typically supports this band.
8. Baxım
- Təmizləmə: Use a soft, dry cloth to clean the device. Avoid using liquids or abrasive cleaners.
- Yaddaş: Store the ATOMS3R in a cool, dry place away from direct sunlight and extreme temperatures.
- İdarəetmə: Handle the device with care to avoid physical damage to the screen, ports, or pins.
- Firmware Güncellemeleri: M5Stack rəsmisini mütəmadi olaraq yoxlayın website for the latest firmware and library updates to ensure optimal performance and access to new features.
9. Zəmanət və Dəstək
For detailed warranty information, technical support, and additional resources, please visit the official M5Stack websayt:
- Rəsmi Websayt: m5stack.com
- Sənədləşdirmə: docs.m5stack.com
- İcma Forumları: Engage with other users and find solutions on M5Stack's community platforms.
Zəmanət iddiaları üçün satınalma sübutunuzu özünüzdə saxlayın.


