AXXESS AXDIS-MB82 Mercedes Data Interface With SWC

Specifications
- Product Name: AXDIS-MB82
- Compatibility: Mercedes vehicles with MOST 25 amplifier, model years 2002-2013
- Manufacturer: AxxessInterfaces.com
Product Usage Instructions
Tools Required
Before starting the installation process, ensure you have the necessary tools such as butt connectors, bell caps, etc.
Precautions
- With the key out of the ignition, disconnect the negative battery terminal before installing the product.
- Ensure all installation connections are plugged in before reconnecting the battery or testing the product.
- Refer to the aftermarket accessory instructions before installing this device.
Connections
The BLK-AXDIS-MB82 harness connects to the vehicle connector with a 6-pin interface and to the aftermarket radio front with a 16-pin interface. Make sure to match the corresponding wires:
- Black – Ground wire
- Yellow – Battery wire
- Red – Accessory power
- Green – Reverse
- Orange – Illumination
- Blue – AMP Turn On
- Purple – E-Brake
- Pink – VSS
SWC Chart
- Refer to the SWC chart to set dipswitch settings based on your radio type for proper functionality.
Installing the AXDIS-MB82 Interface
- Follow the provided instructions for setting up dipswitches on the interface to match your radio type for compatibility.
Installing the Fiber Optic Cable
- To adapt to the Media Oriented System Transport (MOST) interface, removal of the original fiber optic connection is required. Follow the provided diagrams for guidance.
FAQ
Q: Do I need to disconnect the battery before installing the product?
A: Yes, it is recommended to disconnect the negative battery terminal before installation for safety purposes.
Q: How do I know which dipswitch settings to use for my radio type?
A: Refer to the SWC chart provided in the manual and set the dipswitches according to your radio manufacturer and model.
INTERFACE COMPONENTS
- AXDIS-MB82 interface
- AXDIS-MB82 harness
- Steering wheel control harness
INTERFACE FEATURES
- Designed for MOST*25 amplified systems
- Provides accessory power (12-volt)
- Retains audio controls on the steering wheel controls
- Easy to set Dipswitches for SWC configuration
- Provides NAV outputs (parking brake, reverse, and speed sense)
- Micro B USB updatable
- Note: Backup Camera not retained if equipped.
- Media Oriented System Transport
TOOLS REQUIRED
- Wire cutter
- Crimp tool and Connectors (example: butt-connectors, bell caps, etc.) or Solder gun, solder, heat shrink
- Zip-ties
- Tape
- ATTENTION: With the key out of the ignition, disconnect the negative battery terminal before installing this product.
- Ensure that all installation connections, especially the airbag indicator lights, are plugged in before reconnecting the battery or cycling the ignition to test this product.
- NOTE: Refer also to the instructions included with the aftermarket accessory before installing this device.
APPLICATIONS
US Applications: Mercedes
- C CLASS (W203)..…………………………………………………………….2004-2007
- CLK (W209)…………………………………………………………………….2005-2009
- E Class (W211) ………………………………………………………………..2003-2008
- GL (X164) ………………………………………………………………………..2007-2012
- ML (W164) .…………………………………………………………………….. 2006-2011
- R CLASS (W254)….…………………………………………………………… 2006-2011
- SL55-AMG (R230) .………………………………………………………….2005-2008
- SL63-AMG (R230)…………………………………………………………….2009-2012
- SLK (R171)……………………………………………………………………….. 2009-2011
World Applications: Mercedes
- A CLASS (W169)……………………………………………………………….2004-2012
- B CLASS (T245).………………………………………………………………. 2005-2011
- C CLASS (W203).……………………………………………………………..2004-2007
- CLK (W209)….……………………………………………………………….. 2004-2009
- E Class (W211)…..…………………………………………………………….2002-2009
- GL (X164)…..…………………………………………………………………… 2006-2010
- ML (W164).……………………………………………………………………… 2005-2011
- R CLASS (W254)….……………………………………………………………2006-2013
- SL55-AMG (R230)..………………………………………………………….2002-2008
- SL63-AMG (R230)…..………………………………………………………..2008-2012
- SLK (R171) ….…………………………………………………………………… 2008-2011
- Without OEM Navigation, Audio 20 Radio
CONNECTIONS: BLK-AXDIS-MB82 HARNESS

APPLICABLE RADIOS
Radios that are applicable with AXDIS-MB82
SWC CHART
| Metra MOST Interface Dipswitch Table | |||||||
| MFR | System | DIP Switch Settings | Additional Comments | ||||
| 1 | 2 | 3 | 4 | 5 | |||
| RESERVED | NA | OFF | OFF | OFF | OFF | OFF | SW UPDATE MODE |
| ALPINE | IR DATA | OFF | ON | OFF | OFF | OFF | |
| AXXERA 2 | IR DATA | ON | ON | OFF | OFF | OFF | |
| CLARION 1 | IR DATA | ON | OFF | OFF | ON | OFF | |
| CLARION 2 | IR DATA | ON | ON | OFF | ON | OFF | |
| DUAL | Analog | OFF | OFF | ON | ON | OFF | |
| GRUNDIG | IR DATA | OFF | ON | OFF | ON | OFF | |
| JENSEN | Analog | OFF | OFF | OFF | ON | ON | |
| JVC | IR DATA | OFF | OFF | ON | OFF | OFF | BROWN WIRED SWC |
| KENWOOD 1 | IR DATA | ON | OFF | OFF | OFF | OFF | BROWN WIRED SWC |
| KENWOOD 2 | IR DATA | ON | ON | OFF | OFF | OFF | BROWN WIRED SWC |
| LG 1 | Analog | OFF | OFF | ON | ON | OFF | |
| LG 2 | IR DATA | OFF | ON | ON | OFF | OFF | |
| PHILIPS 1 | IR DATA | ON | OFF | ON | ON | OFF | |
| PHILIPS 2 | IR DATA | OFF | ON | OFF | ON | OFF | |
| PIONEER 1 | Analog | OFF | OFF | OFF | ON | ON | MALE 3.5MM JACK |
| PIONEER 2 | Analog | OFF | OFF | OFF | ON | OFF | MALE 3.5MM JACK |
| SONY | Analog | OFF | OFF | ON | ON | OFF | MALE 3.5MM JACK |
| VALOR | IR DATA | ON | OFF | ON | OFF | OFF | |
| SPARE | IR DATA | OFF | ON | ON | ON | OFF | |
| SPARE | Analog | ON | ON | ON | OFF | OFF | |
| SPARE | Analog | ON | ON | ON | ON | OFF | |
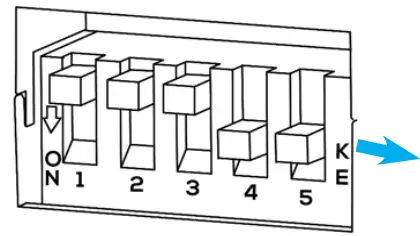
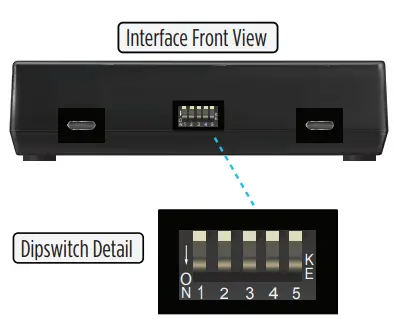
- Press the dipswitch into the down position to turn ON.
- Pioneer 1 example is shown in the diagram.
INSTALLING THE AXDIS-MB82 INTERFACE
With the key in the off position:
- Connect the male 3.5mm jack to the steering wheel control port on the radio.
- Ensure that the dipswitches are set to the desired radio type. Refer to the SWC Chart.
- Connect the AXDIS-MB82 harness to the AXDIS-MB82 interface.
- Remove the dust cover from the optic port on the AXDIS-MB82 interface.
- Connect the factory fiber optic cable to the AXDIS-MB82 interface. See right this page.
- Connect the AXDIS-MB82 harness to the wiring harness in the vehicle.
- Turn on the ignition and test all features.
- NOTE: For Dipswitch Settings for your Radio Type, refer to the SWC Chart on
INSTALLING THE FIBER OPTIC CABLE
Installing the Fiber Optic Cable:
- Removal of the original fiber optic connection is required to adapt to the Media Oriented System Transport (MOST) interface.
- Seat the AXDIS-MB82 amplifier interface in the black connector housing provided with this kit and snap the housing in place.
- (Figure A)
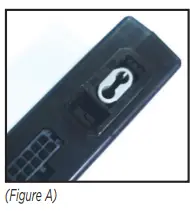
- (Figure A)
- From the original Fiber Optic Connector: Using a pick tool, carefully pull this tab towards the outside edge for the connector housing. Gently remove the fiber optic insert from the connector.
- (Figure B)
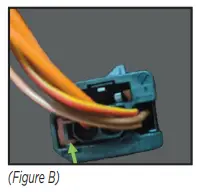
- (Figure B)
- From the MOST Interface: Push the tab toward the dust cover and, using a needle nose plier, remove the dust cover. Replace the connector with the factory fiber optic cables into the MOST interface’s black connector housing.
- (Figure C)

- (Figure C)
- Having difficulties? We’re here to help.
- Contact our Tech Support line at 386-257-1187
- Or via email at: techsupport@metra-autosound.com
- Tech Support Hours (Eastern Standard Time)
- Monday – Friday: 9:00 AM – 7:00 PM Saturday: 10:00 AM – 5:00 PM
- Sunday: 10:00 AM – 4:00 PM
- AxxessInterfaces.com
- © COPYRIGHT 2024 METRA ELECTRONICS CORPORATION

Documents / Resources
 |
AXXESS AXDIS-MB82 Mercedes Data Interface With SWC [pdf] Instructions AXDIS-MB82 Mercedes Data Interface With SWC, AXDIS-MB82, Mercedes Data Interface With SWC, Interface With SWC, With SWC, SWC |