Av Access HDIP-IPC KVM Over IP Controller
Specifications
- Model: HDIP-IPC
- Ports: 2 Ethernet ports, 2 RS232 ports
- Control Features: LAN (Web GUI & Telnet), RS232, Third-party controller integration
- Power Adapter: DC 12V 2A
Product Information
Introduction
The KVM over IP Controller (Model: HDIP-IPC) is designed to function as an A/V controller for managing and configuring encoders and decoders over an IP network. It offers integrated control features through LAN (Web GUI & Telnet) and RS232 ports. The device can also be used with a third-party controller for codec system control.
Features
- Two Ethernet ports and two RS232 ports
- Control methods include LAN (Web UI & Telnet), RS232, and third-party controller integration
- Automatic discovery of encoders and decoders
Package Contents
- Controller x 1
- DC 12V 2A Power Adapter x 1
- 3.5mm 6-Pin Phoenix Male Connector x 1
- Mounting Brackets (with M2.5*L5 Screws) x 4
- User Manual x 1
Product Usage Instructions
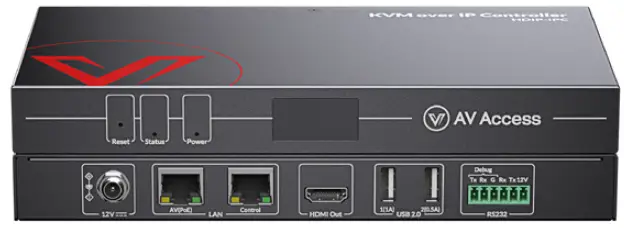
Front Panel
- Reset: To reset the device to factory defaults, press and hold the RESET button with a pointed stylus for five seconds or more. Exercise caution as this action will erase custom data.
- Status LED: Indicates the device’s operational status.
- Power LED: Indicates the power status of the device.
- LCD Screen: Displays IP addresses, PoE information, and firmware version.
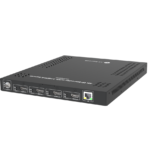
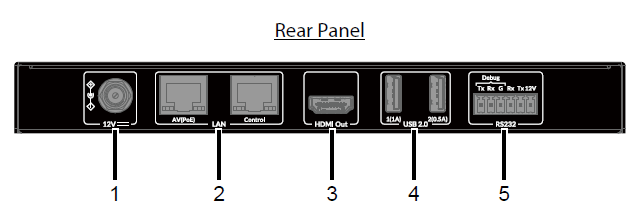
Rear Panel
- 12V: Connect the DC 12V power adapter here.
- LAN: Connects to a network switch for communication with encoders and decoders. Default protocol settings are provided.
- HDMI Out: Connect to an HDMI display for video output.
- USB 2.0: Connect USB peripherals for system control.
- RS232: Used for connecting to a third-party controller for system management.
Note: Only the LAN port supports PoE. Ensure proper power input when using a PoE switch or power adapter to avoid conflicts.
Frequently Asked Questions (FAQ)
- Q: How do I reset the device to factory defaults?
- A: Press and hold the RESET button on the front panel using a pointed stylus for at least five seconds to restore the device to its factory settings.
- Q: What are the default network settings for LAN control?
- A: The default network settings for LAN control are as follows: IP Address: 192.168.11.243 Subnet Mask: 255.255.0.0 Gateway: 192.168.11.1 DHCP: Off
KVM over IP Controller
HDIP -IPC
User Manual
Introduction
Overview
This device is used as an A/V controller for managing and configuring encoders and decoders over IP network. It includes two Ethernet ports and two RS232 ports, offering integrated control features—LAN (Web GUI & Telnet) and RS232. Additionally, it can work with a third-party controller to control the codecs in the system.
Features
- Features two Ethernet ports and two RS232 ports.
- Provides multiple methods including LAN (Web UI & Telnet), RS232 and a third-party controller to control encoders and decoders.
- Discovers encoders and decoders automatically.
Package Contents
Before you start the installation of the product, please check the package contents
- Controller x 1
- DC 12V 2A Power Adapter x 1
- 3.5mm 6-Pin Phoenix Male Connector x 1
- Mounting Brackets (with M2.5*L5 Screws) x 4
- User Manual x 1

| # | Name | Description |
| 1 | Reset | When the device is powered on, use a pointed stylus to hold down the RESET button for five or more seconds, and then release it, it will reboot and restore to its factory defaults.
Note: When the settings are restored, your custom data is lost. Therefore, exercise caution when using the Reset button. |
| # | Name | Description |
| 2 | Status LED |
|
| 3 | Power LED |
|
| 4 | LCD Screen | Displays the IP addresses of AV (PoE) and Control ports and the device’s firmware version. |
| # | Name | Description |
| 1 | 12V | Connect to the DC 12V power adapter. |
| 2 | LAN |
Note
|
| 3 | HDMI Out | Connect to an HDMI display and USB 2.0 peripherals to control the system. |
| 4 | USB 2.0 | |
| 5 | RS232 |
Default RS232 parameters: Baud Rate: 115 200 bps |
| # | Name | Description |
Data Bits: 8 bits Parity: None Stop Bits: 1
Note: Please connect correct pins for device debug and control. When this device is powered by a power adapter, if you connect a control terminal to the control port after first connection with the debug port, you need to reboot this device followed by device control operation. |
Installation
Note: Before installation, make sure all devices are disconnected from the power source.
Steps to install the device on a suitable location
- Attach the mounting brackets to the panels of both sides using the screws (two on each side) provided in the package.

- Install the brackets on the position as desired using screws (not included).
Specifications
| Technical | |
| Input/Output Port | 1 x LAN (AV PoE) (10/100/1000 Mbps)
1 x LAN (Control) (10/100/1000 Mbps) 2 x RS232 |
| LED Indicators | 1 x Status LED, 1 x Power LED |
| Button | 1 x Reset Button |
| Control Method | LAN (Web UI & Telnet), RS232, Third-party controller |
| General | |
| Operating Temperature | 0 to 45°C (32 to 113°F), 10% to 90%, non-condensing |
| Storage Temperature | -20 to 70°C (-4 to 158°F), 10% to 90%, non-condensing |
| ESD Protection | Human Body Model
±8kV (air-gap discharge)/±4kV (contact discharge) |
| Power Supply | DC 12V 2A; PoE |
| Power Consumption | 15.4W (Max) |
| Unit Dimensions (W x H x D) | 215 mm x 25 mm x 120 mm / 8.46” x 0.98” x 4.72” |
| Unit Net Weight
(without accessories) |
0.69kg/1.52lbs |
Warranty
Products are backed by a limited 1-year parts and labor warranty. For the following cases AV Access shall charge for the service(s) claimed for the product if the product is still remediable and the warranty card becomes unenforceable or inapplicable.
- The original serial number (specified by AV Access) labeled on the product has been removed, erased, replaced, defaced or is illegible.
- The warranty has expired.
- The defects are caused by the fact that the product is repaired, dismantled or altered by anyone that is not from an AV Access authorized service partner. The defects are caused by the fact that the product is used or handled improperly, roughly or not as instructed in the applicable User Guide.
- The defects are caused by any force majeure including but not limited to accidents, fire, earthquake, lightning, tsunami and war.
- The service, configuration and gifts promised by salesman only but not covered by normal contract.
- AV Access preserves the right for interpretation of these cases above and to make changes to them at any time without notice.
Thank you for choosing products from AV Access.
If you have any question, please contact us via the following emails: General Enquiry: info@avaccess.com
Customer/Technical Support: support@avaccess.com
Documents / Resources
 |
Av Access HDIP-IPC KVM Over IP Controller [pdf] User Manual HDIP-IPC, HDIP-IPC KVM Over IP Controller, HDIP-IPC IP Controller, KVM Over IP Controller, Over IP Controller, IP Controller |