![]()
 Incorporated in Queensland
A.C.N. 010 809 168
A.B.N. 81 010 809 168
SD004 Service and Boot Door
Installation Instruction
The door should be fitted from the inside. The thickness of the sidewall should be 30—45mm, if it is less than 30mm you need additional plastic material to pack the sidewall for mounting the braces correctly.
Contents:
- Door 1 piece
- Brackets and screws
- Cylinder with 1 key
- Rubber seal
- Clip
Open the cutout of the door
Check if the side wall is absolutely straight.
Cut out the space for the doora measures (H+3)x(W+3) mm with radius of 68 mm on both upper and bottom corners.
Example:SD004-500×800, the measures of the cutout is H+3=503, W+3=803, R68。(Figure 1a)
Recommendation: If the sidewall is prepared with PU – foam material, the space needs to be packed out.
To avoid bulges at the side wall, the packing pieces should match the internal dimensions of the wall (Figure 1b).

Installation of the door
Start by adding sealant to the frame and the butt edge of the aluminum frame (Figure 2).
Immediately set the frame into the sidewall and press it several times in different positions. Whilst the door is being held firmly in position, a second person needs to securely fasten the door into position (Figure 3).

Clean any excess sealant away.
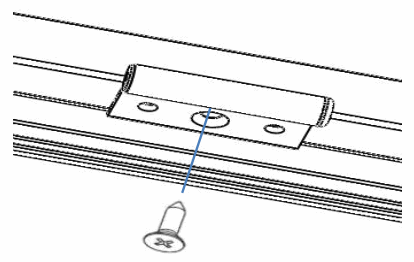
Drill the frame to match the location of the holes in the hinges, then fix the frame and hinges to the side wall (Figure 4). All holes should be sealed with the sealant before fixing.
 Figure 4
Note:
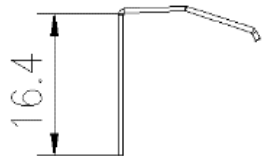
- There are three sizes of brackets to suit different walls.
- If the sidewall is too thick, the frame can be installed like (Figure 5) or glued to the wall
 Figure 5
| The thickness of the sidewall | Bracket types | |
| 30-36mm |  |
Bracket 1 |
| 37-41mm |  |
Bracket 2 |
| 42-45mm |  |
Bracket 3 |
Installation of the seal
To mount the seal start in the middle of the bottom line of the door.
NOTE: Don’t over bend the seal, otherwise the metal stabilization inside could be destroyed.
If there are gas struts, at the gas strut brackets cut out the sealing compound (Figure 6).
Both ends of the seal should be exactly cut and then glued. Carefully fix the seal with a rubber mallet.

Installation of the clips (Figure 7)
- Remove the release paper from the double-sided adhesive on the clip.
- Install the clip from the direction of the arrow.

Note: If the lock is below the door, then both ends of the seal below the lock will have a cleaner appearance.
Installation of the gas strut (Figure 8)
- Open the hatch at the proper angle, install the gas spring, and then tighten the nut. Do the same on the opposite side.
- Pay attention to the direction of the gas strut and the gas strut column, and keep the gas strut vertical

Finishing
- Remove excess sealant from around the door
- Remove the foil on the door and clean all sides of the door system.
BRISBANE
11-15 Oasis Court, Clontarf, QLD 4019
Phone : 07 3284 3284 Fax : 07 3284 5969
E-mail: enquiries@aussietraveller.com.au
www.aussietraveller.com.au
MELBOURNE
235A Barry Road, Campbellfield VIC 3061
Ph: 03 9357 6565 Fx: 03 9357 6515
E-mail: info@aussietraveller.com.au
I00108A3/3
Documents / Resources
 |
AUSSIE TRAVELLER SD004 Service and Boot Door [pdf] Instruction Manual SD004, Service and Boot Door, Service Door, SD004, Boot Door |


