ATTOP W10 Folding Remote Control Drone User Manual
FOR AGES
14+
FOLDING DRONE USER MANUAL
REMOTE CONTROL FUNCTION DESCRIPTION
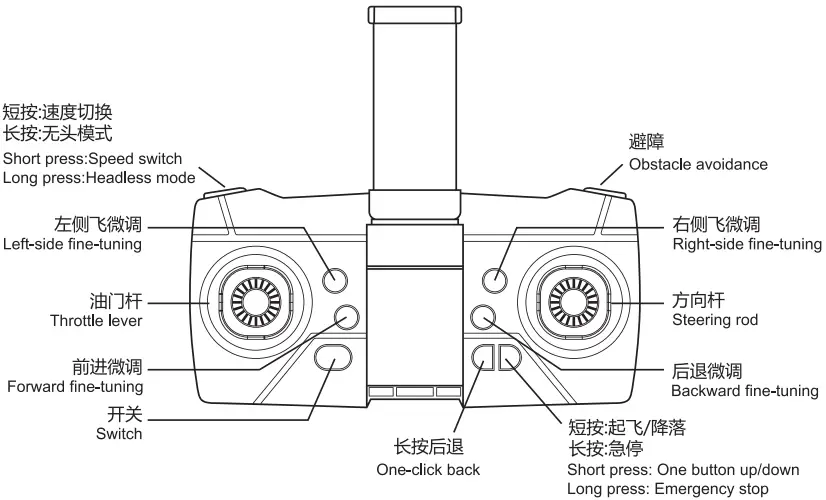
Note: Automatic frequency correction, outside eight correction, inside eight unlock.
REMOTE CONTROL

- Mobile phone rack
Pull out the mobile phone handle and clamp the mobile phone.

- 2.4G frequency alignment
Turn on the power switch of the aircraft and place it on the flat ground with the indicator flashing. Then turn on the power switch of the remote control, push the power operating lever to the highest position for 1 second, and pull it to the lowest position with a sound of Di and a long-term on of the aircraft indicator, it means that the frequency matching is completed, and the flight can be started.

- One-button take-off and one-button landing It is suggested that the height of this product is determined by barometer. Due to the influence of various environmental temperatures and other different factors, it is normal for the aircraft to change evenly at the beginning of flight or at low voltage.

- Flight control
- Throttle (left rocker)

- Rotation (left rocker)

- Forward and backward (right rocker)

- Left and right side flight (right rocker)

- Throttle (left rocker)
Remote Control and Aircraft Battery Installation and Charging Instructions
- Remote control battery installation

Put the battery correctly according to the electrode instructions (+,-) of the battery box as shown - Aircraft battery charging
- Remove the battery from the aircraft;
- Connect the battery to the specific charging cable, and then insert the cable into the charging equipment such as the USB port of the computer.
- When the remote control is charged, the indicator lights up while be off when charging completion.

- Installation and startup of aircraft battery
Put the fully charged battery into the battery slot of the aircraft and hold down the power switch until the aircraft lights up.

Aircraft installation
- Folding function

- Installation of aircraft blades
Please install the propeller in the correct direction, and lock the screw after installing the support arm of the aircraft corresponding to the mark (A/B) on the propeller.

Direction Definition and Mode Selection of Headless Mode

When switching to headless mode, the aircraft will give up its front, back, left and right directions, and take the nose direction (one side with camera) of the aircraft at 2.4 G frequency alignment as the forward direction.
- Direction definition before take-off: Put the forward direction of the aircraft directly in front of you (there is a camera side, and then turn on the remote control for 2.4 G frequency alignment to complete the headless mode direction definition of this flight.
- Press headless mode when flying, and the remote controller keeps making noise; The aircraft lights quickly flash and enter the headless mode; Press the headless mode key again, and the remote controller will make a di” and “di” sound, that is, exit the headless mode.
![]() Note: Before entering into the headless mode, the forward direction must be determined, that is, the direction of the aircraft on the ground after startup.
Note: Before entering into the headless mode, the forward direction must be determined, that is, the direction of the aircraft on the ground after startup.
Fine-tuning Operations

If the aircraft has been drifting in a certain direction or rotates left / right in place, the aircraft can be slightly adjusted through the following operations to make the aircraft reach a stable flight state.
- Drift all the way forward or backward

- Adjust the direction

- Drift all the way to the left or right side

- Adjust the direction

Speed Switch

The speed switch is divided three speeds for the flight of forward, backward and left & right side. It defaults to gear 1 after power on. And when press the remote control with two sounds of Di for the gear 2, three sounds of Di for the gear 3 and one sound of Di for returning to gear 1.
360° rolling

Implementation steps:
- Press the 360° rolling button, and the remote controller will continue to send out “di””d””di”;
- Push the right rocker. At this time, the aircraft will carry out 360° rolling according to the pushing direction of the right rocker.
![]() When the aircraft enters the low voltage state, the carry out 360° rolling function will be automatically prohibited
When the aircraft enters the low voltage state, the carry out 360° rolling function will be automatically prohibited
Problem solving guidelines
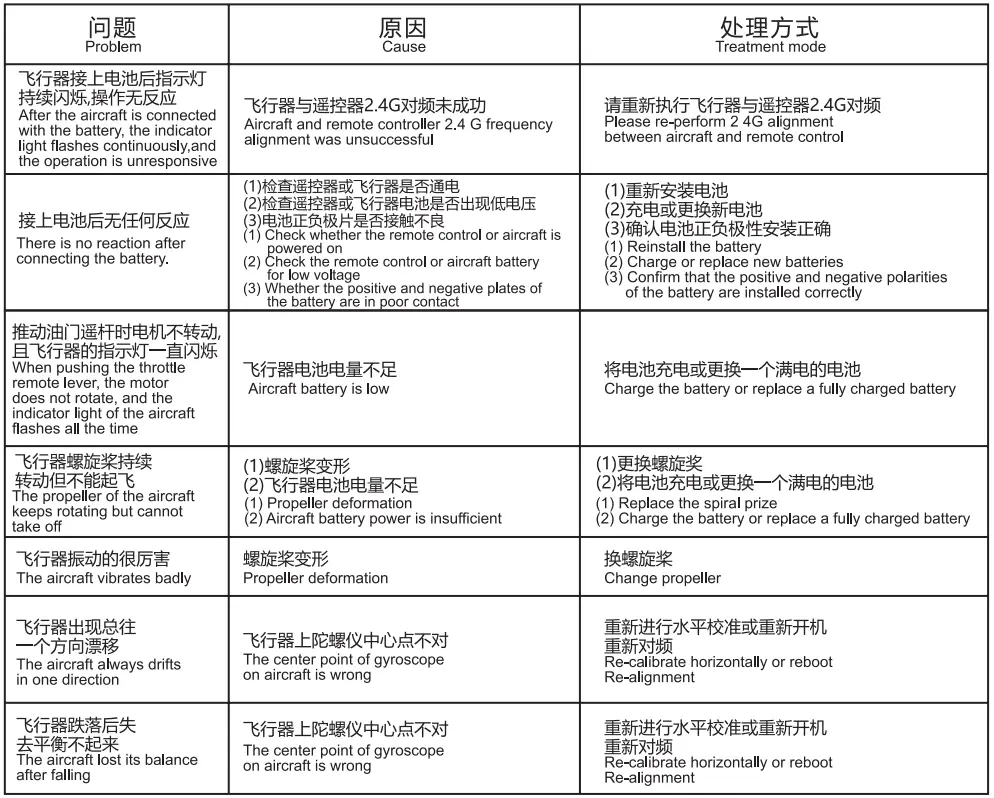
Note: the batteries of newly purchased products are low voltage, please fill the battery before use!
FCC Warning:
This equipment has been tested and found to comply with the limits for a Class B digital device, pursuant to part 15 of the FCC Rules. These limits are designed to provide reasonable protection against harmful interference in a residential installation. This equipment generates, uses and can radiate radio frequency energy and, if not installed and used in accordance with the instructions, may cause harmful interference to radio communications. However, there is no guarantee that interference will not occur in a particular installation. If this equipment does cause harmful interference to radio or television reception, which can be determined by turning the equipment off and on, the user is encouraged to try to correct the interference by one or more of the following measures:
- Reorient or relocate the receiving antenna.
- Increase the separation between the equipment and receiver.
- Connect the equipment into an outlet on a circuit different from that to which the receiver is connected.
- Consult the dealer or an experienced radio/TV technician for help.
Caution: Any changes or modifications to this device not explicitly approved by manufacturer could void your authority to operate this equipment.
This device complies with part 15 of the FCC Rules. Operation is subject to the following two conditions:
(1)This device may not cause harmful interference, and (2) this device must accept any interference received, including interference that may cause undesired operation.
This equipment complies with FCC radiation exposure limits set forth for an uncontrolled environment. This equipment should be installed and operated with minimum distance 20cm between the radiator and your body.
Documents / Resources
 |
ATTOP W10 Folding Remote Control Drone [pdf] User Manual W10 Folding Remote Control Drone, W10, Folding Remote Control Drone, Remote Control Drone, Drone |