
Introduction
This manual provides essential information for the safe and efficient operation, installation, and maintenance of your Wonder WL6205AI 6 kg Front-Load Washing Machine. Please read these instructions carefully before using the appliance and keep them for future reference. Proper use and care will ensure optimal performance and extend the lifespan of your washing machine.
The Wonder WL6205AI features a 6 kg capacity, 1200 rpm spin speed, an Inverter motor for quiet and energy-efficient operation, 12 wash programs, an Eco-logic system, and a durable stainless steel drum. Its compact design makes it suitable for various living spaces.
Product Overview

Figure 1: Wonder WL6205AI 6 kg Front-Load Washing Machine. This image displays the full front view of the washing machine, highlighting its white finish and transparent door.

Figure 2: Control Panel of the Wonder WL6205AI. This close-up shows the program selection dial, LED display, and various function buttons for operating the washing machine.
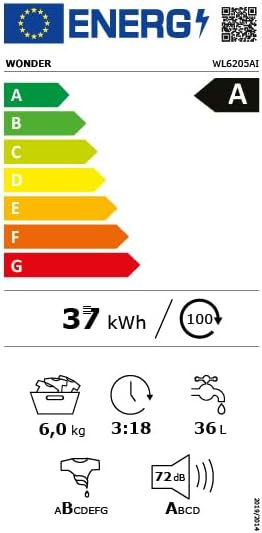
Figure 3: Energy Efficiency Label for Wonder WL6205AI. This label indicates the appliance's energy consumption, water usage, capacity, spin speed, and noise level, confirming its A-10 energy class rating.
Setup and Installation
1. Unpacking
- Carefully remove all packaging materials.
- Inspect the washing machine for any damage. If damaged, do not install or operate it, and contact customer support.
- Remove all transport bolts from the rear of the appliance. Keep these bolts for future transport.
- Ensure the power cord is included and undamaged.
2. Placement
- Place the washing machine on a firm, level surface.
- Adjust the leveling feet to ensure the appliance is stable and does not wobble.
- Allow sufficient space around the machine for ventilation and maintenance. Dimensions: 84 cm (Height) x 59 cm (Width) x 40 cm (Depth).
3. Water and Drain Connections
- Connect the water inlet hose to a cold water tap. Ensure connections are tight to prevent leaks.
- Position the drain hose into a standpipe or over the edge of a sink, ensuring it is securely fixed to prevent displacement during operation.
4. Electrical Connection
- Plug the power cord into a grounded electrical outlet.
- Do not use extension cords or adapters.
5. Initial Use
- Before the first wash with laundry, run an empty cycle (e.g., a short cotton program at 60°C) with a small amount of detergent to clean the drum and remove any manufacturing residues.
Operating Instructions
1. Control Panel Overview
Refer to Figure 2 for a visual guide to the control panel. The panel includes a program selection dial, an LED display, and buttons for various functions such as start/pause, delayed start, and special options.
2. Loading Laundry
- Open the washing machine door.
- Load laundry into the drum, ensuring not to exceed the 6 kg capacity. Overloading can affect washing performance and efficiency.
- Close the door firmly.
3. Adding Detergent
- Pull out the detergent dispenser drawer.
- Add the appropriate amount of detergent to the main wash compartment and fabric softener to its designated compartment.
- Close the dispenser drawer.
4. Selecting a Program
- Turn the program selection dial to choose one of the 12 available wash programs (e.g., Cotton, Synthetics, Delicates, Eco 40-60, 20°C, 30 min, 15 min).
- The LED display will show the program duration and default settings.
- Use the option buttons to select additional functions like steam for odor removal and wrinkle reduction, or adjust spin speed and temperature if available for the selected program.
5. Starting a Cycle
- Press the Start/Pause button to begin the wash cycle.
- To use the Delayed Start function, select your program, then press the delayed start button repeatedly to set the desired delay time before pressing Start/Pause.
- The Stop and Go function allows you to pause a running cycle to add forgotten items. Press the Start/Pause button, wait for the door to unlock, add items, then close the door and press Start/Pause again to resume.
6. Eco-logic System
The integrated Eco-logic system automatically detects the amount of laundry loaded and adjusts the water and energy consumption, as well as the program duration, for optimal efficiency and reduced environmental impact.
7. End of Cycle
- The machine will signal the end of the cycle.
- Wait for the door to unlock before opening it.
- Remove laundry promptly to prevent wrinkles and odors.
- Unplug the appliance from the power outlet when not in use for extended periods.
Maintenance
1. Drum Cleaning Function
The washing machine includes an internal cleaning function to keep the stainless steel drum free of residues, mold, and dirt. It is recommended to run this cycle periodically, especially if you frequently wash at low temperatures.
- Ensure the drum is empty.
- Select the dedicated drum cleaning program (if available) or a hot, long cycle.
- Add a descaling agent or a small amount of detergent to the dispenser.
- Start the cycle.
2. Cleaning the Detergent Dispenser
- Remove the detergent dispenser drawer.
- Rinse it under running water to remove any detergent or softener residues.
- Clean the housing of the dispenser with a brush.
- Reinsert the drawer.
3. Cleaning the Filter
Regularly check and clean the drain pump filter to prevent blockages and ensure proper drainage.
- Locate the filter cover at the bottom front of the machine.
- Place a shallow container underneath to catch any residual water.
- Carefully open the cover and unscrew the filter.
- Remove any lint, coins, or foreign objects.
- Rinse the filter under running water.
- Screw the filter back in tightly and close the cover.
4. Exterior Cleaning
- Wipe the exterior surfaces with a soft, damp cloth.
- Do not use abrasive cleaners or solvents.
- Leave the door slightly ajar after use to allow the drum to air dry and prevent odors.
Troubleshooting
Before contacting customer support, please refer to the following common issues and solutions:
| Problem | Possible Cause | Solution |
|---|---|---|
| Machine does not start | Power cord not plugged in; door not closed properly; program not selected; Start/Pause button not pressed. | Check power connection; ensure door is latched; select a program; press Start/Pause. |
| No water intake | Water tap closed; water inlet hose kinked or blocked; water pressure too low. | Open water tap; straighten hose; check water supply. |
| Water not draining | Drain hose kinked or blocked; drain pump filter clogged. | Straighten drain hose; clean drain pump filter (see Maintenance section). |
| Excessive vibration/noise | Transport bolts not removed; machine not level; uneven load. | Remove transport bolts; adjust leveling feet; redistribute laundry evenly. |
| Detergent residues in dispenser | Insufficient water pressure; clogged dispenser. | Clean detergent dispenser (see Maintenance section); check water pressure. |
Specifications
| Feature | Detail |
|---|---|
| Model | WL6205AI |
| Brand | WONDER |
| Capacity | 6 kg |
| Spin Speed | 1200 rpm |
| Motor Type | Inverter Motor |
| Energy Efficiency Class | A-10 (as per product description) |
| Number of Programs | 12 |
| Noise Level (Max) | 72 dB |
| Dimensions (H x W x D) | 84 cm x 59 cm x 40 cm |
| Weight | 50 kg |
| Drum Material | Stainless Steel |
| Access Type | Front-Load |
| Color | White |
| Included Components | Power Cord |
Warranty and Support
Warranty Information
This Wonder WL6205AI washing machine comes with a 3-year warranty from the date of purchase. This warranty covers manufacturing defects and ensures the proper functioning of the appliance under normal use. Please retain your proof of purchase for warranty claims.
The warranty does not cover damage caused by improper installation, misuse, neglect, unauthorized repairs, or normal wear and tear.
Customer Support
For technical assistance, warranty claims, or any questions regarding your Wonder washing machine, please contact your retailer or the official Wonder customer support. Refer to the product packaging or the official Wonder website for specific contact details.
When contacting support, please have your model number (WL6205AI) and serial number (if applicable) ready.