
ANNKE AU-N46PCK4-V4-9CDM-P
Contents
ANNKE 4K PoE 16 Channel Security Camera System User Manual
Model: AU-N46PCK4-V4-9CDM-P
1. Introduction
Welcome to your ANNKE 4K PoE 16 Channel Security Camera System. This manual provides essential instructions for the setup, operation, and maintenance of your surveillance system. This system features 4K UHD resolution, Smart Dual Light technology for enhanced night vision, AI-powered human and vehicle detection, 24/7 audio and video recording, and remote access capabilities.
2. What's in the Box
Carefully unpack your ANNKE Security Camera System and verify that all components are present:
- 1x 16-Channel 12MP PoE NVR with 4TB Hard Drive (pre-installed)
- 12x 8MP PoE Dome Cameras
- 6x 30m/100 ft Network Cables
- 6x 18m/60 ft Network Cables
- 1x User Manual
- 1x HDMI Cable
- 1x Power Cable
- 1x USB Mouse
- 1x Wall Sticker
- 12x Screw Kits
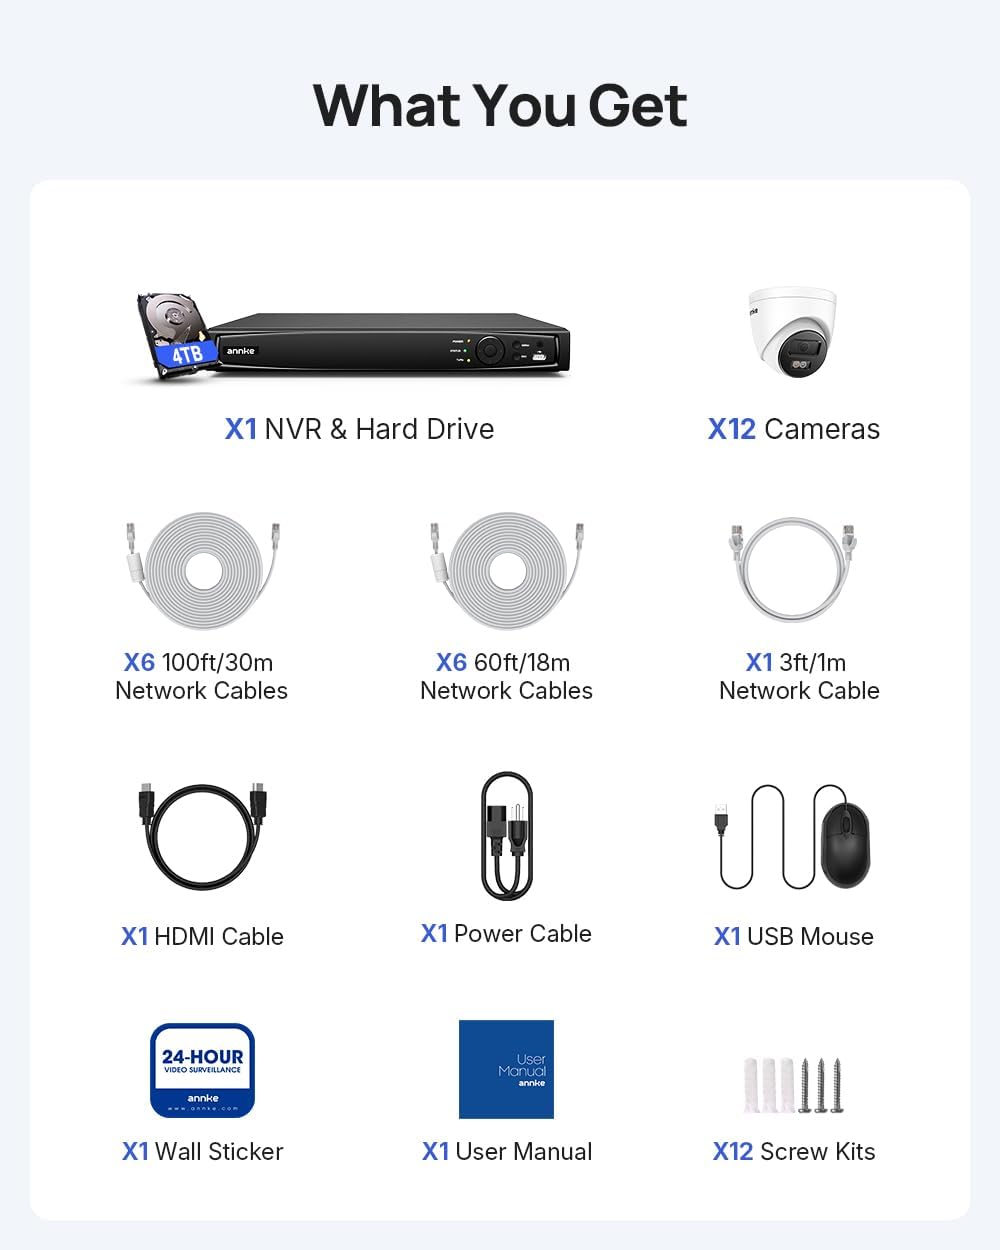
Image: All components included in the ANNKE 4K PoE 16 Channel Security Camera System kit.
3. Setup
3.1 System Overview and Unboxing
Before beginning installation, familiarize yourself with the system components. The ANNKE 4K PoE system is designed for plug-and-play setup, simplifying the connection process.
Video: An unboxing guide for the ANNKE 16CH 4K PoE Smart Dual Light Camera System, demonstrating the contents and initial presentation.
3.2 Connecting the NVR and Cameras
- Connect Cameras: Use the provided network cables (60ft/18m or 100ft/30m) to connect each 8MP PoE camera to the PoE ports on the back of the NVR. The Power over Ethernet (PoE) technology provides both power and video transmission through a single cable.
- Connect NVR to Monitor: Connect the NVR to a monitor using the HDMI cable.
- Connect NVR to Network: Connect the NVR to your router using a network cable for remote access and app functionality.
- Power On: Connect the NVR to a power source using the power cable. The system will boot up automatically.

Image: Illustration of the simple single-cable PoE connection between a camera and the NVR.
3.3 Initial Configuration
Follow the on-screen prompts to complete the initial setup wizard, including setting a password and configuring basic network settings.
3.4 ANNKE Vision App Setup
Download the ANNKE Vision App on your smartphone for remote access. Follow the in-app instructions to add your NVR system by scanning the QR code or manually entering device details. This enables remote viewing, playback, and receiving alerts.

Image: The ANNKE Vision app interface shown across various devices for remote monitoring.
4. Operating Instructions
4.1 Live View and Recording
Once set up, the system will display live feeds from all connected cameras. The pre-installed 4TB hard drive supports 24/7 continuous recording. You can also configure event-based recording, such as motion detection.

Image: Overview of the 24/7 recording capability with storage details.
4.2 4K UHD Video Quality
The 8MP cameras deliver 4K Ultra High Definition (3840x2160) video, ensuring clear and detailed footage. The 120dB Wide Dynamic Range (WDR) feature helps maintain image clarity in scenes with both very bright and very dark areas.

Image: Demonstrates the 4K clarity of the camera system, showing sharp details.
4.3 Smart Dual Light and Color Night Vision
The cameras feature Smart Dual Light technology, providing both black & white infrared (IR) night vision and full-color night vision. When motion is detected, the spotlight can activate to illuminate the scene in color, enhancing detail and deterrence.

Image: Illustrates the Smart Dual Light feature, showing the difference between IR and color night vision.
4.4 AI Human & Vehicle Detection
The system utilizes advanced AI to accurately detect humans and vehicles, significantly reducing false alarms from other movements like animals or swaying branches. Real-time alerts are pushed to your phone via the ANNKE Vision App.

Image: Depicts AI Human & Vehicle Detection in action, showing alerts for detected activity.
4.5 Audio Recording
Each camera includes a built-in microphone for one-way audio recording, allowing you to capture sound alongside video footage. Audio recording can be enabled or disabled in the system settings as needed.

Image: Shows the audio recording feature, capturing sound from the surveillance area.
4.6 Camera Display Settings
You can customize various display parameters for each camera, including the camera name, watermark, day/night switching, and supplementary light mode (e.g., white light for color night vision). These settings are accessible through the NVR interface.
Video: A tutorial on how to adjust camera display settings for Smart Dual Light cameras within the ANNKE system.
4.7 Output Resolution Adjustment
Ensure your NVR's output resolution matches your monitor's native resolution for optimal display. This setting can be adjusted in the NVR's system configuration menu.
Video: Instructions on how to set the output resolution for your ANNKE NVR system to ensure proper display on your monitor.
4.8 Adding Third-Party Cameras
The ANNKE NVR system supports adding third-party IP cameras. Refer to the video below for detailed steps on how to integrate compatible cameras into your system.
Video: A guide on how to add a third-party camera to your ANNKE NVR and system.
4.9 Image Rotation/Mirroring
If a camera is installed in an inverted position, you can easily rotate or mirror the image digitally through the NVR settings without physically reinstalling the camera.

Image: Demonstrates the image rotation and mirroring feature for flexible camera placement.
4.10 Privacy Masking
To protect privacy in sensitive areas, you can set up to 4 customizable privacy masks. These masks block out specific regions in the camera's view from being recorded or displayed.

Image: Illustrates customizable privacy masks applied to specific areas within the camera's field of view.
5. Maintenance
5.1 Weatherproof Design
The cameras are rated IP67 weatherproof, ensuring reliable operation in various outdoor conditions, from extreme cold (-30°C/-22°F) to high heat (60°C/140°F).

Image: Highlights the IP67 weatherproof and robust design of the camera, suitable for all weather conditions.
5.2 Hard Drive Management
The NVR comes with a 4TB hard drive pre-installed, providing ample storage for 24/7 recording. The system supports up to 16TB of storage via two SATA interfaces. Regularly check the hard drive status in the NVR settings to ensure optimal performance and data integrity.

Image: ANNKE professional security-grade hard drive for continuous surveillance.
6. Troubleshooting
- No Display on Monitor: Ensure the NVR output resolution matches your monitor's native resolution. Refer to Section 4.7 for instructions on adjusting output resolution.
- False Motion Alerts: Adjust the sensitivity of the motion detection settings or utilize the AI Human & Vehicle Detection feature to filter out irrelevant movements.
- No Audio Recording: Check the audio recording settings for the specific camera in the NVR interface. Ensure the microphone is enabled.
- Remote Access Issues: Verify the NVR is connected to the internet and the ANNKE Vision App is correctly configured with your device. Check network settings and firewall rules.
7. Specifications
| Feature | Specification |
|---|---|
| Brand | ANNKE |
| Model Number | AU-N46PCK4-V4-9CDM-P |
| Connectivity Technology | Wired (PoE) |
| Video Capture Resolution | 4K (8MP Cameras) |
| Number of Channels | 16 |
| Memory Storage Capacity | 4 TB (pre-installed), expandable up to 16 TB |
| Special Features | App Control, AI Human & Vehicle Detection, Smart Dual Light, Color Night Vision, Audio Recording, IP67 Weatherproof |
| Night Vision Range | 100 feet |
| Viewing Angle | 96 degrees |
| Hardware Interface | USB 2.0 |
| Operating Temperature | -30°C to 60°C (-22°F to 140°F) |
8. Warranty and Support
ANNKE is committed to providing excellent customer service. Your product comes with:
- After-Sale Support: Dedicated assistance for any post-purchase inquiries.
- Quick Response: Efficient support to address your concerns promptly.
- Lifetime Technical Help: Ongoing technical assistance for the lifespan of your product.
For further assistance, please visit the official ANNKE website or contact their customer support.

Image: ANNKE's commitment to customer support and lifetime technical assistance.
Ask a question about this manual
Ask about setup, troubleshooting, compatibility, parts, safety, or missing instructions. Manuals+ will review the question and use this page’s manual context to help answer it.