
1. Introduction
This manual provides essential information for the safe and efficient operation, installation, and maintenance of your Samsung Inverter WindFree AI Pro 12.000 BTUs Split Air Conditioner. Please read this manual thoroughly before using your air conditioner and keep it for future reference.
2. Safety Information
To prevent injury to the user or others and property damage, the following instructions must be followed. Incorrect operation due to ignoring instructions may cause harm or damage.
- Installation: Installation must be performed by qualified personnel in accordance with national wiring standards. Do not install the unit yourself.
- Power Supply: Ensure the voltage and frequency of the power supply match the specifications of the unit. Do not use multi-outlet adapters or extension cords.
- Operation: Do not insert fingers or foreign objects into the air inlet/outlet. Do not spray water directly onto the unit.
- Maintenance: Always turn off the power and unplug the unit before cleaning or performing any maintenance.
- Refrigerant: The unit contains R32 refrigerant. Do not attempt to repair or tamper with the refrigerant circuit. Contact qualified service personnel.
3. Package Contents
Verify that all components are present in the package:
- Indoor Unit (AR60H12D1AWNAZ)
- Outdoor Unit
- Remote Control
- User Manual (this document)
4. Product Overview
Indoor Unit
The indoor unit is designed for wall mounting and features a sleek, modern design with a digital display. The WindFree™ panel ensures gentle air distribution.

Figure 4.1: Front view of the indoor unit, showing the WindFree panel and digital display.

Figure 4.2: The indoor unit mounted on a wall, illustrating its aesthetic integration.
Outdoor Unit
The outdoor unit houses the compressor and condenser, responsible for heat exchange. It should be installed in a well-ventilated area.
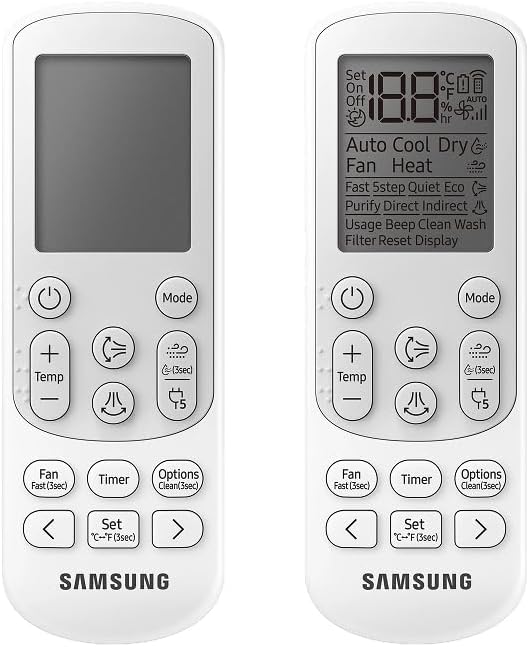
Figure 4.3: Front-angled view of the outdoor unit.
Remote Control
The remote control allows you to manage all functions of your air conditioner, including power, mode, temperature, fan speed, and special features.

Figure 4.4: The remote control for the air conditioner, displaying various function buttons and the LCD screen.
5. Setup (Installation)
Installation of this split air conditioner requires specialized tools and knowledge. It is strongly recommended that installation be performed by a certified and qualified technician to ensure proper function, safety, and warranty validity.
General Installation Steps (for reference only):
- Site Selection: Choose appropriate locations for both indoor and outdoor units, considering airflow, drainage, and structural support.
- Indoor Unit Mounting: Securely mount the indoor unit to the wall using the provided mounting plate.
- Outdoor Unit Placement: Place the outdoor unit on a stable, level surface, ensuring adequate clearance for airflow.
- Refrigerant Piping: Connect the refrigerant lines between the indoor and outdoor units. This involves vacuuming the lines and charging with refrigerant.
- Electrical Wiring: Connect the power supply and communication cables according to the wiring diagram.
- Drainage: Install the condensate drain pipe for the indoor unit, ensuring proper slope for water flow.
- Test Run: After installation, perform a test run to verify all functions are operating correctly.
6. Operating Instructions
Use the remote control to operate your air conditioner. Ensure the remote control is pointed towards the indoor unit.
Basic Operation
- Power On/Off: Press the Power button to turn the unit on or off.
- Mode Selection: Press the Mode button to cycle through available modes: Cool, Dry, Fan, Auto.
- Temperature Adjustment: Use the Temp + or Temp - buttons to set your desired temperature.
- Fan Speed: Press the Fan button to adjust the fan speed (Auto, Low, Med, High).
Special Features
- WindFree™ Mode: Activates a gentle airflow through 23,000 micro-holes, eliminating direct drafts for enhanced comfort. Press the WindFree button on the remote.

Figure 6.1: WindFree™ Comfort Cooling technology, showing airflow through micro-holes.
- AI Energy Mode: Optimizes energy consumption by analyzing usage patterns and environmental conditions, aiming for up to 30% energy savings.

Figure 6.2: AI Energy Mode feature, highlighting potential energy savings.
- Good Sleep Mode: Adjusts temperature and humidity to create optimal conditions for a restful night's sleep, following natural sleep cycles.
Figure 6.3: WindFree™ Good Sleep mode, showing temperature adjustments over sleep phases.
- Dehumidification: The Dry Comfort Mode effectively removes excess moisture from the air without overcooling the room, maintaining a comfortable humidity level.

Figure 6.4: Comparison of dehumidification modes, highlighting Dry Comfort Mode.
7. Maintenance
Regular maintenance ensures optimal performance and longevity of your air conditioner.
Air Filter Cleaning
The air filter should be cleaned regularly (e.g., every two weeks or as needed) to maintain air quality and unit efficiency.
- Turn Off Power: Always turn off the air conditioner and disconnect power before cleaning.
- Open Front Panel: Gently lift the front panel of the indoor unit to access the air filters.

Figure 7.1: Indoor unit with the top panel open, revealing the air filters for cleaning.
- Remove Filters: Carefully slide out the air filters.
- Clean Filters: Use a vacuum cleaner to remove dust or wash them with lukewarm water and a mild detergent. Rinse thoroughly and allow them to dry completely in a shaded area.
- Reinstall Filters: Slide the dry filters back into their original position and close the front panel.
Exterior Cleaning
Wipe the indoor and outdoor units with a soft, damp cloth. Do not use harsh chemicals or abrasive cleaners.
8. Troubleshooting
Before contacting service, check the following common issues and solutions:
| Problem | Possible Cause | Solution |
|---|---|---|
| Unit does not turn on | No power supply; Remote control batteries are dead. | Check power connection and circuit breaker; Replace remote control batteries. |
| Insufficient cooling | Dirty air filter; Doors/windows open; Temperature setting too high. | Clean air filter; Close doors/windows; Lower temperature setting. |
| Unusual noise | Loose parts; Obstruction in fan. | Turn off unit and inspect for loose parts or obstructions. If noise persists, contact service. |
| Water leakage from indoor unit | Clogged drain pipe; Improper installation. | Check and clear the drain pipe; Contact a qualified technician for inspection. |
If the problem persists after performing these checks, please contact Samsung customer support or a qualified service technician.
9. Specifications
| Feature | Specification |
|---|---|
| Brand | Samsung |
| Model Number | F-AR60H12D1AW |
| Capacity | 12,000 BTUs |
| Voltage | 220 Volts |
| Power | 1150 watts |
| Noise Level | 40 Decibels |
| Installation Type | Wall Mount |
| Annual Energy Consumption | 416 Kilowatt Hours Per Year |
| Efficiency | A |
| Item Weight (Indoor Unit) | 10 Kilograms |
| Product Dimensions (Indoor Unit P x L x A) | 37.5P x 88L x 29A centimeters |
| Control Type | Remote Control |
10. Warranty and Support
Warranty Information
This Samsung Air Conditioner comes with a 12-month warranty from the date of purchase, covering manufacturing defects. Please retain your proof of purchase for warranty claims. The warranty does not cover damage caused by improper installation, misuse, or unauthorized repairs.
Customer Support
For technical assistance, troubleshooting beyond this manual, or warranty service, please contact Samsung customer support. Refer to the official Samsung website or your purchase documentation for local contact details.


