
aigo Luna A275
Aigo Luna A275 Mini-Tower Gaming PC Case User Manual
Model: Luna A275 (AC-A275-B-BR1)
1. Introduction
The Aigo Luna A275 is a compact mini-tower PC case designed for users seeking a powerful system in a reduced footprint. It features a modern design with a tempered glass side panel and includes three pre-installed Rainbow fans for efficient cooling and aesthetic lighting. This manual provides essential information for the setup, operation, maintenance, and troubleshooting of your Aigo Luna A275 PC case.
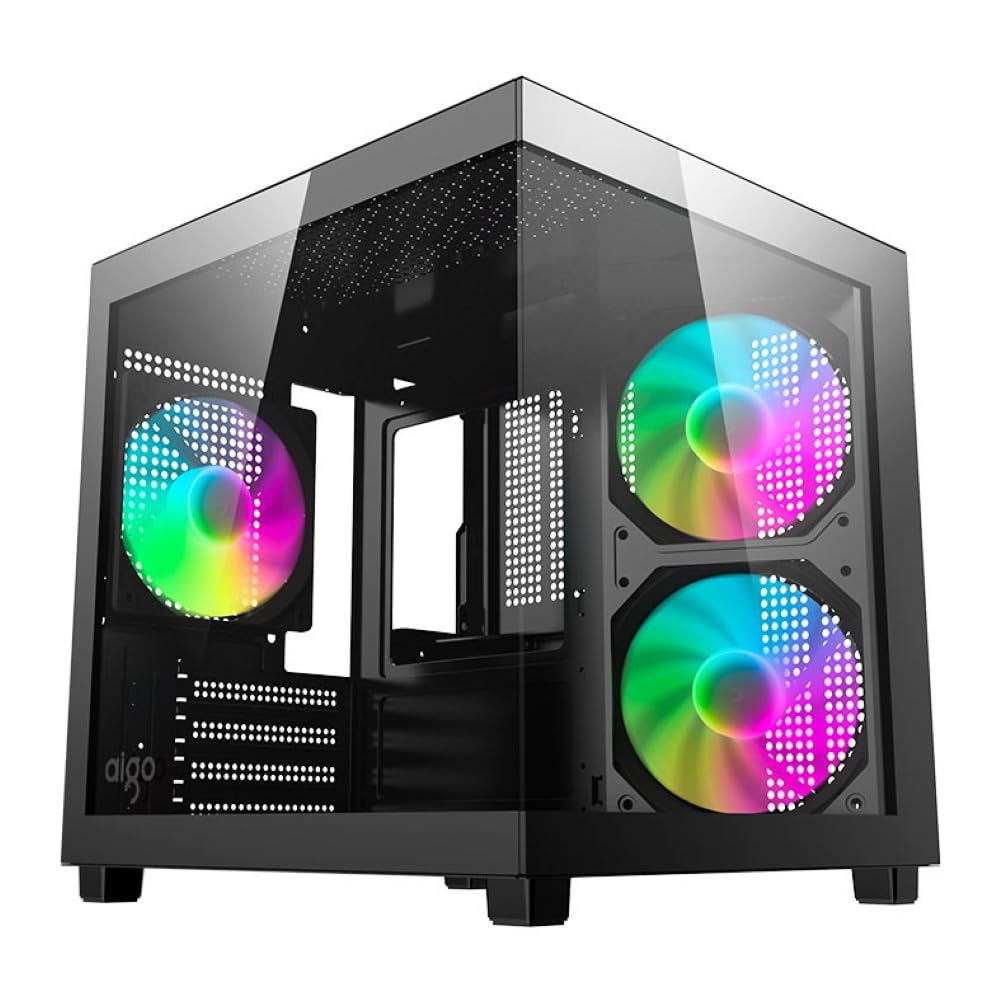
Image 1.1: Front view of the Aigo Luna A275 Mini-Tower Gaming PC Case, showcasing its compact design and illuminated Rainbow fans.
2. Key Features
- Pre-installed Rainbow Fans: Includes 3 pre-installed Rainbow fans for enhanced airflow and aesthetic lighting without additional accessories.
- Tempered Glass Side Panel: A tempered glass side panel allows for clear viewing of internal components and enhances the system's aesthetics.
- Compact Mini-Tower Design: Optimizes desk space while maintaining compatibility with essential PC components.
- Motherboard Compatibility: Supports Micro-ATX and Mini-ITX motherboards, offering flexibility for various hardware configurations.
- GPU Support: Accommodates graphics cards up to 290 mm in length, suitable for gaming and high-performance applications.
- CPU Cooler Clearance: Supports CPU coolers up to 155 mm in height, providing options for effective cooling.
- Liquid Cooling Support: Compatible with water coolers up to 240 mm, allowing for advanced liquid cooling solutions.
- Storage Options: Dedicated space for 1 x 3.5" HDD and 2 x 2.5" SSDs, balancing loading speed and storage capacity.
- Front I/O Panel: Equipped with 1 x USB 3.0, 2 x USB 2.0, and HD audio connections for convenient peripheral access.
- Optimized Internal Structure: Designed for easy assembly and organized component management, contributing to a clean and functional interior.
3. Setup and Installation
Before beginning installation, ensure you have all necessary components and tools. Refer to your motherboard and component manuals for specific installation instructions.
3.1 Preparing the Case
- Place the case on a stable, flat surface.
- Carefully remove the tempered glass side panel by unscrewing the thumb screws and gently sliding it off. Set it aside on a soft, non-abrasive surface to prevent scratches.
- Remove the rear side panel to access the cable management area.

Image 3.1: Interior view of the Aigo Luna A275 case with the side panel removed, showing the internal layout and fan placement.
3.2 Component Installation
- Motherboard: Install the I/O shield into the rear opening of the case. Secure the motherboard to the standoffs using appropriate screws. Ensure all standoffs align with the motherboard's screw holes.
- Power Supply Unit (PSU): Install the PSU into its designated compartment, typically at the bottom rear of the case. Secure it with screws from the rear.
- Storage Drives:
- For 3.5" HDDs: Mount the drive into the 3.5" drive bay.
- For 2.5" SSDs: Mount the drives into the 2.5" SSD mounts.
- Graphics Card (GPU): Remove the necessary expansion slot covers. Insert the GPU into the PCIe slot on the motherboard and secure it with screws.
- Cooling (Optional): If installing additional fans or a liquid cooler, mount them in the designated locations (top, side, bottom, rear) as per the case specifications.

Image 3.2: Internal view of the Aigo Luna A275 case, illustrating potential component placement such as motherboard, GPU, and fans.
3.3 Cable Management
Route all power and data cables through the cutouts in the motherboard tray to the rear side of the case. Use cable ties or Velcro straps to bundle and secure cables, ensuring optimal airflow and a clean appearance.
3.4 Connecting Front Panel Cables
Connect the front panel cables (USB 3.0, USB 2.0, HD Audio, Power Switch, Reset Switch, Power LED, HDD LED) to the corresponding headers on your motherboard. Refer to your motherboard manual for exact header locations.
4. Operation
Once all components are installed and cables connected, replace the side panels. Connect your monitor, keyboard, mouse, and power cable to the system.
- Power On: Press the power button located on the front I/O panel. The system should boot, and the Rainbow fans will illuminate.
- Front Panel Ports: Use the USB 3.0, USB 2.0, and audio jacks on the front panel for convenient access to peripherals and audio devices.
- Fan Operation: The pre-installed Rainbow fans operate automatically to provide airflow. Their illumination is static Rainbow.
5. Maintenance
Regular maintenance helps ensure optimal performance and longevity of your PC components.
- Dust Filters: Periodically check and clean any removable dust filters (if present) to maintain good airflow and prevent dust buildup inside the case. Use compressed air or a soft brush.
- Exterior Cleaning: Wipe the exterior surfaces with a soft, damp cloth. Avoid abrasive cleaners or solvents. For the tempered glass panel, use a glass cleaner and a microfiber cloth.
- Internal Dust: Every few months, open the case and use compressed air to remove dust from internal components, especially heatsinks and fan blades. Ensure the system is powered off and unplugged before cleaning.
6. Troubleshooting
If you encounter issues, consider the following basic troubleshooting steps:
- No Power:
- Ensure the power cable is securely connected to the PSU and the wall outlet.
- Check if the PSU's power switch is in the "ON" position.
- Verify that the front panel power switch cable is correctly connected to the motherboard.
- No Display:
- Confirm that the monitor is connected to the graphics card (not the motherboard's integrated graphics, unless intended).
- Reseat the graphics card in its PCIe slot.
- Check RAM modules are properly seated.
- Fans Not Spinning/Lighting:
- Ensure fan power connectors (e.g., 4-Pin MOLEX) are securely connected to the power supply.
- Check for any obstructions preventing fan rotation.
- Overheating:
- Verify that all case fans are spinning correctly and oriented for proper airflow.
- Clean any dust buildup from fans and heatsinks.
- Ensure adequate space around the case for ventilation.
7. Technical Specifications
| Feature | Specification |
|---|---|
| Model | Luna A275 (AC-A275-B-BR1) |
| Case Type | Mini-Tower |
| Motherboard Compatibility | Micro-ATX, Mini-ITX |
| Steel Thickness | 0.45mm SPCC |
| Drive Bays | 1 x 3.5" HDD, 2 x 2.5" SSD |
| Expansion Slots | 4 Slots |
| Max GPU Length | 290 mm |
| Max CPU Cooler Height | 155 mm |
| PSU Support | Max 140 mm length |
| Supported Water Cooler | Top: 240 mm |
| Supported Fans | Top: 2 x 120 mm, Side: 2 x 120 mm, Bottom: 2 x 120 mm, Rear: 1 x 120 mm |
| Front I/O Ports | 2 x USB 2.0, 1 x USB 3.0, HD Audio, Power, Reset |
| Side Panel | Tempered Glass |
| Dimensions (L x W x H) | 300 x 275 x 298 mm |
| Pre-installed Fans | 3 x 120mm Rainbow Fans |
| Fan Speed | 1000 ± 10% RPM |
| Fan Noise Level | 18 dBA (max) |
| Fan Airflow | 40 CFM |
| Fan Connector | 4-Pin MOLEX |
8. Warranty and Support
This Aigo Luna A275 PC case comes with a 12-month warranty from the date of purchase. This warranty covers manufacturing defects and material faults under normal use.
For warranty claims or technical support, please contact your retailer or the official Aigo support channels. Keep your proof of purchase for warranty validation.
The warranty does not cover damage caused by improper installation, misuse, unauthorized modifications, accidents, or natural disasters.
Related documentsLuna A275

Ask a question about this manual
Ask about setup, troubleshooting, compatibility, parts, safety, or missing instructions. Manuals+ will review the question and use this page’s manual context to help answer it.