
1. Introduction
This manual provides essential information for the installation, operation, and maintenance of your Varstrom TSDZ-2B, Z8, or TSDZ16 mid-drive electric bike conversion kit. These kits are designed to transform a standard bicycle into an electric bicycle, offering pedal assistance and pure electric modes. The advanced torque sensor system adjusts assistance based on your pedaling force, enhancing efficiency and range. The unique dual-clutch design minimizes resistance when the motor is off, allowing for a natural cycling experience.
Please read this manual thoroughly before installation and use to ensure proper function and safety.
2. Safety Information
- Always wear a helmet and appropriate safety gear when riding an electric bicycle.
- Ensure all components are securely fastened and correctly installed before each ride.
- Regularly check brakes, tires, and electrical connections.
- Do not operate the electric bicycle in conditions beyond your riding ability or in adverse weather without proper precautions.
- Adhere to local regulations regarding electric bicycle use, speed limits, and power output.
- Keep the battery and electrical components dry. Waterproof connectors are designed for reliability, but avoid submerging the system.
- Do not modify the motor or battery system. Unauthorized modifications can lead to malfunction, injury, or void the warranty.
- Charge the battery in a well-ventilated area, away from flammable materials.
3. Package Contents
The Varstrom electric bike conversion kit typically includes the following components. Specific items may vary based on the chosen kit version and optional accessories.
- Mid-drive Motor (TSDZ-2B, Z8, or TSDZ16)
- LCD Display (various options available)
- Brake Levers / Brake Sensors
- Thumb Throttle
- Chainring
- Crank Arms
- Speed Sensor and Magnet
- 1T4 Cable
- Mounting Screws and Hardware
- Wrench
- Cable Ties
- Installation Manual
- Optional: Battery with Charger (if purchased with the kit)
- Optional: Headlight & Taillight (for TSDZ16 48V motor)
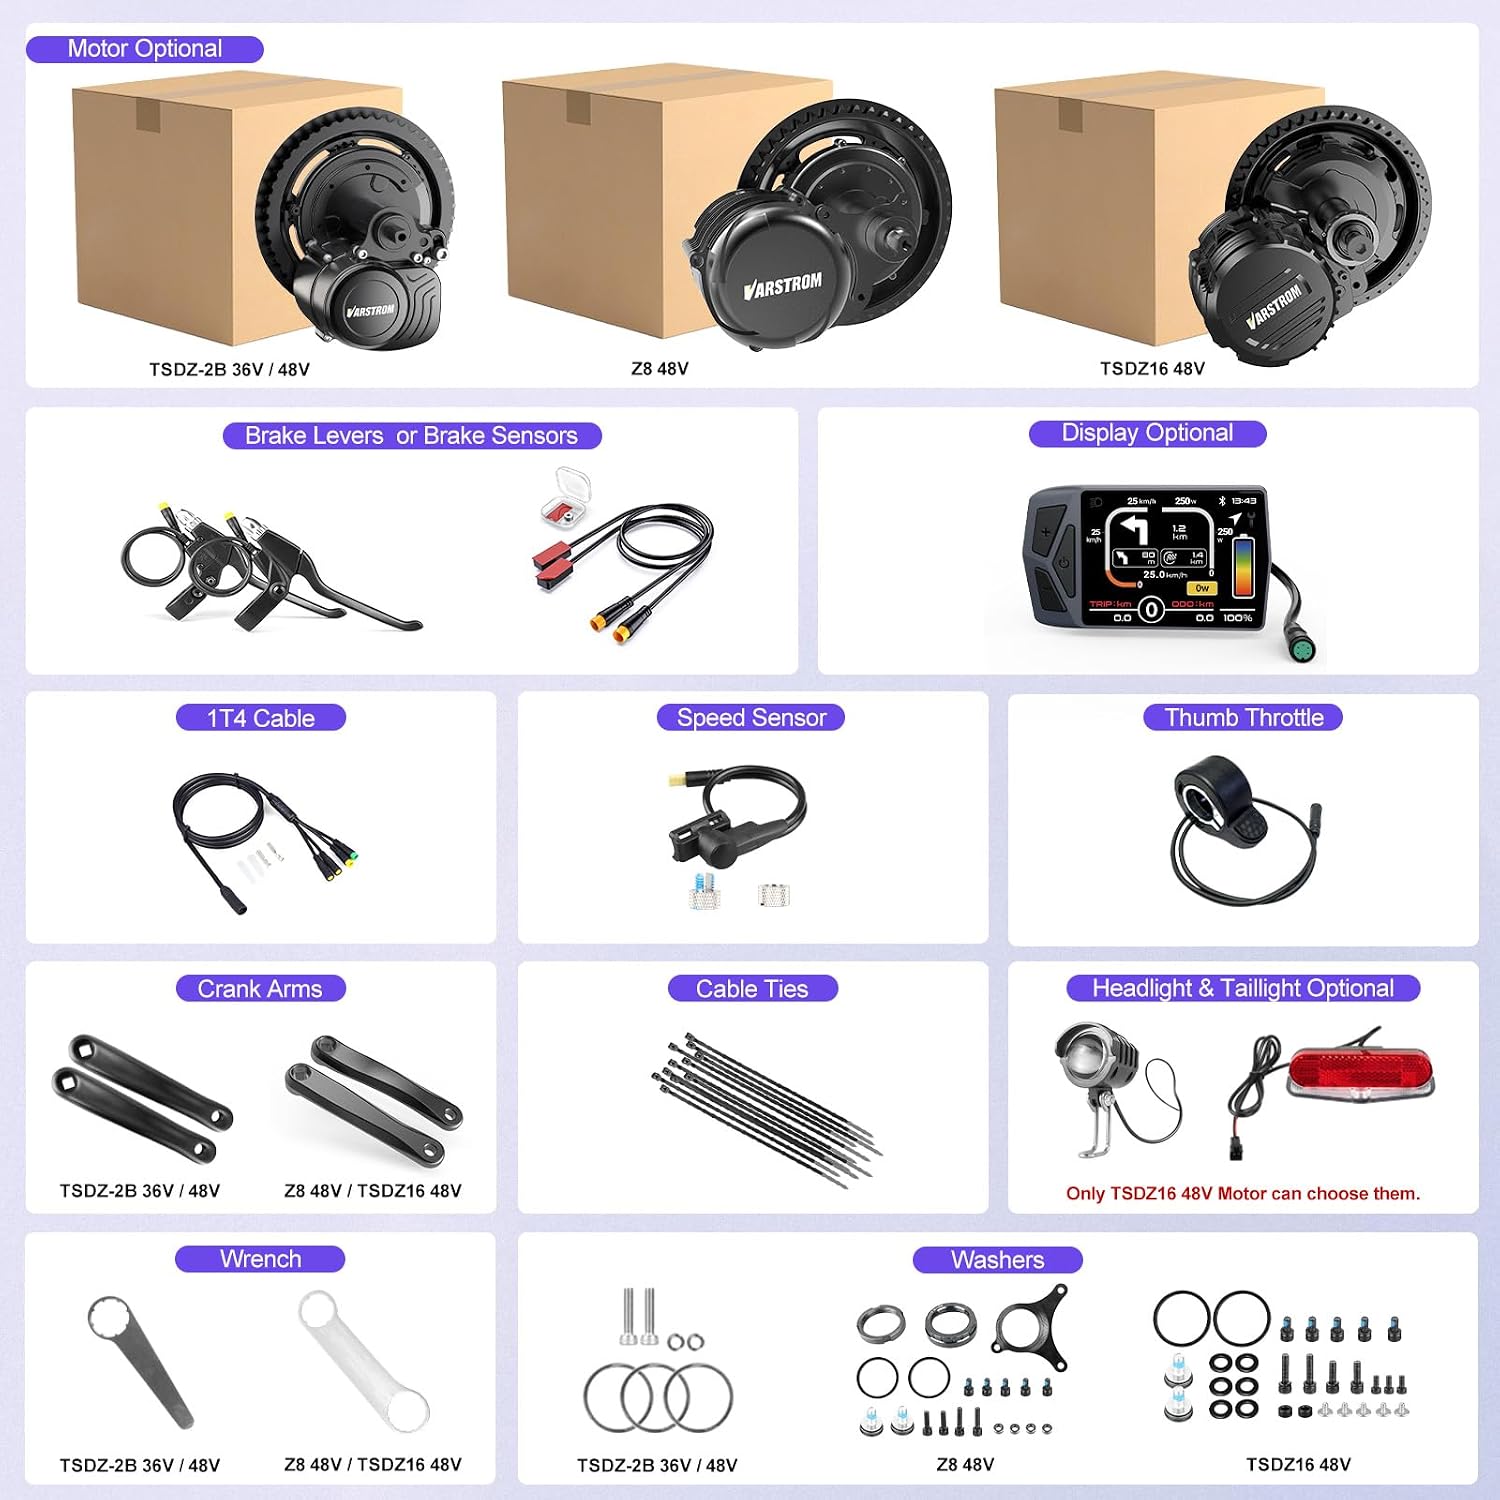
Figure 3.1: Overview of typical kit components, including motor, display, brake levers, throttle, chainring, crank arms, speed sensor, cables, and mounting hardware.
4. Compatibility
The Varstrom mid-drive motor kit is designed for broad compatibility with most mountain bikes (MTB), city bikes, road bikes, and commuter bikes. To ensure proper fitment, verify the following specifications of your bicycle:
- Bottom Bracket Width: The motor is compatible with bottom bracket widths between 68mm and 73mm.
- Bottom Bracket Inner Diameter: The inner diameter of your bottom bracket shell must be between 33.5mm and 36mm.
- Brake System: Compatible with both V-brakes and disc brakes without requiring modifications.
Incompatible Bicycle Types:
- Bicycles with carbon fiber frames.
- Bicycles with coaster brakes.
- Bicycles with belt drive chainrings.
Before purchasing and installing, it is crucial to measure your bicycle's bottom bracket dimensions and confirm compatibility to ensure correct assembly of the conversion kit.

Figure 4.1: Diagram illustrating bottom bracket dimensions for compatibility and examples of incompatible bicycle types (belt drive, coaster brake, carbon fiber frame).
5. Setup & Installation
The installation process involves mounting the mid-drive motor to your bicycle's bottom bracket, installing the chainring, crank arms, display, brake sensors, throttle, and connecting all electrical components. A detailed installation manual is included with your kit, providing step-by-step instructions and diagrams.
General Installation Steps:
- Remove the existing bottom bracket, crank arms, and chainring from your bicycle.
- Mount the Varstrom mid-drive motor into the bottom bracket shell. Ensure it is properly aligned and secured with the provided mounting hardware.
- Install the new chainring and crank arms onto the motor spindle.
- Attach the LCD display to the handlebars.
- Install the brake levers or brake sensors (if using your existing levers) and the thumb throttle.
- Mount the speed sensor to the rear chainstay and attach the magnet to a spoke on the rear wheel.
- Connect all electrical components using the 1T4 cable and other provided wiring. Ensure all connections are secure and waterproof.
- If applicable, install the battery securely on the bicycle frame and connect it to the motor system.
- Perform a functional test to ensure all components are working correctly before riding.
For specific torque values, wiring diagrams, and detailed instructions, refer to the dedicated installation manual provided in your kit.

Figure 5.1: Various motor options (TSDZ-2B, Z8, TSDZ16) and their typical packaging.
6. Operation
Your Varstrom electric bike conversion kit offers multiple riding modes and display functionalities to enhance your cycling experience.
Riding Modes:
- Pedal Assist Mode: The motor provides assistance based on your pedaling input, detected by the torque sensor. This mode offers a natural riding feel and extends battery range.
- Pure Electric Mode (Throttle): Use the thumb throttle to engage the motor without pedaling. This mode is ideal for quick acceleration or when you need a break from pedaling.
- Walk Assist Mode: A low-speed assist mode designed to help you push the bicycle when walking alongside it.
Display Options:
The kit supports various LCD displays, each offering different features and interfaces:
- VD18MT: Touchscreen display for intuitive control without physical buttons.
- DZ40: Compact display providing essential e-bike information.
- EKD01: Features a Type-C port for charging devices during long rides.
- VD04 & M58: Large screens (3.5" and 3.8" respectively) for clear and immediate readability of riding data.
Refer to your specific display's manual for detailed instructions on navigating menus, adjusting assist levels, and accessing features.

Figure 6.1: Overview of Varstrom torque sensor motor models and their key specifications.

Figure 6.2: Detailed parameters for various Varstrom battery options, including voltage, capacity, and dimensions.
7. Maintenance
Regular maintenance ensures the longevity and optimal performance of your electric bike conversion kit.
- Cleaning: Keep the motor, battery, and electrical connections clean. Use a damp cloth to wipe surfaces; avoid high-pressure washing directly on electrical components.
- Lubrication: Periodically lubricate the chain and other moving parts of your bicycle as per standard bicycle maintenance practices.
- Battery Care: Charge the battery regularly, even when not in use, to maintain its health. Avoid fully discharging the battery. Store the battery in a cool, dry place.
- Connections: Periodically check all electrical connections for tightness and signs of wear or corrosion. Ensure waterproof connectors are properly sealed.
- Fasteners: Inspect all bolts and screws, especially those securing the motor and battery, to ensure they are tight.
- Professional Inspection: Consider having your electric bike inspected by a qualified technician annually or after significant mileage.
8. Troubleshooting
This section addresses common issues you might encounter with your Varstrom electric bike conversion kit.
- Motor Not Engaging:
- Check if the battery is charged and properly connected.
- Ensure all electrical cables are securely plugged in.
- Verify that the display is powered on and showing no error codes.
- Check if brake levers are fully released, as brake sensors can cut motor power.
- Display Not Turning On:
- Confirm the battery is connected and has sufficient charge.
- Inspect the display cable for damage and ensure it's securely connected to the main harness.
- Reduced Power/Range:
- Ensure the battery is fully charged before each ride.
- Check tire pressure; underinflated tires increase rolling resistance.
- Verify that the torque sensor is clean and free from obstructions.
- Riding in higher assist levels or using the throttle frequently will consume more power.
- Unusual Noises from Motor:
- Check for loose components or foreign objects near the motor or chainring.
- Ensure the chain is clean and lubricated.
- If noises persist, consult a professional technician.
For more complex issues or error codes displayed on your screen, refer to the specific troubleshooting section in your display's manual or contact Varstrom customer support.
9. Specifications
| Feature | Detail |
|---|---|
| Brand | Varstrom |
| Model Name | TSDZ-2B, Z8, TSDZ16 Mid Drive |
| Material | Aluminum |
| Manufacturer | SUZHOU TONGSHENG ELECTRIC APPLIANCES CO., LTD |
| Country of Origin | China |
| Included Components | Mid-drive motor kit (as listed in Package Contents) |
| ASIN | B0H3JZ1VP8 |
| Motor Type | Mid-drive, Torque Sensor |
| Controller Current Limit | TSDZ-2B 36V: 12A, TSDZ-2B 48V: 15A, Z8 48V: 22A, TSDZ16 48V: 30A |
| Max Torque | TSDZ-2B: 80Nm, Z8: 140Nm, TSDZ16: 160Nm |
| Weight | TSDZ-2B 36V: 3.82 Kg, TSDZ-2B 48V: 3.86 Kg, Z8 48V: 4.78 Kg, TSDZ16 48V: 6.21 Kg |
| Efficiency | ≥ 80% (TSDZ-2B, Z8), ≥ 82% (TSDZ16) |
| Waterproof Grade | IP-65 (TSDZ-2B, Z8), IP-X6 (TSDZ16) |
| Operating Temperature | -20°C to 45°C |
| Bottom Bracket Compatibility | Width: 68-73mm, Inner Diameter: 33.5-36mm |
10. Warranty & Support
For specific instructions regarding product warranty and support, please refer to the documentation included with your purchase or contact Varstrom customer service directly. The product warranty details are typically provided in the installation manual or on the manufacturer's official website.
When seeking support, please have your product model, serial number, and proof of purchase readily available.

