
1. Introduction
Thank you for choosing the BXLIYER Android 15 Car Stereo. This manual provides detailed instructions for the installation, setup, and operation of your new car stereo system. Please read this manual thoroughly before using the product to ensure proper functionality and to maximize your user experience. This system is designed for Dodge RAM 1500, 2500, and 5500 models from 2013 to 2019.
2. Safety Information
- Always consult a professional for installation to avoid damage to the vehicle's electrical system or the stereo unit.
- Do not operate the device in a way that distracts you from driving. Always prioritize road safety.
- Ensure all wiring is correctly connected to prevent short circuits or fire hazards.
- Keep the unit away from water and excessive moisture.
- Do not attempt to disassemble or modify the unit. This may void the warranty and cause damage.
- Use only specified accessories and parts.
3. Package Contents
Please check the package for the following items:
- BXLIYER Android 15 Car Stereo Unit
- Power Harness
- GPS Antenna
- USB Cables
- RCA Cables
- External Microphone (if included)
- Rear View Camera (FREE)
- User Manual (this document)
- Mounting Brackets and Screws
4. Installation
4.1 Vehicle Compatibility
This car stereo is specifically designed for Dodge RAM 1500, 2500, and 5500 models manufactured between 2013 and 2019. Ensure your vehicle's dashboard matches the compatible configurations shown below.
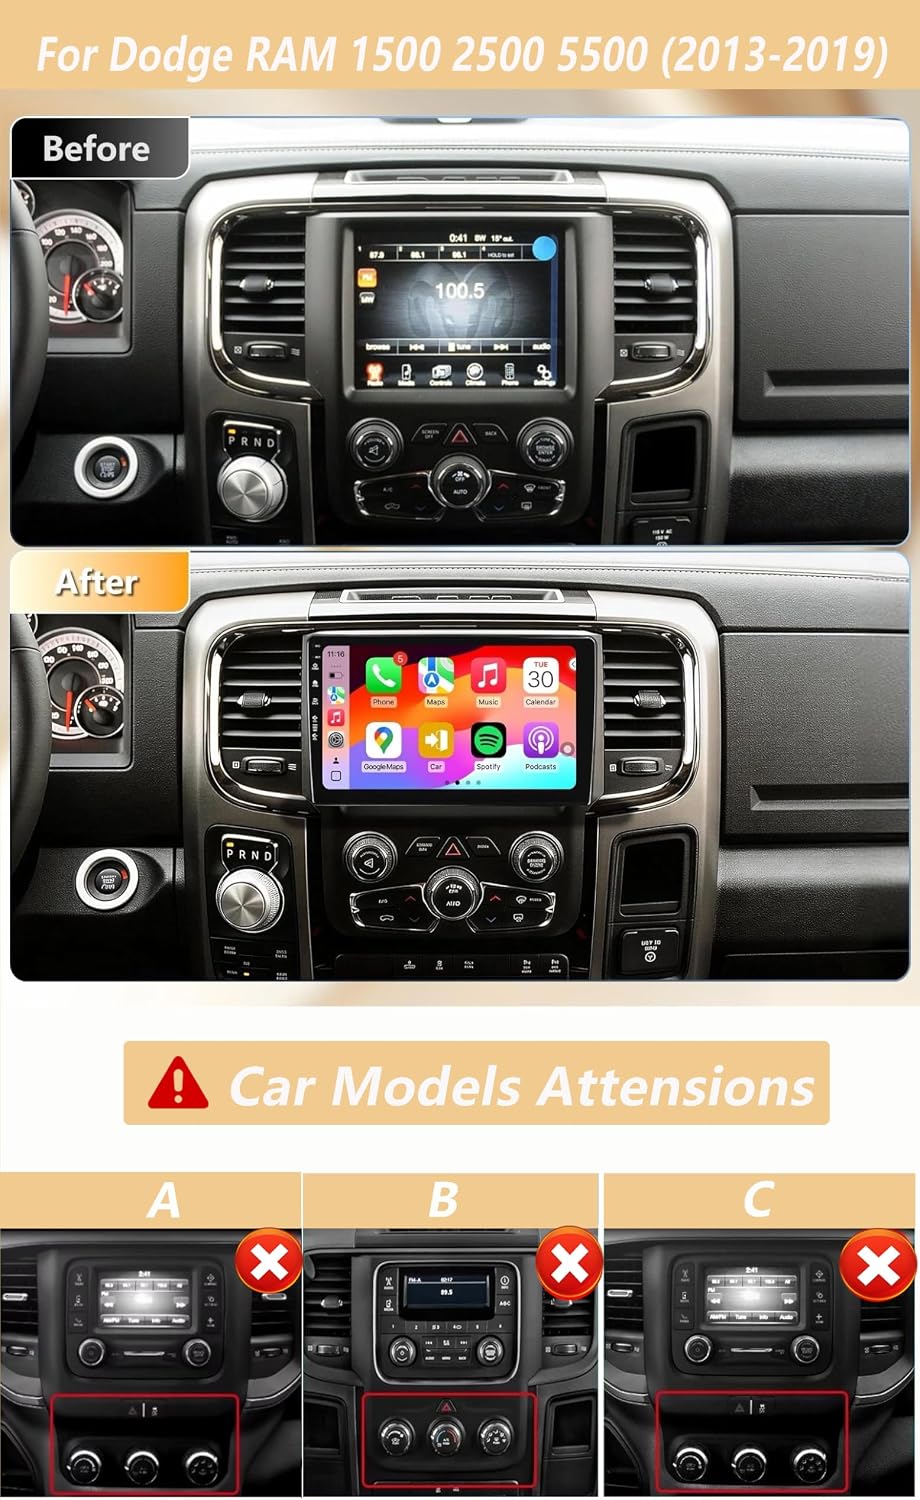
Image: Before and After installation of the BXLIYER Android 15 Car Stereo in a Dodge RAM dashboard. The top image shows the original factory radio, and the bottom image displays the new 9-inch touchscreen unit seamlessly integrated. Below this, three dashboard configurations (A, B, C) are shown with red 'X' marks, indicating incompatibility with this specific car stereo model. Please verify your vehicle's dashboard matches the 'After' image for proper fitment.
If you are unsure about your car's compatibility, please provide images of your dashboard to customer support for verification.
4.2 Wiring Diagram
A detailed wiring diagram is typically included with the product packaging. Refer to this diagram for specific connections. General wiring includes:
- Power Harness: Connects to the vehicle's main power, ground, and accessory wires.
- Speaker Wires: Connect to the vehicle's existing speaker wiring.
- GPS Antenna: Mount in a location with a clear view of the sky, typically on the dashboard or under the windshield.
- USB Cables: Route to a convenient location for connecting USB devices.
- Rear Camera Input: Connect the included rear camera to this input. Ensure the reverse trigger wire is connected to the vehicle's reverse light circuit.
- External Microphone: Connect for improved call quality.
Note: Professional installation is highly recommended.
4.3 Mounting the Unit
After completing the wiring, carefully slide the head unit into the dashboard opening. Secure it using the provided mounting brackets and screws. Ensure the unit is firmly in place and does not obstruct any vehicle controls.
5. Initial Setup
5.1 Initial Power On
Turn on your vehicle's ignition. The car stereo should power on automatically. The system features a fast-boot function, allowing access to the Android system in less than 2 seconds.

Image: This image highlights the "Fast-boot" feature, demonstrating that the system can be accessed in less than 2 seconds, significantly reducing startup time from the typical 25 seconds for Android systems.
5.2 System Settings
Upon first boot, you may be prompted to set up basic system preferences:
- Language: Navigate to Settings > Language & Input to select your preferred language. The system supports up to 196 languages.
- Date & Time: Set the correct date and time, or enable automatic synchronization via GPS/network.
- Network: Connect to a Wi-Fi network or insert a 4G USB modem (sold separately) for internet access.
Image: This image illustrates the "Languages & Multicolor illumination" settings. It shows a selection of country flags for language options and a color palette, allowing users to customize the button light colors on the stereo unit.
5.3 Connecting to Wi-Fi / 4G
The unit features built-in dual-band Wi-Fi (2.4GHz and 5GHz) for a stronger signal and faster network speed. To connect:
- Go to Settings > Network & Internet > Wi-Fi.
- Turn on Wi-Fi and select your desired network from the list.
- Enter the password if prompted.
For 4G connectivity, an external 4G USB modem (not included) is required. Insert the modem into a USB port on the stereo unit.

Image: This image demonstrates the "Dual band WI-FI/4G" capability, showing a tablet connected to the internet via Wi-Fi, accessing various applications. It emphasizes support for both 2.4 GHz and 5 GHz Wi-Fi bands, along with 4G LTE connectivity for global internet access.
6. Operating Instructions
6.1 Basic Navigation
The home screen provides access to frequently used applications. Swipe left or right to view additional app pages. Tap an icon to launch an application.
6.2 Radio (AM/FM/DAB+)
Access the "Radio" app for AM/FM tuning. The unit supports RDS for displaying station information.
For DAB+ digital radio, an external DAB+ tuner (e.g., B07Y5DYNMT or B083Q7YG4F, sold separately) is required. Once connected, you can enjoy CD-quality audio and a wider range of digital stations.

Image: This image displays the user interface for DAB+ radio, showing station details like "Absolut relax" and signal strength. It also indicates that DAB+ support is optional and requires a separate tuner, with examples of compatible tuner models provided.
6.3 Media Playback (USB, MicroSD)
Connect USB drives or MicroSD cards (up to 500GB) to play audio and video files. Use the "Music" or "Video" app to browse and play your media.
6.4 Bluetooth 5.0
The unit features Bluetooth 5.0 for stable and efficient wireless connections. To pair your phone:
- Go to Settings > Connected devices > Bluetooth.
- Enable Bluetooth on both the stereo and your phone.
- Search for available devices on your phone and select "BXLIYER" (or similar name).
- Confirm the pairing code.
Once paired, you can make/receive calls, access your phonebook, and stream music wirelessly.
Image: This image illustrates "Bluetooth 5.0 Technology," showing a smartphone wirelessly connected to the car stereo. The stereo's screen displays music playback information, and icons for Bluetooth phone calls, call records, phonebook, and music are visible, highlighting the enhanced data transmission and accuracy of Bluetooth 5.0.
6.5 Wireless CarPlay & Android Auto
The unit has built-in wireless Apple CarPlay and Android Auto. This allows you to integrate your smartphone's functions directly onto the car stereo screen, including navigation, music, calls, and messages, using voice control (Siri/Google Assistant).
- Ensure Bluetooth and Wi-Fi are enabled on your smartphone.
- On the car stereo, open the "CarPlay" or "Android Auto" app.
- Follow the on-screen prompts to connect your phone wirelessly.
You can also connect via a USB cable for a wired connection.
Image: This image demonstrates the "Built-in CarPlay & Android Auto" feature. It shows a smartphone connected to the car stereo, with the stereo's screen displaying the CarPlay/Android Auto interface, featuring common apps like Phone, Maps, Music, and YouTube Music. This allows users to mirror and control their smartphone via USB cable or Wi-Fi.
6.6 GPS Navigation
The stereo supports both online and offline GPS navigation applications. You can download your preferred navigation apps from the Google Play Store. The unit supports 3D maps and voice guidance.
Image: This image illustrates the "GPS Navigation" feature, displaying a map with a route and current location. It highlights the stereo's ability to support both online and offline navigation applications, ensuring users can navigate without internet access if offline maps are downloaded.
6.7 Mirror-Link Mode
Mirror-Link allows you to mirror your smartphone's screen (iOS or Android) onto the car stereo display. You can control your phone from the stereo screen.
- Connect your smartphone via USB cable or Wi-Fi.
- Open the "Mirror-Link" app on the stereo and follow the instructions.
Image: This image demonstrates "Mirror-Link Mode," where a smartphone's screen is duplicated onto the car stereo display. It shows a mobile game being played, indicating support for mirroring most Android phones and iPhones via Bluetooth or USB connection.
6.8 Split Screen Mode
The split-screen feature allows you to run two applications side-by-side. For example, you can use navigation on one half of the screen while playing music or another app on the other half.
- Open the first app you want to use.
- Press and hold the recent apps button (or swipe up from the bottom and hold, depending on Android version).
- Drag the first app to one side of the screen, then select the second app for the other side.
Image: This image illustrates "Split Screen Mode," showing the car stereo display divided into two sections. On one side, a map application is active, providing navigation, while on the other side, a music player is running. This feature allows users to multitask, such as using Spotify or other applications concurrently with navigation.
6.9 Steering Wheel Control
The unit supports your vehicle's original steering wheel controls. This allows you to easily change tracks, adjust volume, and perform other functions without taking your hands off the wheel, enhancing safety.
To configure: Go to Settings > Steering Wheel Control and follow the on-screen instructions to map your vehicle's buttons.
Image: This image depicts "Steering Wheel Control," showing a car's steering wheel with integrated control buttons. Below it, a graphical representation on the stereo screen displays icons for various functions (e.g., play/pause, skip track, volume, phone call), indicating that users can easily control the stereo's functions directly from their steering wheel for a safer and more enjoyable driving experience.
6.10 Rear Camera Function
The included rear view camera automatically displays the rear view on the stereo screen when the vehicle is shifted into reverse. This assists with safe parking and maneuvering.
Image: This image illustrates "Support Reversing Video." It shows a car's rear camera view displayed on the stereo screen, complete with parking guidelines. A diagram of a car with a rear camera is also shown, emphasizing that connecting a backup camera will automatically switch the stereo to the rear-view display when reversing, aiding in safe parking.
6.11 OBD2 Connection
The unit is compatible with most OBD2 and Wi-Fi OBD2 scanners (sold separately). Connect an OBD2 scanner to your vehicle's OBD port and pair it with the stereo via Bluetooth or Wi-Fi. Use a compatible app (e.g., Torque) to view real-time vehicle data and diagnostic trouble codes.
7. Troubleshooting
| Problem | Possible Cause | Solution |
|---|---|---|
| Unit does not power on. | Incorrect wiring, blown fuse, vehicle ignition off. | Check power connections, inspect vehicle fuses, ensure ignition is on. Consult a professional. |
| No sound. | Volume too low, speaker wires disconnected, incorrect audio output settings. | Increase volume, check speaker wiring, verify audio settings in the system. |
| Bluetooth not connecting. | Bluetooth off on device/stereo, device not in pairing mode, interference. | Ensure Bluetooth is enabled on both devices, put phone in pairing mode, try restarting both devices. |
| GPS signal weak/lost. | GPS antenna obstructed or improperly installed. | Relocate GPS antenna to a clearer position, ensure it's securely connected. |
| Touchscreen unresponsive. | System freeze, temporary software glitch. | Perform a soft reset (refer to specific model instructions for reset button location, usually a small pinhole). |
8. Specifications
| Feature | Detail |
|---|---|
| Model Number | BXLIYER-5449-H04-BXF |
| Operating System | Android 15 |
| CPU | T3 Quad Core Cortex-A7 Processor |
| RAM | 2GB DDR3 |
| ROM | 64GB |
| Display | 9-inch IPS Screen (1280x720 resolution, 178° viewing angle) |
| Audio Output | 4*50W Max |
| Connectivity | Bluetooth 5.0, Dual Band Wi-Fi (2.4GHz/5GHz), 4G (via external USB modem) |
| Features | Wireless CarPlay, Android Auto, GPS Navigation, Mirror-Link, Split Screen, Steering Wheel Control, Rear Camera Input, OBD2 Support, DAB+ Support (external tuner required), Fast Boot, Multicolor Illumination. |
| USB/MicroSD Support | Up to 500GB |
| Item Weight | 2.3 Kilograms |
| Origin | China |
Image: This image highlights the "IPS Screen" technology, featuring a vibrant dolphin graphic. It specifies the screen's resolution as 1280x720 and a wide viewing angle of 178 degrees, contrasting it with other screens that might offer lower resolutions (960x800, 960x480).
9. Maintenance
- Cleaning: Use a soft, dry cloth to clean the screen and unit. Avoid abrasive cleaners or solvents.
- Software Updates: Periodically check for system software updates via the Settings menu to ensure optimal performance and access to new features.
- Data Backup: Regularly back up important data from the unit to an external storage device.
10. Warranty and Support
For warranty information, please refer to the documentation included with your purchase or contact your retailer. For technical support, please reach out to BXLIYER customer service through the contact information provided on their official website or your purchase platform.