
1. Important Safeguards
Please read all instructions carefully before using the Ranvaira Slushie Machine & Ice Cream Maker. Keep this manual for future reference. Failure to follow these instructions may result in electric shock, fire, or serious injury.
- Always ensure the machine is placed on a stable, flat, and dry surface.
- Do not immerse the main unit, cord, or plug in water or other liquids.
- Unplug the machine from the outlet when not in use, before assembling or disassembling parts, and before cleaning.
- Close supervision is necessary when any appliance is used by or near children.
- Avoid contact with moving parts.
- Do not operate any appliance with a damaged cord or plug, or after the appliance malfunctions or has been damaged in any manner.
- Use only attachments recommended or sold by the manufacturer.
- Do not use outdoors.
- Do not let the cord hang over the edge of a table or counter, or touch hot surfaces.
- Do not place on or near a hot gas or electric burner, or in a heated oven.
- Always turn off the machine when the vessel is empty to prevent the auger from freezing and making a scraping sound, which can damage the motor.
2. Product Overview
The Ranvaira Slushie Machine & Ice Cream Maker Model S1 is designed to create a variety of frozen treats, including slushies, milkshakes, frappés, and soft ice cream, without the need for pre-chilling or ice. It features a 40 oz capacity vessel, multiple preset modes, and adjustable temperature control for customized texture.
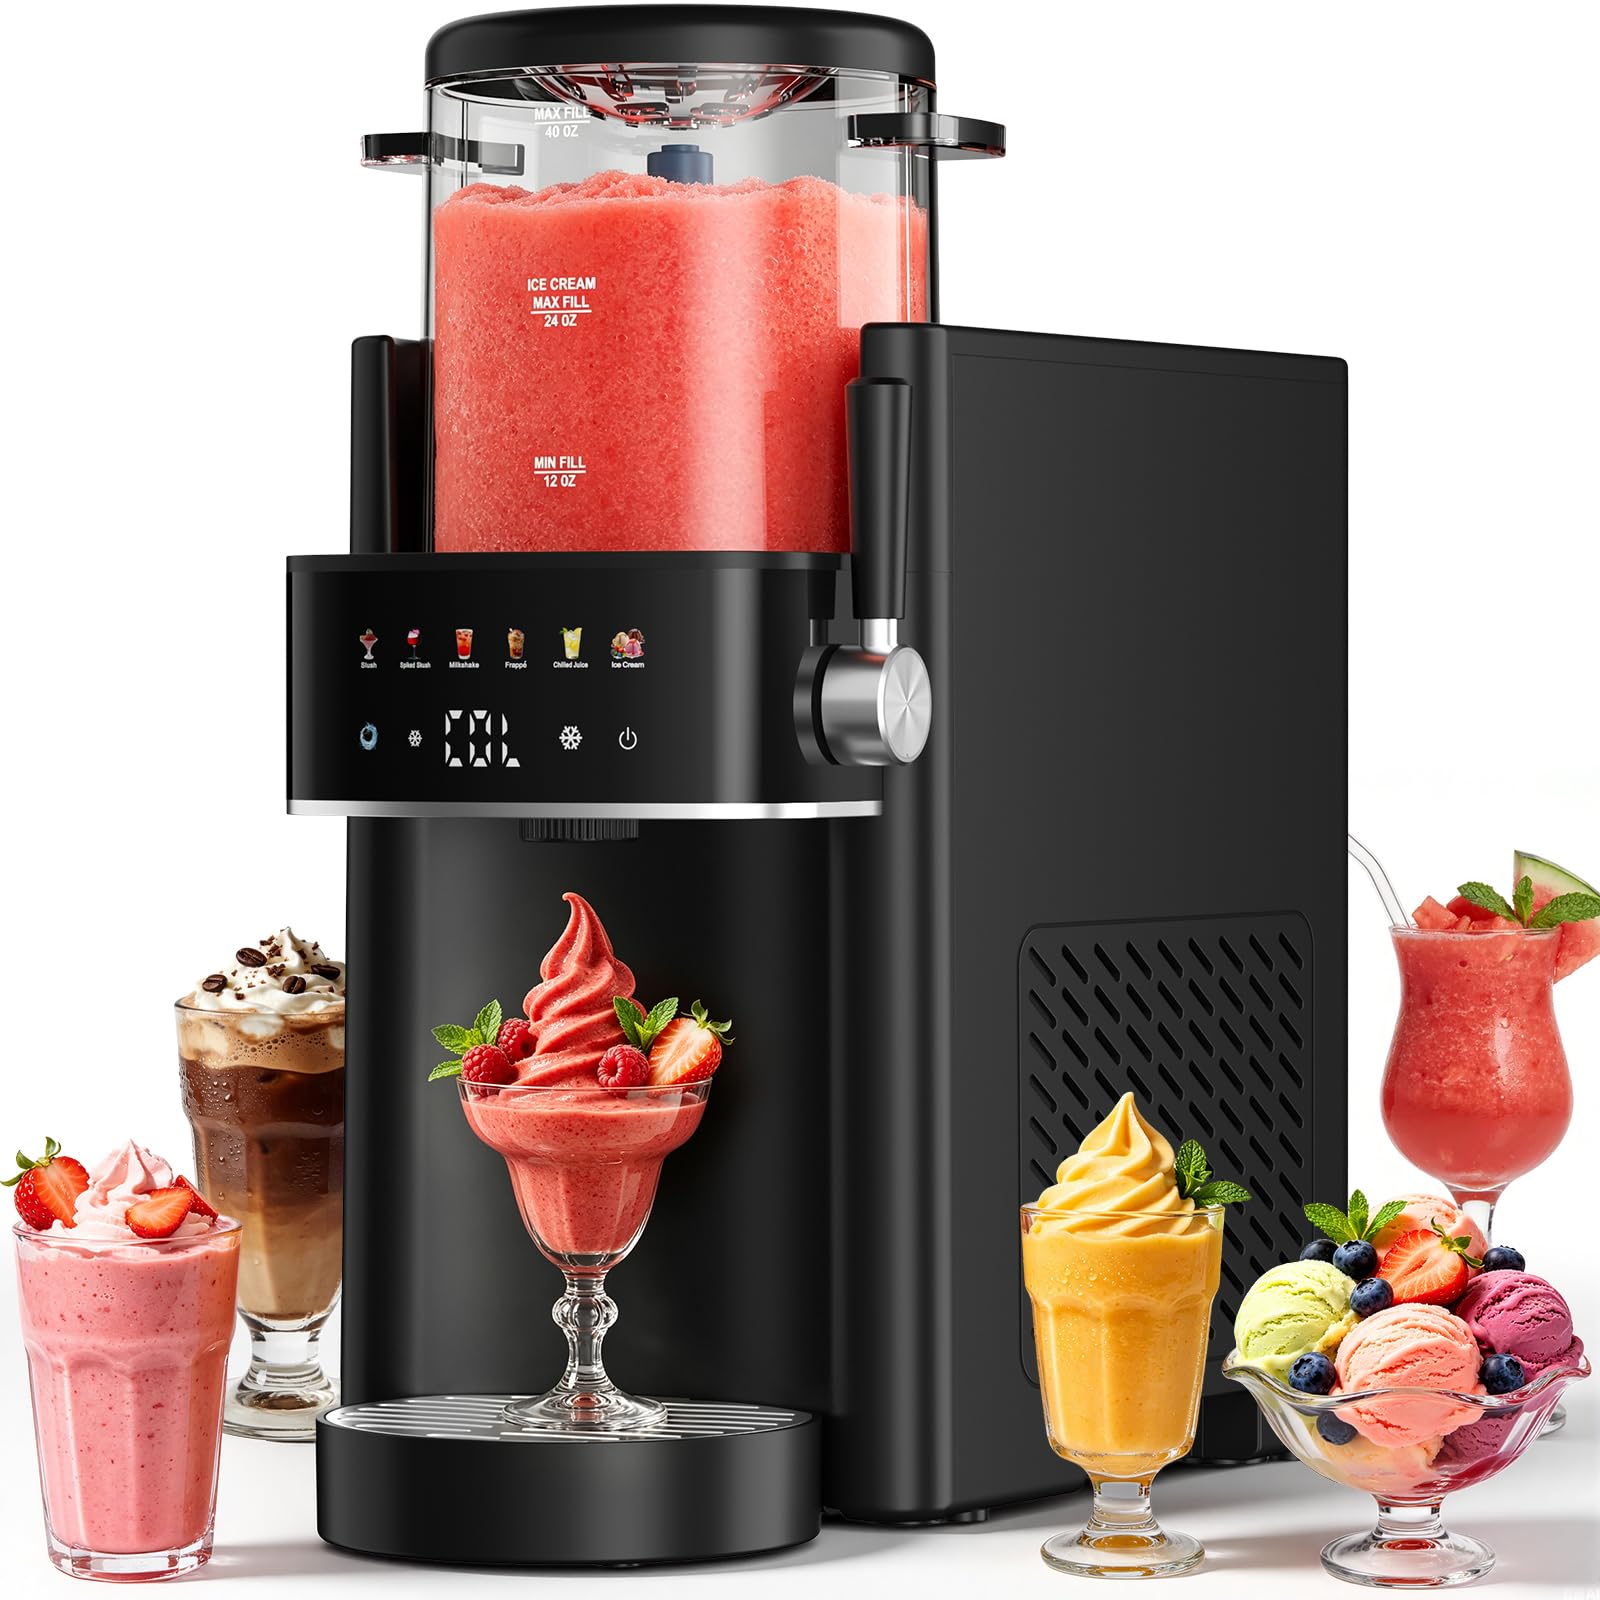
The Ranvaira Slushie Machine and Ice Cream Maker, Model S1, in black.

The machine offers dual functionality for making both soft ice cream and slushies.
3. Components
Familiarize yourself with the main components of your Ranvaira Slushie Machine:
- Main Unit (with control panel and cooling system)
- Removable Processing Vessel (40 oz capacity)
- Lid
- Mixing Paddle / Auger
- Dispensing Handle
- Drip Tray
- Power Cord
- Cleaning Brush

Exploded view of the Ranvaira Slushie Machine components.
4. Setup
4.1 Unboxing and Initial Cleaning
- Carefully remove all components from the packaging.
- Wash the removable processing vessel, lid, mixing paddle, and drip tray with warm, soapy water. Rinse thoroughly and dry completely.
- Wipe the main unit with a damp cloth. Do not immerse the main unit in water.
4.2 Placement
- Place the machine on a clean, dry, and level countertop.
- Ensure there is adequate ventilation around the machine, especially the rear cooling vents.
- Plug the power cord into a grounded electrical outlet.

Visual guide for initial setup and first use.
5. Operation
5.1 Preparing Your Ingredients
- Prepare your desired liquid mixture (juice, soda, coffee, cocktail mix, milk, cream, etc.).
- Ensure the liquid is at refrigerator temperature for optimal results.
- Do not exceed the MAX FILL line (40 oz) for slushies or the ICE CREAM MAX FILL line (24 oz) for ice cream, and ensure the liquid is above the MIN FILL line (12 oz).
5.2 Making Frozen Treats
- Assemble the machine: Place the mixing paddle into the processing vessel, then secure the lid. Insert the assembled vessel into the main unit.
- Pour your prepared liquid into the processing vessel.
- Plug in the machine and press the power button to turn it on.
- Select your desired program using the intuitive LED touchscreen. The machine offers 6 one-touch programs:
- Milkshake: For creamy, thick milkshakes.
- Slush: For classic icy slushies.
- Spiked Slush: Optimized for alcoholic slushie mixtures.
- Frozen Juice: For fruit-based frozen drinks.
- Frappé: For coffee-based frozen beverages.
- Ice Cream: For soft-serve ice cream consistency.
- The machine will begin the freezing and mixing process. The display will show the remaining time or temperature.
- To adjust the texture (thicker or thinner), use the adjustable temperature and texture settings on the control panel during operation.
- Once the program is complete, the machine will maintain the frozen texture.

The LED touchscreen offers six preset modes for various frozen treats.

The LED touchscreen allows for precise temperature and texture control.
5.3 Dispensing
- Place a cup or bowl under the dispensing spout.
- Pull the dispensing handle forward to release the frozen treat.
- Push the handle back to stop dispensing.
5.4 Pro Tip: Motor Protection
To protect the motor and ensure longevity of your machine, always turn off the machine when the vessel is empty. This prevents the auger from freezing and producing a scraping sound, which indicates potential motor strain.
6. Maintenance and Cleaning
Regular cleaning ensures optimal performance and hygiene of your Ranvaira Slushie Machine.
6.1 Self-Cleaning Function
- After dispensing all contents, pour approximately 12-16 oz of clean water into the processing vessel.
- Select the 'Self-Clean' mode (refer to your control panel for the specific icon).
- Allow the machine to cycle through the cleaning program.
- Once complete, dispense the water and unplug the machine.
6.2 Deep Cleaning
- Dishwasher Safe: The removable processing vessel, lid, mixing paddle, and drip tray are top-rack dishwasher safe.
- Hand Washing: For a deeper clean, hand wash these components with warm, soapy water and the included specialized cleaning brush for hard-to-reach areas. Rinse thoroughly and dry completely before reassembly or storage.
- Main Unit: Wipe the exterior of the main unit with a damp cloth. Do not use abrasive cleaners or immerse in water.

The machine offers multiple cleaning options for convenience.
7. Troubleshooting
If you encounter issues with your Ranvaira Slushie Machine, refer to the following common problems and solutions:
| Problem | Possible Cause | Solution |
|---|---|---|
| Machine does not turn on. | Not plugged in; power outlet issue; machine malfunction. | Ensure the power cord is securely plugged into a working outlet. Check the circuit breaker. If the issue persists, contact customer support. |
| Liquid leaks from the bottom. | Improper assembly of the processing vessel or seal; damaged seal. | Ensure the processing vessel is correctly seated and all seals are properly in place and undamaged. If a seal is damaged, contact customer support for a replacement. |
| Slushie is too thick or too thin. | Incorrect temperature setting; ingredient ratio. | Adjust the temperature settings on the control panel to achieve the desired consistency. Ensure your liquid mixture follows recommended recipes for optimal results. |
| Scraping sound during operation. | Vessel is empty; auger is frozen. | Turn off the machine immediately. Ensure there is sufficient liquid in the vessel. If the auger is frozen, allow it to thaw slightly before restarting. Refer to the motor protection tip in Section 5.4. |
| Machine takes too long to freeze. | Ingredients not cold enough; ambient temperature too high; overfilling. | Use refrigerated ingredients. Operate the machine in a cool environment. Do not exceed the maximum fill lines. |
8. Specifications
Technical specifications for the Ranvaira Slushie Machine & Ice Cream Maker Model S1:
| Feature | Detail |
|---|---|
| Brand | Ranvaira |
| Model Number | S1 |
| Color | Black |
| Capacity | 40 Fluid Ounces |
| Special Features | Touchpad Control, Adjustable Temperature, Automatic Clean, Compact Design |
| Included Components | User manual, quick use guide, recipe book |
| Recommended Uses | Residential |
| Item Dimensions (L x W x H) | 11.81"L x 7.28"W x 15.75"H |
| Operation Mode | Automatic |
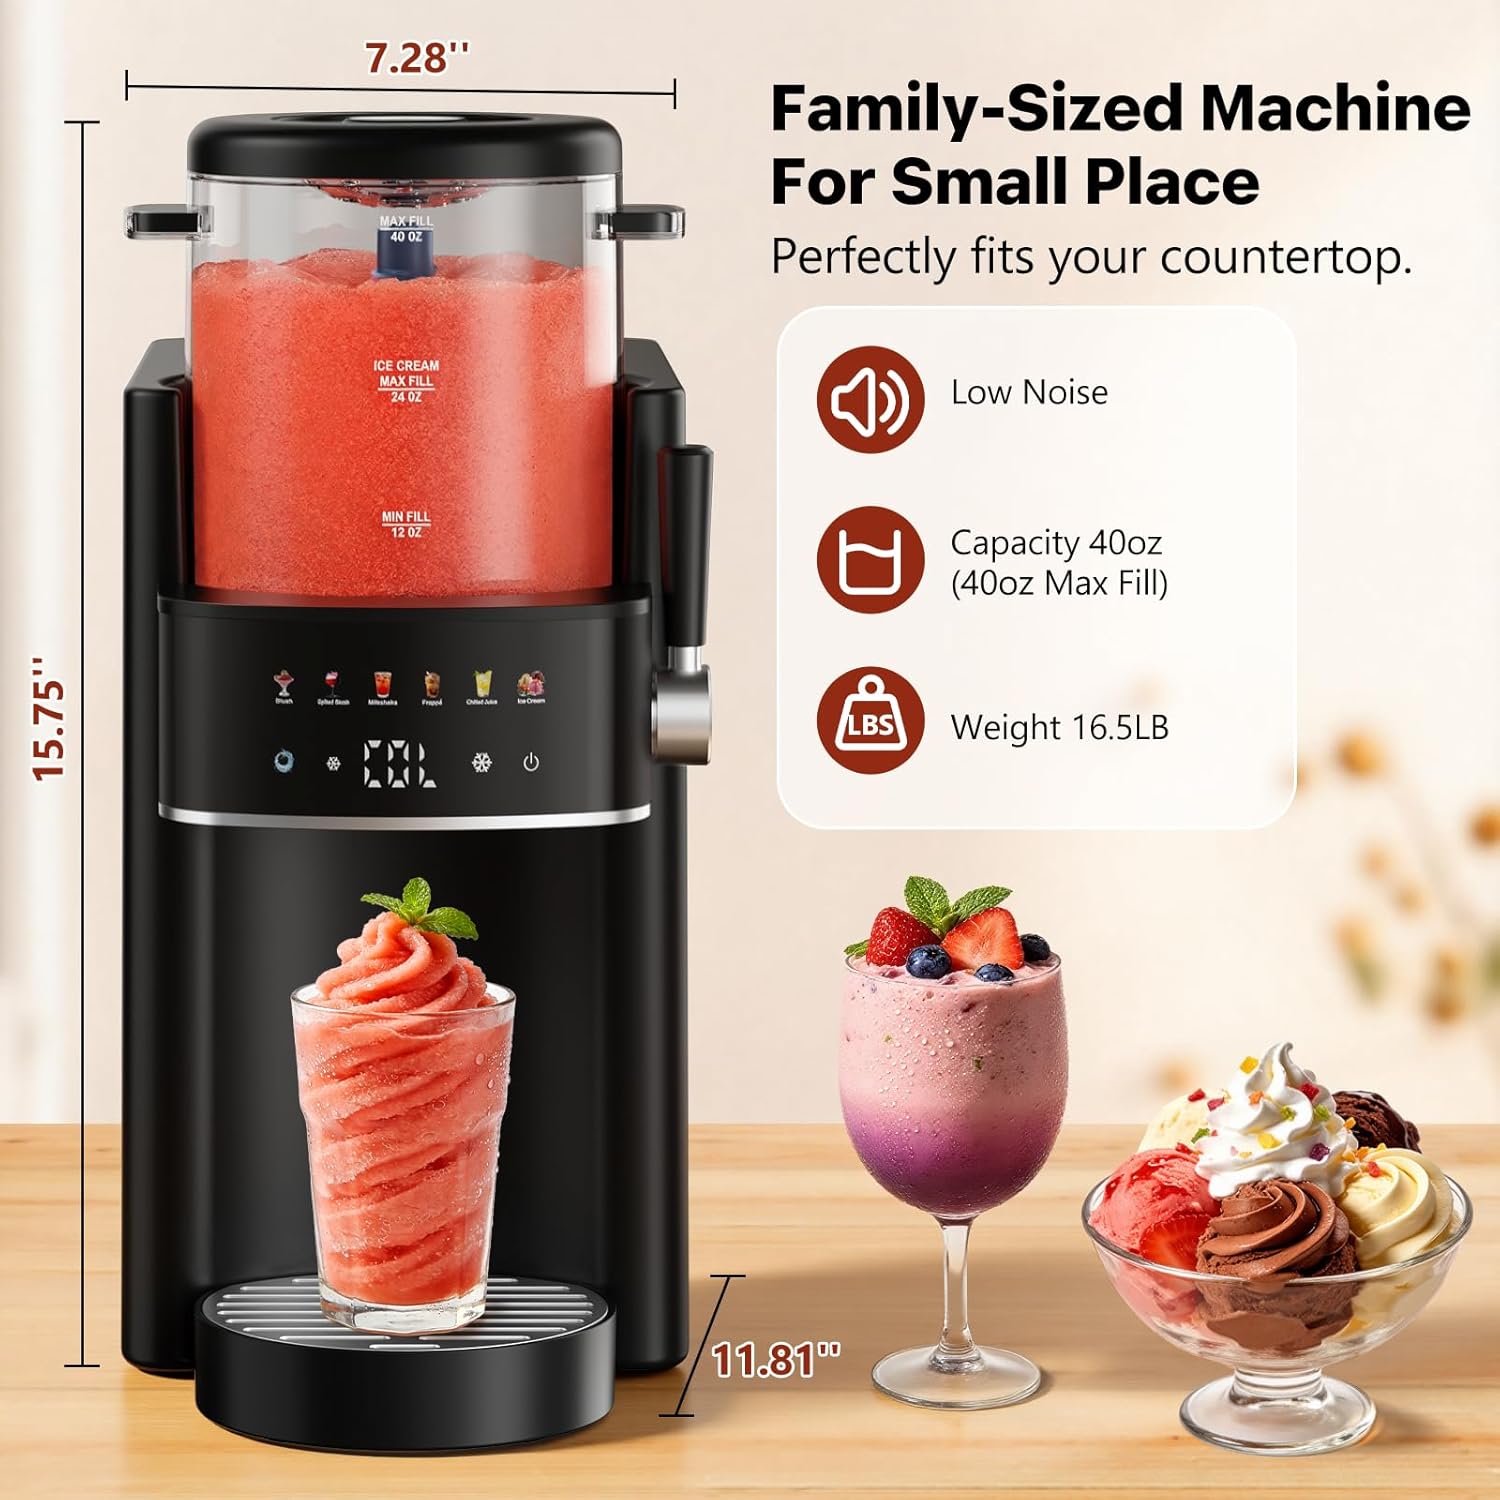
Dimensions and key features of the Ranvaira Slushie Machine.
9. Warranty and Support
Ranvaira products are manufactured to high-quality standards. For information regarding warranty coverage, please refer to the warranty card included with your purchase or contact Ranvaira customer support.
Customer Support
For technical assistance, troubleshooting, or warranty claims, please contact Ranvaira customer support through the contact information provided on our official website or your purchase documentation. Please have your model number (S1) and purchase date available when contacting support.