
1. Introduction
Thank you for choosing the Jebao FD Series Automatic Aquarium Feeder. This device is designed to provide reliable and convenient automatic feeding for your fish in both indoor aquariums and outdoor ponds. With programmable feeding schedules and adjustable portion control, it ensures your aquatic pets are fed consistently, even when you are away. Please read this manual thoroughly before installation and operation to ensure proper use and longevity of your feeder.
2. Safety Instructions
- Always disconnect the power supply before performing any maintenance or cleaning.
- Do not immerse the main control unit or power adapter in water. The feeder unit is weather-resistant, but the power adapter is not.
- Ensure the power cord is not damaged or pinched.
- Keep the feeder and power adapter out of reach of children and pets.
- Use only the provided power adapter. Using an incorrect adapter may damage the device or pose a safety risk.
- This product is intended for feeding fish food only. Do not use it for other substances.
- Ensure the feeder is securely mounted to prevent it from falling into the water.
3. Package Contents
Please check the package for the following items:
- Jebao FD Series Automatic Feeder Unit (Food container and dispenser)
- Control Panel with Mounting Bracket
- Power Adapter (12V 1A)
- Large Particle Dispensing Screw
- Small Particle Dispensing Screw
- Mounting Clip/Hardware
4. Product Features
- Multiple Capacity Options: Available in 4L (FD-40), 5.5L (FD-55), and 8.5L (FD-85) to suit various aquarium and pond sizes.
- Programmable Automatic Feeding: LCD display allows for custom feeding schedules, ensuring timely food dispensing.
- Precision Adjustable Portion: Adjust feeding quantity to deliver accurate food amounts, preventing overfeeding and water pollution.
- One-Key Manual Feeding: Instant manual feeding option for daily checks or additional feeding.
- Weather-Resistant Design: Durable housing suitable for both indoor tanks and outdoor ponds, ensuring a long service life.
- Adjustable Feeding Direction: The dispenser spout can be adjusted left and right to direct food flow.

Image: The Jebao Automatic Feeder showcasing its waterproof design, suitable for outdoor use.
5. Setup
5.1 Assembly and Mounting
- Attach the control panel bracket to a stable surface near your aquarium or pond using the provided mounting hardware. Ensure it is secure and level.
- Connect the feeder unit to the control panel arm. The arm allows for extension and adjustment.
- Position the feeder so that the food dispensing spout is directly over the water surface where you want the food to be released.
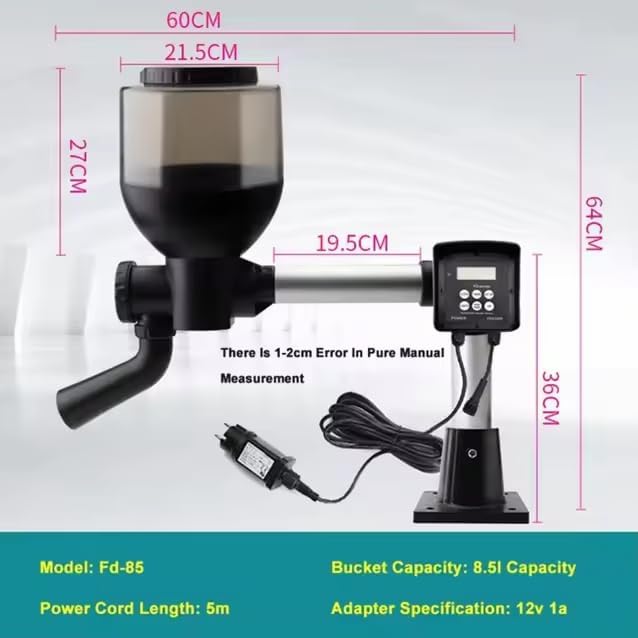
Image: A diagram illustrating the dimensions of the FD-85 model, including height, width, and power cord length.
5.2 Loading Food and Selecting Dispensing Screw
- Open the lid of the food container.
- Select the appropriate dispensing screw based on your fish food particle size:
- Small Particles Screw: Suitable for fish food under 5mm.
- Large Particles Screw: Suitable for fish food below 8mm.
- Insert the chosen screw into the feeder mechanism.
- Fill the food container with dry fish food. Do not overfill.
- Close the lid securely to maintain food freshness and prevent moisture ingress.

Image: Two dispensing screws are shown, one designed for large food particles (up to 8mm) and another for small food particles (under 5mm).
5.3 Power Connection
Connect the power adapter to the control panel and then plug it into a standard electrical outlet. The LCD screen should illuminate.
5.4 Adjusting Feeding Direction
The feeder spout can be rotated left or right to adjust the direction of food dispensing, allowing you to target specific areas of your aquarium or pond.

Image: Arrows indicate the ability to adjust the feeding spout left and right for precise food distribution.
6. Operating Instructions
6.1 Control Panel Overview

Image: A detailed view of the control panel, showing the LCD screen and buttons for CLOCK, TIMING, SET UP, QUANTITY, HAND FEED, and OK.
The control panel features an LCD display and several buttons for programming:
- CLOCK: Used to set the current time.
- TIMING: Used to set feeding schedules.
- SET UP: Used to navigate through settings and adjust values.
- QUANTITY: Used to adjust the amount of food dispensed per feeding.
- HAND FEED: Initiates an immediate manual feeding.
- OK: Confirms selections and saves settings.
6.2 Setting the Current Time
- Press the CLOCK button. The hour display will start flashing.
- Use the SET UP button to adjust the hour.
- Press CLOCK again to move to the minute display.
- Use the SET UP button to adjust the minutes.
- Press OK to confirm and save the current time.
6.3 Programming Automatic Feeding Schedules
The feeder allows you to set up to 6 meals per day and up to 9 servings per meal.
- Press the TIMING button. The first feeding time (e.g., '1') will appear, and the hour display will flash.
- Use the SET UP button to adjust the desired feeding hour for this meal.
- Press TIMING again to move to the minute display.
- Use the SET UP button to adjust the desired feeding minutes.
- Press TIMING again to move to the serving quantity setting.
- Use the QUANTITY button to select the number of servings (1-9) for this meal. Each serving dispenses a small amount of food. Adjust based on your fish's needs and food type.
- Press OK to confirm and save the settings for this feeding time.
- Repeat steps 1-7 for additional feeding times (up to 6). If you do not wish to set all 6 times, simply press OK after setting your desired number of meals.
6.4 Manual Feeding
To dispense food immediately, press the HAND FEED button. The feeder will dispense one serving of food. You can press it multiple times for additional servings.
6.5 Pause Function (Disabling Automatic Feeding)
To temporarily stop automatic feeding without deleting your programmed schedules, you can usually cycle through the feeding times using the TIMING button until you reach an 'OFF' or '—:—' option, or by holding the TIMING button. Refer to the specific on-screen prompts for your model. To re-enable, simply set the feeding times again or reactivate the 'ON' option.
7. Maintenance
7.1 Cleaning the Food Container
- Disconnect the power adapter.
- Empty any remaining food from the container.
- Remove the food container from the feeder unit.
- Wash the container with warm water and a mild, non-toxic detergent. Rinse thoroughly to remove all soap residue.
- Ensure the container is completely dry before refilling with food and reattaching to the feeder unit. Moisture can cause food to clump.
7.2 Cleaning the Dispensing Mechanism
- Disconnect the power adapter.
- Carefully remove the dispensing screw.
- Use a small brush or cloth to clean any food residue from the screw and the dispensing chute.
- Ensure all parts are dry before reassembling.
8. Troubleshooting
- Feeder not dispensing food:
- Check if the food container is empty.
- Ensure the dispensing screw is correctly installed.
- Verify there are no blockages in the dispensing chute.
- Check if the feeder is powered on and the schedules are correctly set.
- Incorrect feeding times or quantities:
- Re-check the current time setting (Section 6.2).
- Review and re-program your feeding schedules (Section 6.3).
- LCD display not working:
- Ensure the power adapter is securely connected to both the control panel and the electrical outlet.
- Check the power outlet with another device to confirm it is functional.
- Food clumping in container:
- Ensure the food container lid is securely closed.
- Avoid placing the feeder in areas with high humidity.
- Ensure food is completely dry before loading.
9. Specifications
| Feature | Specification |
|---|---|
| Model Numbers | FD-40, FD-55, FD-85 |
| Capacity | FD-40: 4 Liters, FD-55: 5.5 Liters, FD-85: 8.5 Liters |
| Power Cord Length | 5 meters (approx. 16.4 feet) |
| Adapter Specification | 12V 1A |
| Max. Feeding Meals per Day | 6 |
| Max. Servings per Meal | 9 |
| Suitable Food Particle Size | Up to 8mm (with appropriate screw) |
| Product Dimensions (FD-85) | Approx. 60cm (L) x 21.5cm (W) x 64cm (H) |
| Manufacturer | Jebao |
10. Warranty and Support
This product comes with a standard manufacturer's warranty. For warranty claims, technical support, or any questions not covered in this manual, please contact your retailer or the manufacturer directly. Please retain your proof of purchase for warranty purposes.