
1. Introduction
This manual provides essential instructions for the safe and efficient operation, installation, and maintenance of your DGIVOVO GFCI Wall Mounted Power Washer, Model G5055-OR. Please read this manual thoroughly before using the product and retain it for future reference.
The DGIVOVO G5055-OR is designed for various cleaning tasks, featuring a retractable hose, adjustable pressure settings, and multiple nozzles for versatile applications.
2. Safety Information
WARNING: Always follow basic safety precautions when using this product to reduce the risk of injury, electric shock, or fire.
- Read all instructions before using the appliance.
- Do not operate the pressure washer if you are tired or under the influence of drugs or alcohol.
- Ensure the power source matches the voltage specified on the product label.
- Always wear appropriate personal protective equipment, including safety glasses, gloves, and hearing protection.
- Never point the spray gun at people, pets, or electrical devices. High-pressure spray can cause serious injury.
- Keep children and bystanders away from the operating area.
- Do not use the pressure washer in explosive atmospheres, such as in the presence of flammable liquids, gases, or dust.
- Always disconnect the power supply before performing any maintenance or cleaning.
- This appliance is equipped with a Ground Fault Circuit Interrupter (GFCI) for your safety. If the GFCI trips, reset it. If it trips repeatedly, discontinue use and contact support.
- Ensure all connections are secure to prevent leaks and maintain pressure.
3. Setup and Installation
Proper installation is crucial for the safe and effective operation of your wall-mounted pressure washer. Follow these steps carefully.
Figure 3.1: Installation steps for the DGIVOVO Wall Mounted Pressure Washer. This image illustrates the three main steps: 1) Defining mounting height and marking points, 2) Installing the base frame and screws, and 3) Setting up the pressure washer and inserting the hover pin. The unit also features 180° rotation capability.
3.1 Mounting the Unit
- Select Location: Choose a sturdy wall surface near a GFCI-protected electrical outlet and a water source. Ensure sufficient space for the 100ft hose to extend and retract.
- Mark Mounting Points: Use the provided mounting template (if applicable) or measure the base frame to mark the drill points on the wall. Ensure the marks are level.
- Drill Holes: Drill pilot holes at the marked locations suitable for the provided screws and wall anchors.
- Install Base Frame: Securely attach the base frame to the wall using the screws and anchors. Ensure it is firmly fixed.
- Mount Pressure Washer: Carefully lift the pressure washer unit and slide it onto the installed base frame. Insert the hover pin or locking mechanism to secure the unit in place.
- Connect Water Supply: Attach a standard garden hose to the water inlet connection on the pressure washer. Ensure the connection is tight to prevent leaks.
- Connect Power: Plug the GFCI power cord into a suitable GFCI-protected electrical outlet. Test the GFCI by pressing the "TEST" and "RESET" buttons.
The unit is designed for 180° rotation on its mount, allowing for flexible positioning during use.
4. Operation
Familiarize yourself with the controls and features before operating the pressure washer.
4.1 Remote Control and Pressure Adjustment
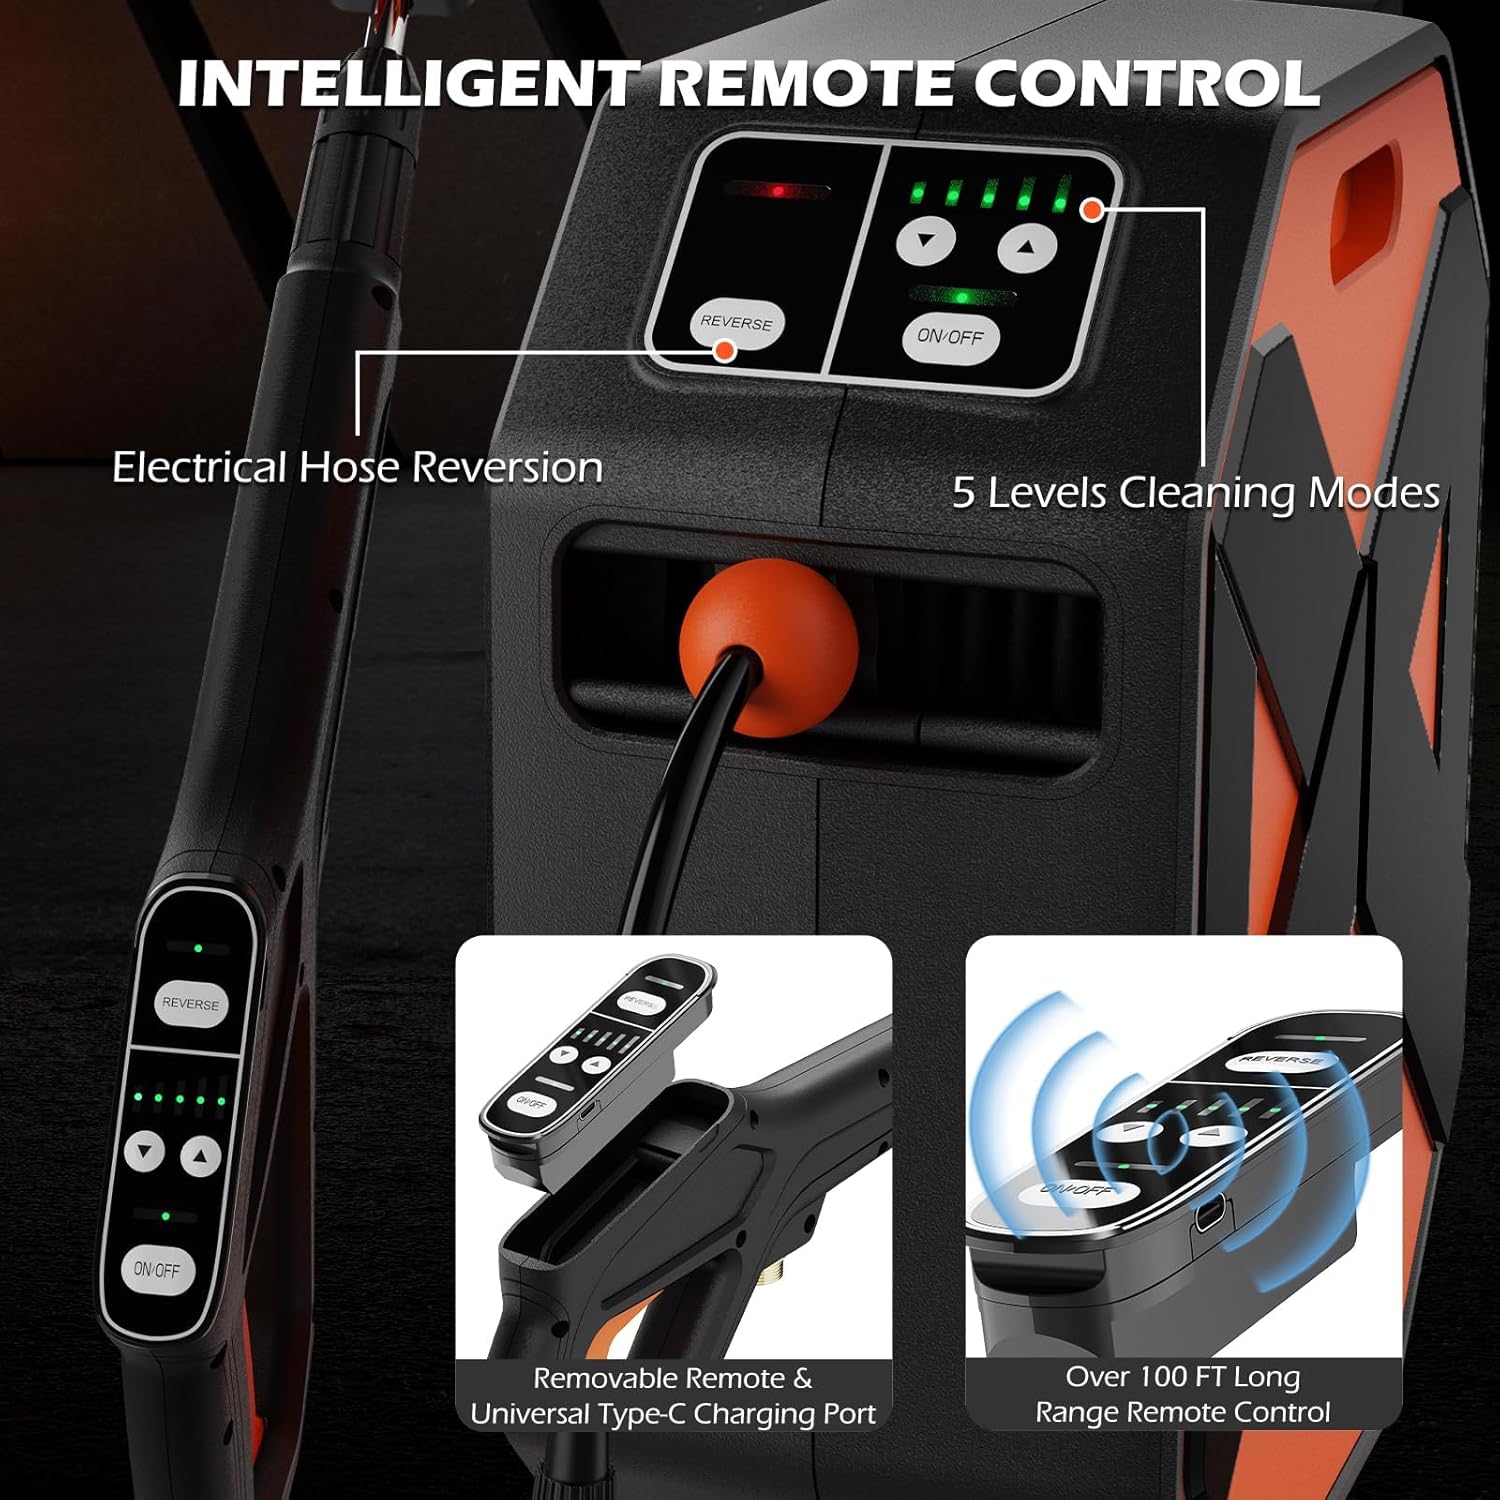
Figure 4.1: Intelligent Remote Control and Main Unit. This image highlights the remote control features, including electrical hose reversion and 5 levels of cleaning modes. The remote is removable, charges via USB-C, and offers over 100ft long-range control.
- Power On/Off: Press the "ON/OFF" button on the remote control or the main unit to power the pressure washer on or off.
- Adjust Pressure: Use the up and down arrow buttons on the remote or main unit to cycle through the 5 available pressure levels. The indicator lights will show the selected pressure.
- Hose Reversion: Press the "REVERSE" button to electrically retract the 100ft hose back into the unit. Ensure the hose is free of kinks or obstructions during retraction.
- Remote Control Range: The remote control operates effectively up to 100 feet, providing convenience for large cleaning areas.
- Remote Charging: The removable remote control features a universal Type-C charging port. Charge as needed to maintain functionality.
4.2 Nozzle Selection and Application

Figure 4.2: Nozzle Types and Spray Modes. This image displays the various quick-connect nozzles (Red-0°, Yellow-15°, Green-25°, White-40°) and their recommended uses, along with the Turbo Nozzle for concentrated cleaning and an efficient Foam Cannon for detergent application.
The pressure washer includes 5 quick-connect nozzles and a foam cannon for various cleaning tasks:
- Red (0° Nozzle): Provides a concentrated, high-impact stream. Use with extreme caution for tough spots on durable surfaces only. Not recommended for general cleaning.
- Yellow (15° Nozzle): Offers a powerful, narrow spray for intensive cleaning of small areas, such as removing stubborn dirt from concrete or brick.
- Green (25° Nozzle): A versatile, medium-angle spray suitable for general cleaning of most surfaces, including driveways, patios, and siding.
- White (40° Nozzle): Delivers a wide, gentle spray for light cleaning and rinsing of delicate surfaces like vehicles, boats, or windows.
- Black (Foam Cannon): Used for applying detergent or soap. Fill the cannon with appropriate cleaning solution, attach it, and spray to cover the surface before pressure washing.
- Turbo Nozzle: Creates a rotating jet of water for powerful cleaning over a wider area, ideal for heavily soiled surfaces.
Always test the spray pattern and pressure on an inconspicuous area before cleaning the main surface.
4.3 General Usage
Video 4.1: Demonstration of the DGIVOVO Wall Mounted Pressure Washer in use. This video showcases the remote control functionality, hose extension and retraction, and general cleaning applications, including the 5 pressure levels.
- Ensure the water supply is turned on and the pressure washer is plugged into a GFCI outlet.
- Turn on the pressure washer using the remote or main unit.
- Squeeze the trigger on the spray gun to begin spraying. Release the trigger to stop the flow.
- Maintain a safe distance from the surface being cleaned to avoid damage.
- After use, turn off the pressure washer, disconnect the water supply, and relieve any remaining pressure by squeezing the trigger.
- Retract the hose using the electrical reversion feature.
5. Maintenance
Regular maintenance ensures the longevity and optimal performance of your pressure washer.
- Clean Nozzles: Periodically clean the nozzle tips to remove any blockages. A clogged nozzle can cause pressure fluctuations.
- Inspect Hose: Check the high-pressure hose for kinks, cuts, or abrasions before each use. Replace if damaged.
- Check Connections: Ensure all water and hose connections are tight and free of leaks.
- Winter Storage: If storing in freezing temperatures, drain all water from the pump, hose, and spray gun to prevent damage. Consider using a pump protector.
- Clean Exterior: Wipe down the exterior of the unit with a damp cloth to remove dirt and debris.
6. Troubleshooting
Refer to this section for common issues and their solutions.
| Problem | Possible Cause | Solution |
|---|---|---|
| No power to the unit. | Power cord unplugged, GFCI tripped, faulty outlet. | Ensure cord is securely plugged in. Reset GFCI. Test outlet with another device. |
| Low pressure. | Insufficient water supply, clogged nozzle, air in pump, incorrect nozzle. | Check water source. Clean or replace nozzle. Bleed air from pump by running water through it without power. Select appropriate nozzle. |
| Hose not retracting. | Hose kinked or obstructed, remote control battery low, motor issue. | Check for obstructions and straighten hose. Charge remote control. If issue persists, contact support. |
| Water leaks. | Loose connections, damaged O-rings, cracked hose. | Tighten all connections. Inspect and replace O-rings if worn. Replace damaged hose. |
If you encounter issues not listed here or if solutions do not resolve the problem, please contact customer support.
7. Specifications
Key technical specifications for the DGIVOVO GFCI Wall Mounted Power Washer, Model G5055-OR.
- Brand: DGIVOVO
- Model Number: G5055-OR
- Power Source: AC Electric
- Maximum Pressure: 5000 PSI (as advertised)
- Hose Length: 100 feet (Retractable)
- Product Dimensions (L x W x H): 22" x 8" x 18"
- Nozzles Included: 0°, 15°, 25°, 40°, Foam Cannon, Turbo Nozzle
- Special Features: GFCI Protection, Wall Mounted, 180° Rotation, Remote Control, Electrical Hose Reversion
- UPC: 717363648052, 717363647444
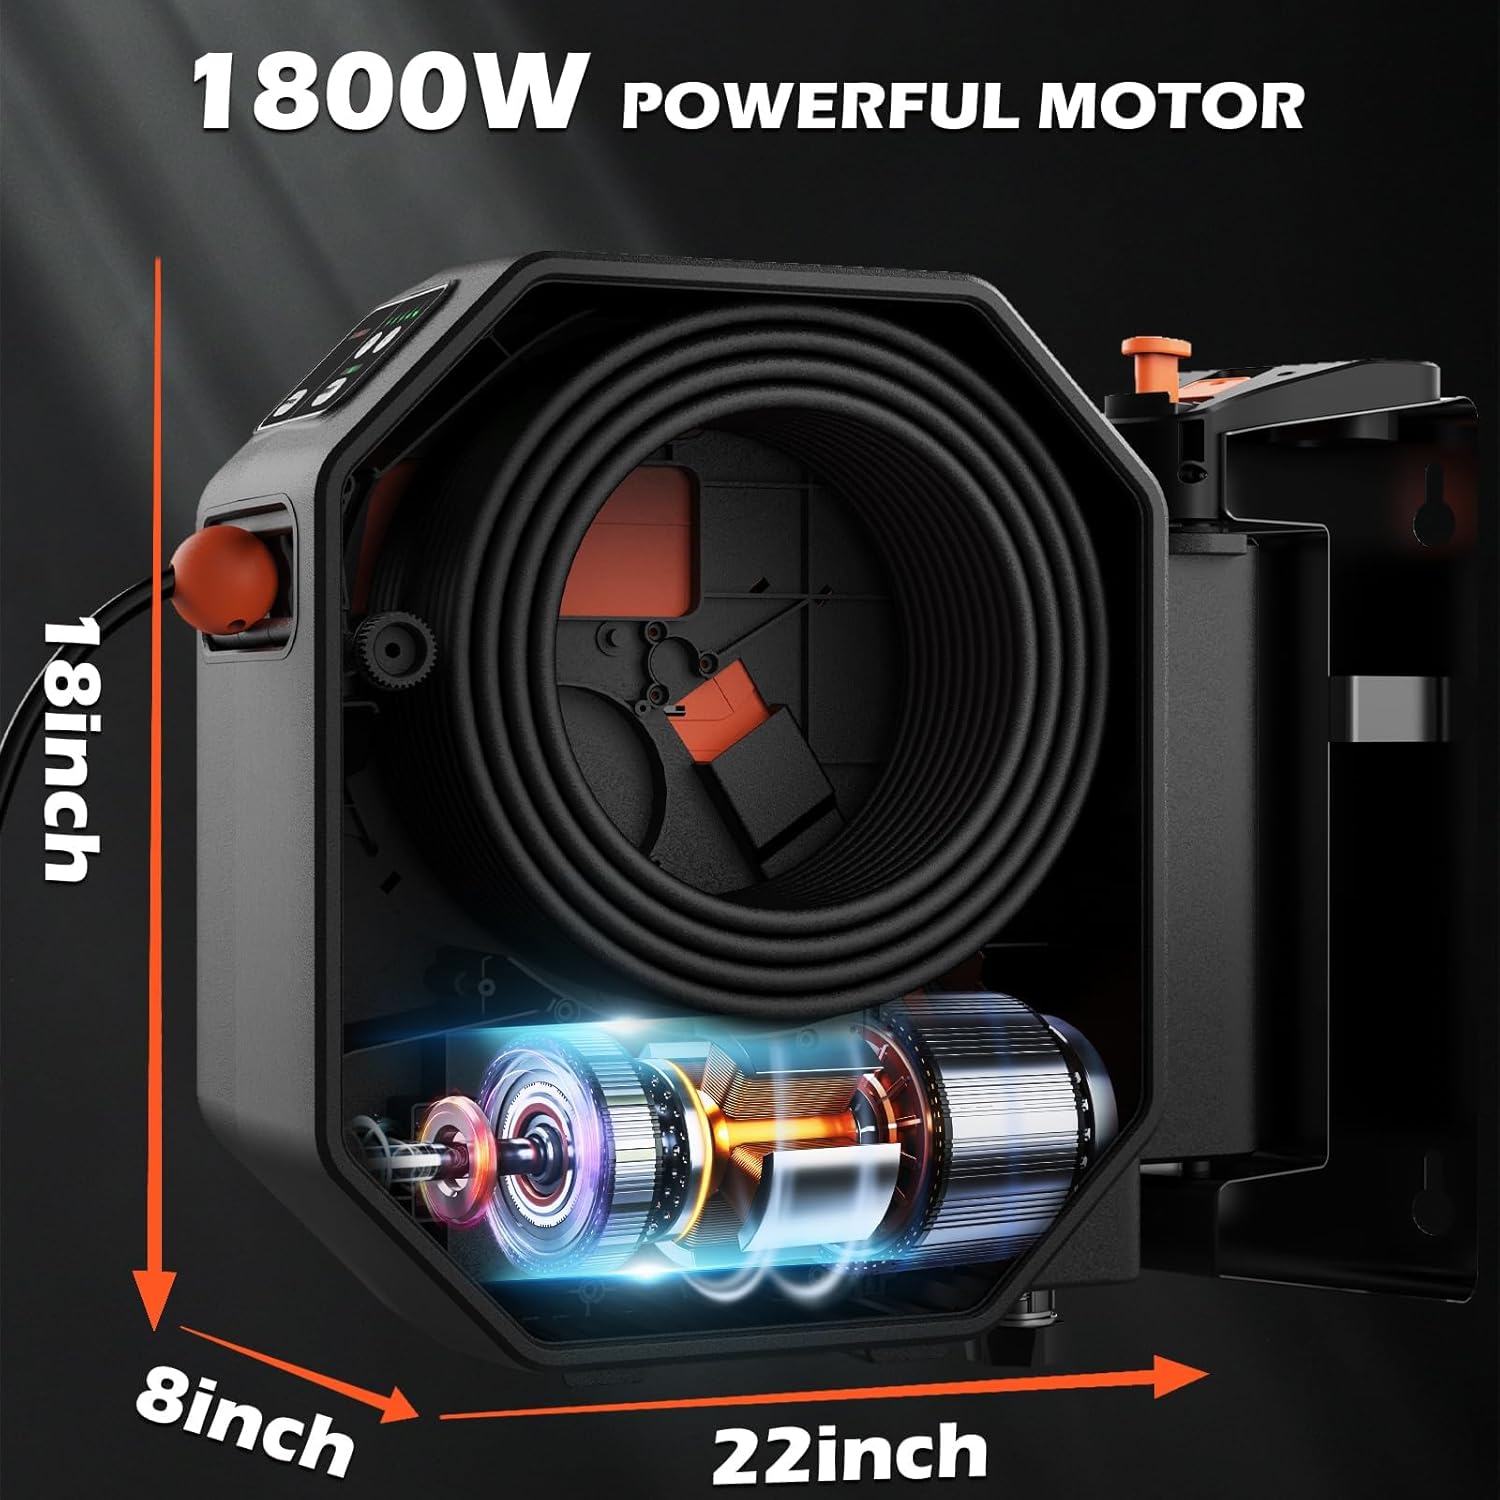
Figure 7.1: Product Dimensions and Motor. This image illustrates the physical dimensions of the pressure washer unit (18"H x 8"W x 22"L) and highlights the internal 1800W powerful motor.
8. Warranty and Support
For warranty information and customer support, please refer to the documentation included with your purchase or contact DGIVOVO customer service directly. Keep your purchase receipt as proof of purchase for any warranty claims.
Contact Information: Please visit the official DGIVOVO website or refer to your product packaging for the most current customer support contact details.