
1. Introduction
The Zopsc 4K 2x2 Video Wall Controller is designed to split a single High-Definition Multimedia Interface (HD Multimedia Interface), DVI, or USB-C input source into four HD Multimedia Interface outputs, creating a dynamic video wall display. This device supports 4K resolution at 30Hz and Full HD at 60Hz, offering 13 distinct splicing modes and a 90-degree rotation capability for flexible display configurations. Its plug-and-play design ensures straightforward setup and operation for various applications, including digital signage, control rooms, and multimedia presentations.
2. Package Contents
Please verify that all items are present in the package:
- 1 x Video Wall Controller
- 1 x Remote Control
- 1 x Power Supply Cord
- 1 x User Manual
3. Product Overview
Familiarize yourself with the ports and controls of the Zopsc 4K 2x2 Video Wall Controller.
3.1 Front Panel
The front panel features input ports and control buttons for easy access:
- IN: HD Multimedia Interface Input port.
- USBC IN: USB-C Input port.
- DVI IN: DVI Input port.
- Indicator Lights: LEDs for USB-C, DVI, OUT1, OUT2, OUT3, OUT4 to show active status.
- IR: Infrared receiver for the remote control.
- Switch: Button to cycle through input sources.
- Mode: Button to cycle through splicing modes.

Figure 1: Front Panel of the Video Wall Controller
3.2 Rear Panel
The rear panel provides output ports and power connections:
- OUT 1-4: HD Multimedia Interface Output ports for connecting up to four displays.
- SPDIF: Digital audio output.
- RS232: Serial port for advanced control.
- DC 5V/2A: Power input port.
- POWER: Power switch.

Figure 2: Rear Panel of the Video Wall Controller
3.3 Remote Control
The included remote control allows for convenient operation of the video wall controller from a distance. It requires 2x AAA batteries (not included).

Figure 3: Video Wall Controller with Remote Control
4. Setup
Follow these steps to set up your Zopsc 4K 2x2 Video Wall Controller:
- Connect Input Source: Connect your video source (e.g., computer, media player, game console) to one of the input ports (HD Multimedia Interface IN, USB-C IN, or DVI IN) on the front panel of the controller.
- Connect Displays: Connect up to four display screens (e.g., TVs, monitors) to the HD Multimedia Interface OUT 1-4 ports on the rear panel of the controller using HD Multimedia Interface cables.
- Connect Power: Plug the provided power supply cord into the DC 5V/2A port on the rear panel of the controller, then plug the adapter into a standard power outlet. Turn on the power switch.
- Insert Remote Batteries: Open the battery compartment of the remote control and insert 2x AAA batteries, ensuring correct polarity.
- Power On: Power on the video wall controller and all connected display screens.

Figure 4: Example Setup of the Video Wall Controller
5. Operating Instructions
5.1 Input Source Selection
To switch between input sources (HD Multimedia Interface, USB-C, DVI), use either:
- The "Switch" button on the front panel of the controller.
- The dedicated input selection buttons on the remote control.
5.2 Splicing Modes
The controller supports 13 different splicing modes to arrange your video wall. Use the "Mode" button on the front panel or the remote control to cycle through the available configurations. These modes include various layouts such as 1x1, 1x2, 2x1, 2x2, 1x3, 3x1, 1x4, and 4x1. The device also supports 90-degree clockwise rotation for flexible display orientation.

Figure 5: Example of a 2x2 Splicing Mode
5.3 Bezel Fusion (Edge Masking)
To minimize the visual impact of display bezels and create a more seamless image across multiple screens, use the "Bezel fusion" buttons on the remote control. Press the "+" or "-" buttons to adjust the edge separation, aligning the image bezels and edges for a continuous effect.
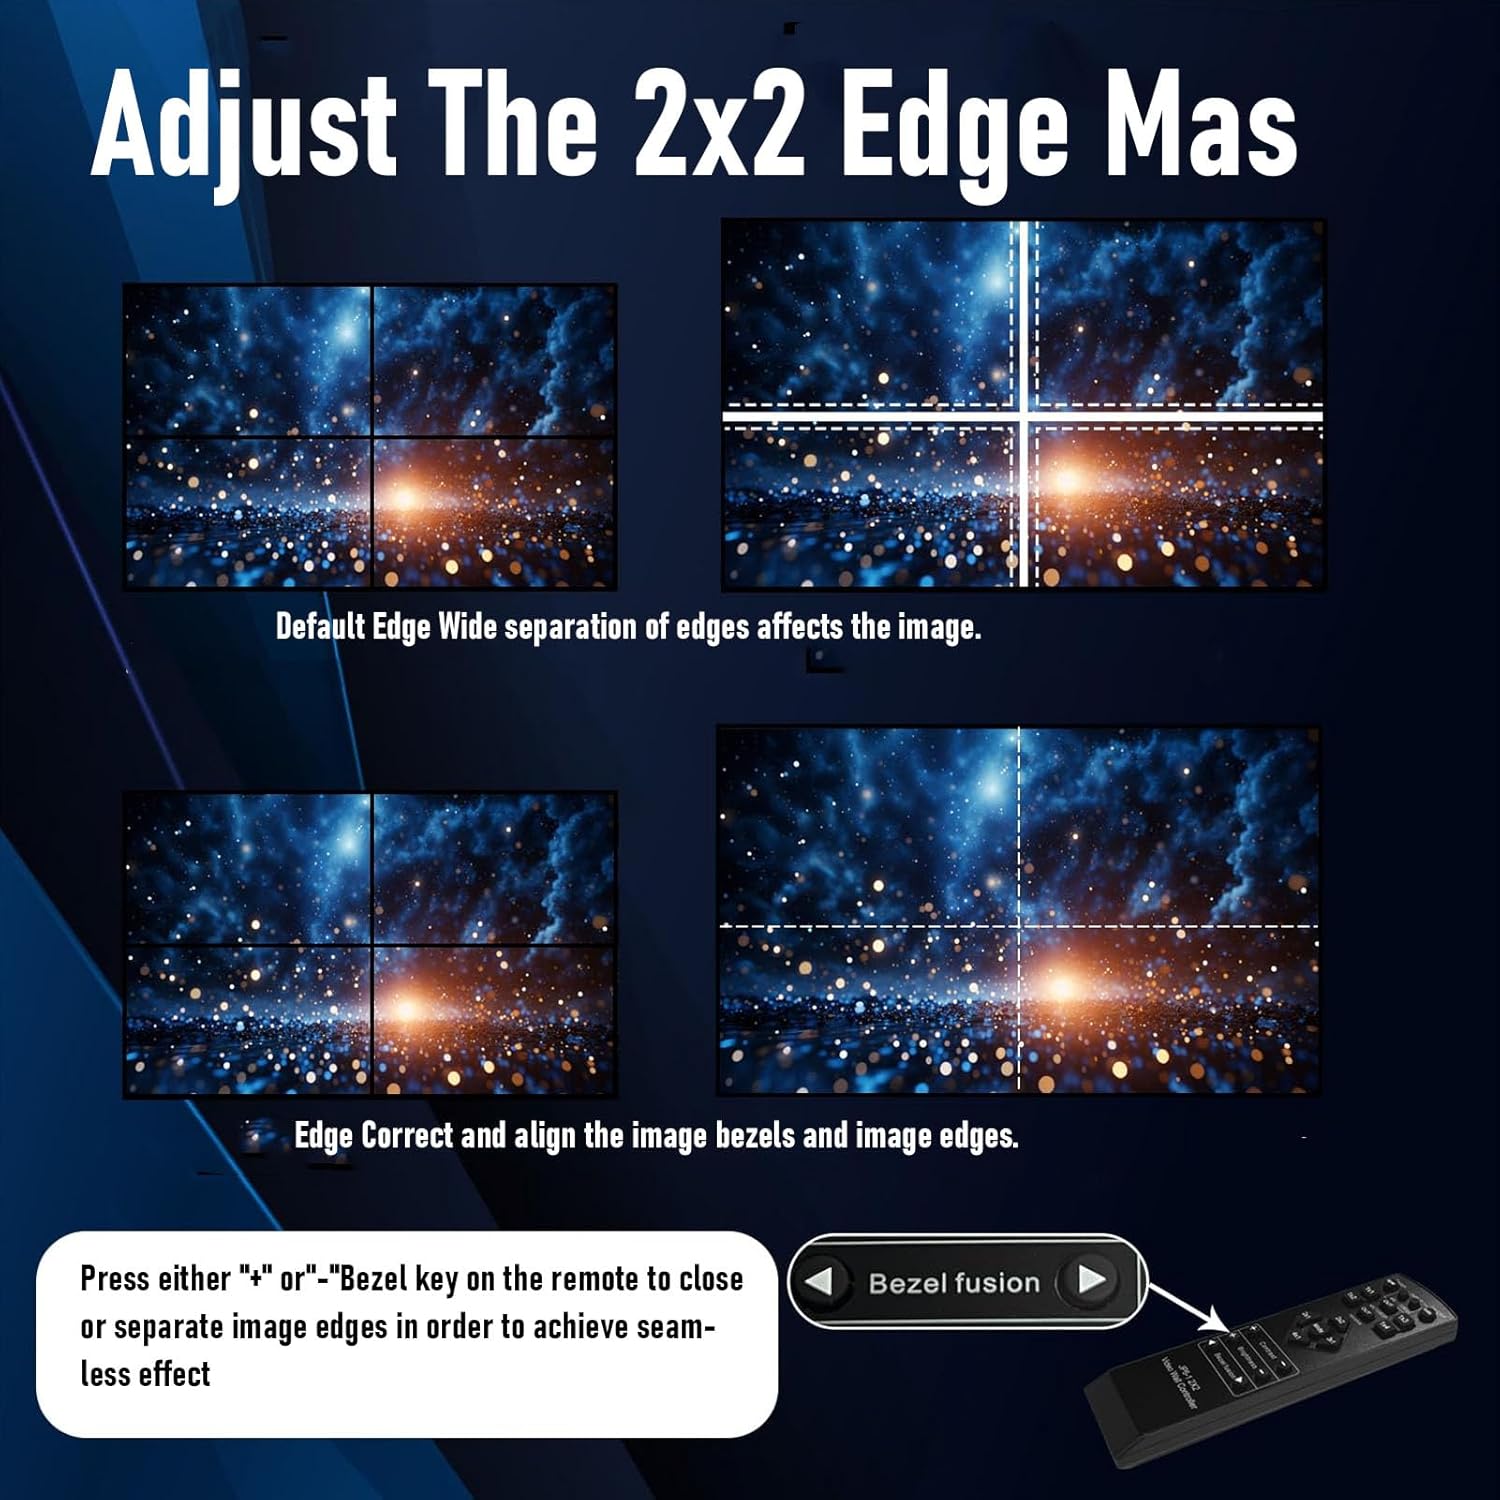
Figure 6: Bezel Fusion Adjustment
5.4 Image Adjustment
Use the "Contrast" and "Brightness" buttons on the remote control to fine-tune the image quality according to your preferences and display environment.
6. Specifications
| Feature | Description |
|---|---|
| Item Type | Video Wall Controller |
| Brand | Zopsc |
| Model Number | Zopscuv9gpdsjel |
| Material | Iron |
| Inputs | HD Multimedia Interface, DVI, USB-C |
| Outputs | HD Multimedia Interface x4 |
| Input Format | RGB, YUV 24 Bit |
| Output Format | RGB4:4:4 24 Bit |
| Input Resolutions | Supports 25/30/50/60Hz, 30Hz |
| Output Resolutions | Supports 4K 30Hz, 1080P 60Hz |
| Remote Control Battery | AAA x2 (Not Included) |
7. Maintenance
To ensure the longevity and optimal performance of your video wall controller, follow these maintenance guidelines:
- Cleaning: Use a soft, dry cloth to clean the device. Avoid using liquid cleaners or aerosols.
- Environment: Keep the controller in a cool, dry, and well-ventilated area. Avoid exposure to direct sunlight, high temperatures, or excessive humidity.
- Handling: Do not drop or subject the device to strong impacts.
- Servicing: Do not attempt to open, disassemble, or repair the device yourself. Refer all servicing to qualified personnel.
8. Troubleshooting
If you encounter issues with your video wall controller, refer to the following common problems and solutions:
- No Signal on Displays:
- Ensure all HD Multimedia Interface, DVI, and USB-C cables are securely connected.
- Verify that the input source (e.g., computer, media player) is powered on and outputting a signal.
- Confirm that the correct input source is selected on the video wall controller using the "Switch" button or remote.
- Check if the displays are powered on and set to the correct HD Multimedia Interface input.
- Distorted or Flickering Image:
- Check the quality and condition of all connecting cables. Try replacing them if necessary.
- Ensure that the input and output resolutions are supported by both the controller and your displays.
- Adjust the "Contrast" and "Brightness" settings using the remote control.
- Remote Control Not Responding:
- Check if the AAA batteries are correctly inserted and have sufficient charge. Replace them if needed.
- Ensure there are no obstructions between the remote control and the IR receiver on the front panel of the controller.
- Point the remote directly at the IR receiver.
- Incorrect Splicing Mode or Display Layout:
- Press the "Mode" button on the controller or remote to cycle through the available splicing modes until the desired layout is achieved.
- If using bezel fusion, ensure the settings are correctly adjusted for your display configuration.
- Power cycle the device (turn off, wait a few seconds, then turn on) to reset its state.
9. Warranty and Support
For detailed warranty information, technical assistance, or customer support, please refer to the documentation provided with your purchase or contact Zopsc customer service through their official channels. Keep your purchase receipt or proof of purchase for warranty claims.