
Introduction
This manual provides detailed instructions for the installation and operation of your BrickSoul LED Lighting Kit, specifically designed for the LEGO 77256 Speed Champions Time Machine from Back to The Future building set. This kit enhances your model with dynamic lighting effects, transforming it into an eye-catching display piece.
Important Note: The LEGO 77256 building set is NOT included with this lighting kit and must be purchased separately or owned previously.

Image: Visual comparison of the LEGO 77256 Time Machine model unlit versus lit with the BrickSoul LED kit.
What's Included
Your BrickSoul LED Lighting Kit package typically includes the following components:
- LED light components (various wires, light strips, and individual LEDs)
- Battery box (requires AAA batteries, not included)
- Installation guide (digital instructions accessed via QR code or link)

Image: The contents of the BrickSoul LED Lighting Kit packaging, including light components, a battery box, and a guide.
Setup and Installation
The BrickSoul LED Lighting Kit is designed for integration with your LEGO 77256 model. For optimal results, it is recommended to install the lighting kit during the initial construction of the LEGO model. If your model is already assembled, some disassembly will be required to properly route the wires and place the lights.
Accessing Digital Instructions
This kit utilizes digital instructions to ensure the most up-to-date and comprehensive guidance. A QR code or link is provided within the package to access detailed PDF and video instructions. These resources include numbered light bags and organized wiring routes to facilitate a smooth installation process.

Image: A tablet showing the digital instruction interface for the lighting kit, emphasizing the absence of a paper manual.
Installation Steps Overview
- Prepare Your Model: If your LEGO 77256 model is already built, carefully identify sections that need to be disassembled to allow for wire routing and light placement. Refer to the digital instructions for specific guidance.
- Follow Digital Guide: Use the provided PDF or video instructions. They will guide you step-by-step through the process, indicating where each light component should be placed and how wires should be routed to remain hidden and maintain the model's aesthetic.
- Connect Components: Securely connect the LED components to the main control board or battery box as instructed. Ensure all connections are firm to prevent flickering or non-functional lights.
- Power Source: Insert AAA batteries (not included) into the battery box or connect the kit to a 5V USB power source.
- Test Lights: Before fully reassembling your model, test all lights to ensure they are functioning correctly.
Thoughtfully hidden wire routing is crucial for a clean and uncluttered appearance, allowing the striking neon flux lights to take center stage.
Video: An official product video demonstrating the BrickSoul LED Lighting Kit installed on the LEGO 77256 Time Machine, showcasing its various lighting effects and overall appearance.


Operating Instructions
Once installed, the BrickSoul LED Lighting Kit offers flexible control over its lighting effects.
Powering the Kit
- Battery Power: Insert 3x AAA batteries (not included) into the battery box. Ensure correct polarity.
- USB Power: Connect the provided USB cable from the battery box to a 5V USB power source (e.g., power bank, USB wall adapter).
Light Modes and Adjustment
The kit features easy-to-use control buttons, typically located on the display base or battery box, allowing you to switch between various lighting modes. The lighting effects include:
- Steady Light: Provides a constant illumination.
- Breathing Light: Lights gently fade in and out.
- Pulse Light: Lights flash in a rhythmic pattern.
- Flash Light: Lights flash rapidly.
Some models may also include controls to adjust the flash rate or brightness. Refer to your specific digital instructions for precise button functions.
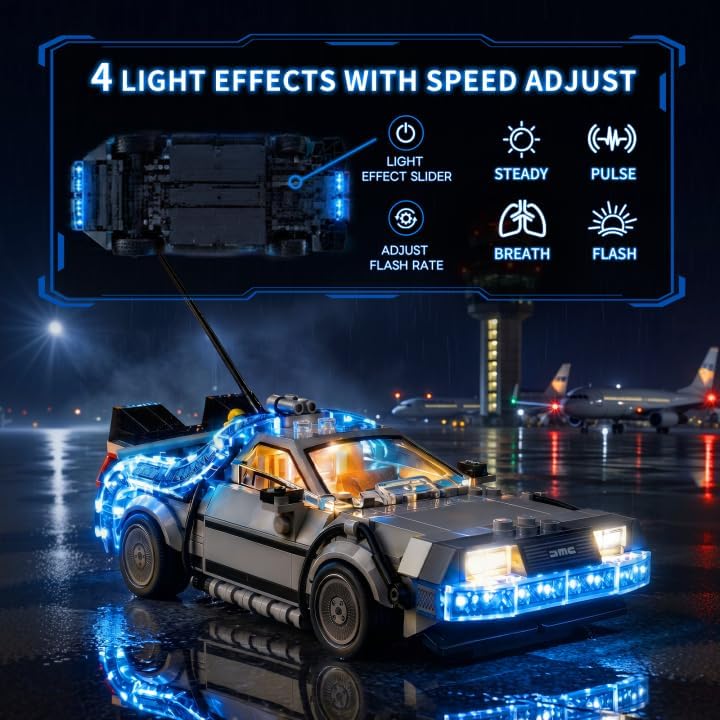
Image: Diagram illustrating the four available light effects and control options.
Maintenance
To ensure the longevity and optimal performance of your BrickSoul LED Lighting Kit, follow these simple maintenance guidelines:
- Cleaning: Use a soft, dry cloth to gently wipe away dust from the LED components and wires. Avoid using liquid cleaners directly on the lights or electrical connections.
- Storage: If storing the model for an extended period, it is advisable to remove the batteries from the battery box to prevent leakage and potential damage.
- Handling: Handle the model with care to avoid stressing the delicate wires and connections of the lighting kit.
- Environment: Avoid exposing the kit to excessive moisture, direct sunlight for prolonged periods, or extreme temperatures, as these can degrade the components.
Troubleshooting
If you encounter any issues with your BrickSoul LED Lighting Kit, please refer to the following troubleshooting steps:
- Lights Not Illuminating:
- Check the power source: Ensure batteries are correctly inserted and fresh, or that the USB cable is securely connected to a functional 5V power source.
- Verify connections: Inspect all wire connections to ensure they are firmly seated and not loose.
- Lights Flickering:
- Check for loose connections: Re-seat any connections that appear loose.
- Ensure stable power: If using batteries, try new ones. If using USB, ensure the power adapter is providing consistent 5V output.
- Difficulty During Installation:
- Refer to digital instructions: The detailed PDF and video guides are your primary resource for complex steps.
- Disassembly may be required: If the LEGO model is already built, it is common to need to disassemble certain sections to properly integrate the lighting kit. This is a normal part of the process.
- Damaged Components: If any components appear physically damaged upon arrival, do not attempt to install them. Contact customer support immediately.
Specifications
| Brand | BrickSoul |
| Model Name | BS-77256-cv-new |
| Compatible LEGO Set | 77256 Speed Champions Time Machine |
| Included Components | LED Light Kit (LEGO model not included) |
| Material Type | Plastic |
| Assembly Required | Yes |
| Power Source | 5V (USB or 3x AAA batteries, not included) |
| Light Modes | Steady, Breathing, Pulse, Flash (4 effects) |
| Item Dimensions (L x W x H) | 6.3 x 5.51 x 1.38 inches |
Warranty and Support
BrickSoul stands behind the quality of its products. Your LED Lighting Kit comes with a 1-year free replacement warranty for any product quality issues.
If you require any assistance, have questions about installation, or experience any issues with your lighting kit, our dedicated support team is ready to help. Please contact us directly through Amazon messages for prompt and efficient problem-solving.
We are committed to ensuring your satisfaction and providing a seamless experience with your BrickSoul product.