
1. Introduction
The Beelink SER5 MAX Mini PC is a compact and powerful desktop computer designed for various applications, including office work, multimedia consumption, and light gaming. It features an AMD Ryzen 7 7735U processor, 16GB LPDDR5 RAM, and a 500GB PCIe SSD, offering efficient performance in a small form factor. This manual provides essential information for setting up, operating, maintaining, and troubleshooting your device.

Figure 1: Beelink SER5 MAX Mini PC Key Features
2. What's in the Box
Please check the contents of your package upon arrival. If any items are missing or damaged, contact customer support.
- Beelink SER5 MAX Mini PC
- User Manual
- HDMI Cable
- Power Adapter

Figure 2: Package Contents
3. Product Overview
Familiarize yourself with the ports and components of your Beelink SER5 MAX Mini PC.
3.1 Front Panel
- CLR CMOS Button: Used to clear CMOS settings.
- USB 3.2 Gen2 (10Gbps) Ports: High-speed USB ports for data transfer.
- USB 2.0 Ports: Standard USB ports for peripherals.
- Headphone Jack: For audio output.
- Type-C (10Gbps) Port: Supports data and video output (up to 4K 144Hz).
- Power Button: To turn the device on or off.
3.2 Rear Panel
- LAN (2.5Gbps) Port: For wired network connection.
- USB 3.2 Gen2 (10Gbps) Ports: High-speed USB ports for data transfer.
- USB 2.0 Ports: Standard USB ports for peripherals.
- DP 1.4 Port: DisplayPort for video output (up to 4K 144Hz).
- HDMI 2.0 Port: HDMI for video output (up to 4K 60Hz).
- DC-in Port: For connecting the power adapter.

Figure 3: Front and Rear Panel Ports
4. Setup
Follow these steps to set up your Beelink SER5 MAX Mini PC.
- Connect Peripherals: Connect your monitor(s) to the HDMI, DisplayPort, or Type-C ports. Connect your keyboard and mouse to the available USB ports.
- Connect to Network: For a wired connection, plug an Ethernet cable into the LAN port. For wireless, ensure your Wi-Fi network is available.
- Connect Power: Plug the power adapter into the DC-in port on the rear panel, then plug the adapter into a power outlet.
- Power On: Press the power button on the front panel. The device will boot up, and you should see the operating system (Windows 11 Pro) load on your monitor.
- Initial Setup: Follow the on-screen instructions to complete the Windows 11 Pro initial setup, including language, region, network connection, and user account creation.
5. Operating Instructions
5.1 Power On/Off and Restart
- Power On: Press the power button.
- Shut Down: From the Windows desktop, click the Start button, then Power > Shut down.
- Restart: From the Windows desktop, click the Start button, then Power > Restart.
5.2 Network Connectivity
- Wired (Ethernet): Connect an Ethernet cable to the LAN port. The system will automatically detect the connection.
- Wireless (Wi-Fi 6): Go to Windows Settings > Network & internet > Wi-Fi. Select your network and enter the password. The device supports Wi-Fi 6 for faster and more stable connections.
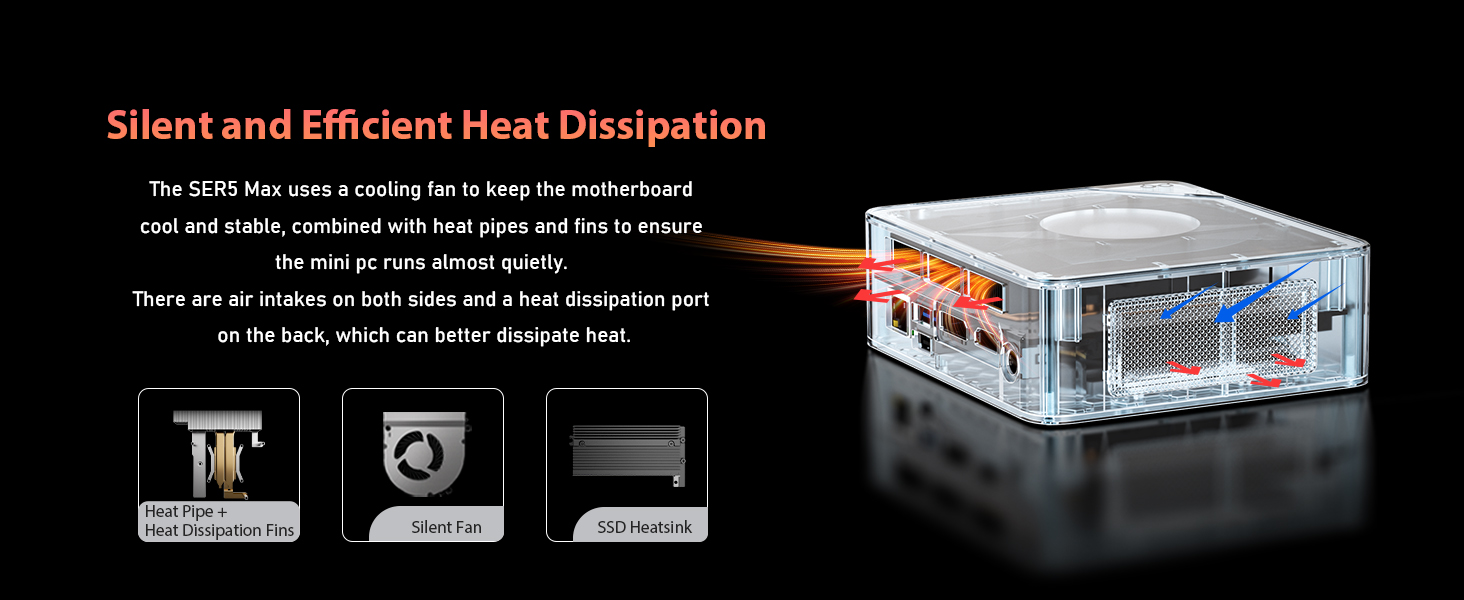
Figure 4: High-Speed Wireless Connectivity
5.3 Multiple Display Setup
The Beelink SER5 MAX supports up to three displays simultaneously via HDMI, DisplayPort, and Type-C ports, all supporting 4K resolution.
- Connect your monitors to the available video output ports.
- Right-click on the desktop and select 'Display settings'.
- Detect and arrange your displays as needed (Extend, Duplicate, or Show only on one).

Figure 5: Triple Display Output
6. Maintenance
6.1 Cleaning
Regularly clean the exterior of the mini PC with a soft, dry cloth. Ensure ventilation openings are free from dust to maintain optimal cooling performance. Do not use liquid cleaners directly on the device.
6.2 Storage Expansion
The SER5 MAX Mini PC is equipped with dual M.2 PCIe SSD slots, each supporting up to 4TB for a total of 8TB of storage. You can expand the storage by installing additional M.2 PCIe SSDs.
- Power off the device and disconnect all cables.
- Carefully open the chassis according to the detailed instructions in the full service manual (not included here).
- Install the M.2 PCIe SSD into an available slot.
- Secure the SSD and close the chassis.
- Power on the device. You may need to initialize and format the new drive in Windows Disk Management.

Figure 6: Dual M.2 PCIe SSD Slots for Storage Expansion
6.3 Cooling System
The SER5 MAX features an efficient cooling system with a CPU fan, heat sink, and heat pipes to maintain optimal operating temperatures and ensure quiet operation. Ensure proper airflow around the device.

Figure 7: Efficient Cooling System
7. Troubleshooting
This section addresses common issues you might encounter.
- No Power:
- Ensure the power adapter is securely connected to the mini PC and a working power outlet.
- Verify the power outlet is functional by plugging in another device.
- No Display:
- Check that the monitor is powered on and the video cable (HDMI, DP, or Type-C) is securely connected to both the mini PC and the monitor.
- Ensure the monitor's input source is set correctly.
- Try connecting to a different monitor or using a different video cable.
- No Internet Connection:
- For wired connections, ensure the Ethernet cable is properly connected and your router is working.
- For Wi-Fi, check if Wi-Fi is enabled in Windows settings and if you are connected to the correct network with the correct password.
- Restart your router and the mini PC.
- System Slowdown:
- Close unnecessary applications running in the background.
- Check for sufficient free storage space on your SSD.
- Ensure the cooling vents are not obstructed.
- Reset CMOS: If you encounter boot issues or incorrect BIOS settings, you can use the CLR CMOS button on the front panel. Refer to the full service manual for detailed instructions on using this feature.
8. Specifications
Detailed technical specifications for the Beelink SER5 MAX Mini PC.

Figure 8: Product Specifications Overview
| Feature | Specification |
|---|---|
| Brand | Beelink |
| Model | SER5 MAX 7735U |
| Operating System | Windows 11 Pro |
| CPU Model | AMD Ryzen 7 7735U (8 Cores/16 Threads, 3.2GHz up to 4.75GHz) |
| Graphics Coprocessor | AMD Radeon Graphics 8 Core 2200MHz |
| RAM Memory Installed | 16 GB LPDDR5 6300MHz |
| Memory Storage Capacity | 500 GB SSD (M.2 PCIe) |
| Storage Expansion | Dual M.2 PCIe SSD slots (up to 4TB each) |
| Video Output | HDMI 2.0 (4K@60Hz), DisplayPort 1.4 (4K@144Hz), USB Type-C (4K@144Hz) |
| Connectivity | Wi-Fi 6, Bluetooth 5.2, Gigabit Ethernet (2.5Gbps) |
| USB Ports | 3x USB 3.2 Gen2, 2x USB 2.0, 1x USB Type-C |
| Additional Features | Wake on LAN, Auto Power On, CLR CMOS button |
| Dimensions | 126mm x 113mm x 42mm (approx.) |
| Item Weight | 0.8 Kilograms |
9. Warranty & Support
Beelink provides comprehensive support for your product.
9.1 Warranty Information
This Beelink Mini PC comes with a 3-year warranty from the date of purchase. The warranty covers manufacturing defects and hardware malfunctions under normal use. Please retain your proof of purchase for warranty claims.
9.2 Customer Support
For technical assistance, troubleshooting, or warranty inquiries, please contact Beelink customer service. We offer 24/7 manual customer service and technical support to ensure you receive prompt assistance.
You can find contact information on the official Beelink website or through your purchase platform.


