
Introduction
This manual provides detailed instructions for the installation, operation, and maintenance of your HG Power 10-inch Solar Powered Exhaust Fan. This fan is designed to provide efficient ventilation for various spaces such as workshops, barns, basements, sunrooms, greenhouses, chicken coops, and attics. It features dual power capabilities (solar and AC adapter), a thermostat, and speed control for optimized performance.
Safety Information
- Read all instructions carefully before installation and operation.
- Ensure all electrical connections are secure and comply with local electrical codes.
- Do not attempt to modify the product. Unauthorized modifications may void the warranty and pose safety risks.
- Keep children and pets away from the fan during operation.
- Disconnect power before performing any maintenance or cleaning.
- The fan is designed for ventilation; do not use it for purposes other than its intended use.
Package Contents
Verify that all components are present in the box before beginning installation:
- Smart Controller (with temperature probe)
- AC/DC Adapter (with 16.4 ft cable)
- 30W Bifacial Solar Panel (with 16.4 ft cable)
- 10-inch Shutter Fan (with 9.8 ft cable)
- Solar Panel Mounting Bracket
- Screw Accessories Set
- User Manual
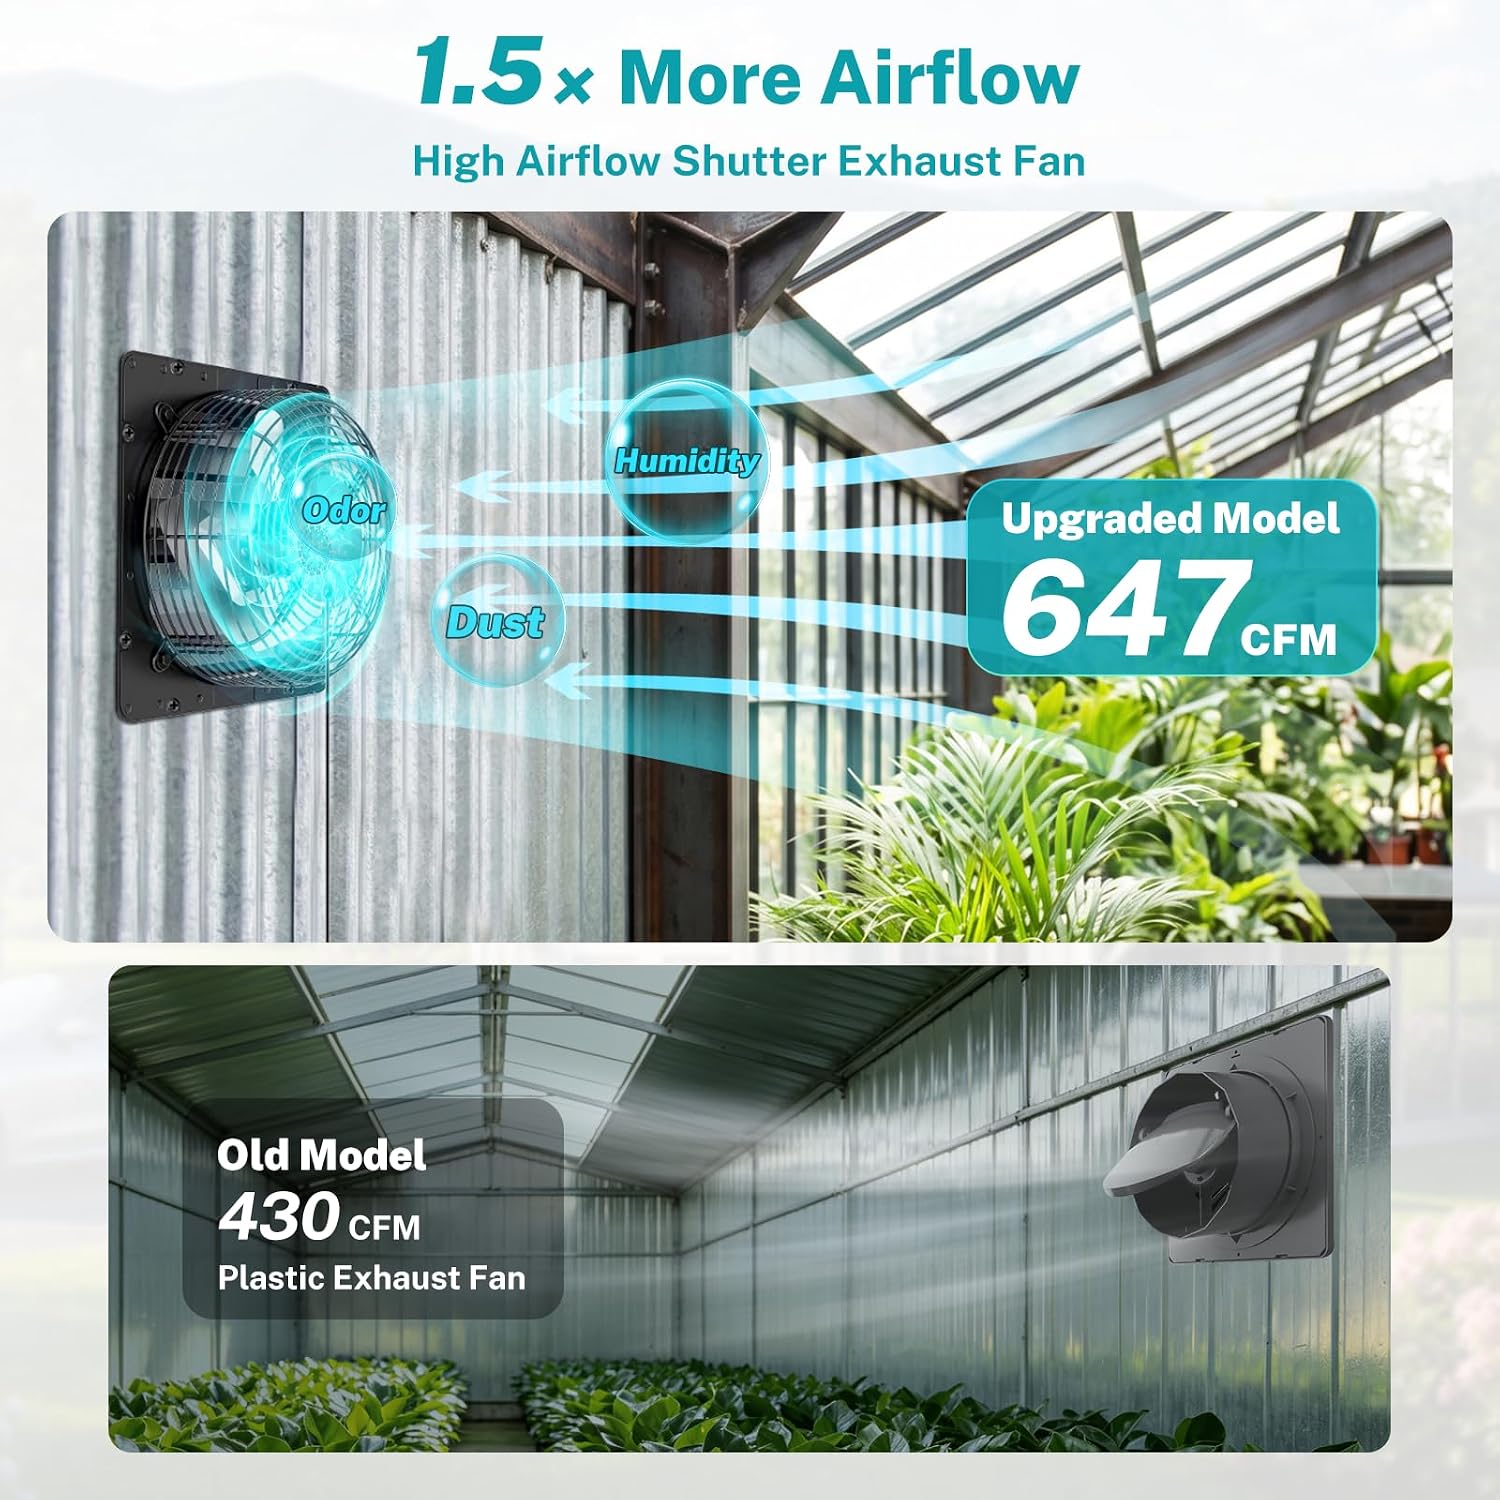
Image: All components included in the HG Power 10-inch Solar Powered Exhaust Fan kit.
Product Features
- Dual Power System: Operates on solar power during the day and automatically switches to the included AC adapter when sunlight is low or at night, ensuring continuous ventilation. No batteries are required.
- Two Operating Modes:
- Mode I (Energy Saving): Fan speed adjusts with sunlight intensity. The AC adapter provides backup for consistent airflow.
- Mode II (Performance): Allows manual adjustment of fan speed from 1 to 4 using the knob (AC adapter required for this mode).
- Thermostat Control: Set a target temperature between 68–113°F (20–45°C) for automatic fan activation and deactivation.
- Smart 10-Minute Delay: After the ambient temperature drops below the set point, the fan continues to run for 10 minutes before shutting off. This feature prevents frequent on/off cycling and extends motor lifespan.
- High-Efficiency Solar Panel: 30W bifacial solar panel captures energy from both sides for maximum power generation.
- Powerful Airflow: The 10-inch shutter fan delivers 647 CFM (Cubic Feet per Minute) airflow.
- Durable Construction: Features an upgraded brushless DC motor for energy efficiency and stability, a corrosion-resistant metal body, larger fan blades for stable airflow, and auto-close shutters for rain protection and to prevent foreign objects from entering.

Image: Diagram illustrating the bifacial solar panel's ability to generate power from both direct and reflected sunlight.

Image: Exploded view of the fan highlighting key components such as the upgraded brushless DC motor, metal body, larger fan blades, and auto-close shutters.
Setup & Installation
Follow these steps for proper installation of your solar powered exhaust fan:
- Choose a Location: Select a suitable location for the fan and solar panel. The fan should be installed in an area requiring ventilation, and the solar panel in a location that receives maximum direct sunlight throughout the day.
- Mark and Cut Opening: Based on the fan's dimensions, mark the area for the fan opening on the wall or surface. Carefully cut the opening. Refer to the dimensions diagram below.
- Mount the Fan: Insert the fan into the prepared opening and secure it using appropriate screws from the accessories set. Ensure the fan is mounted securely and the shutters can open and close freely.
- Install Solar Panel: Assemble the solar panel mounting bracket and attach it to the solar panel. Mount the solar panel in your chosen sunny location, ensuring it is angled for optimal sun exposure.
- Connect Components to Controller: Connect the solar panel cable, fan cable, and temperature probe to the smart controller. The controller has clearly labeled ports for each connection (NTC for temperature probe, OUT for fan, 24V DC for AC adapter, SE for solar panel).
- Connect AC Adapter: If continuous operation or performance mode is desired, plug the AC/DC adapter into the 24V DC input port on the controller and then into a standard electrical outlet.
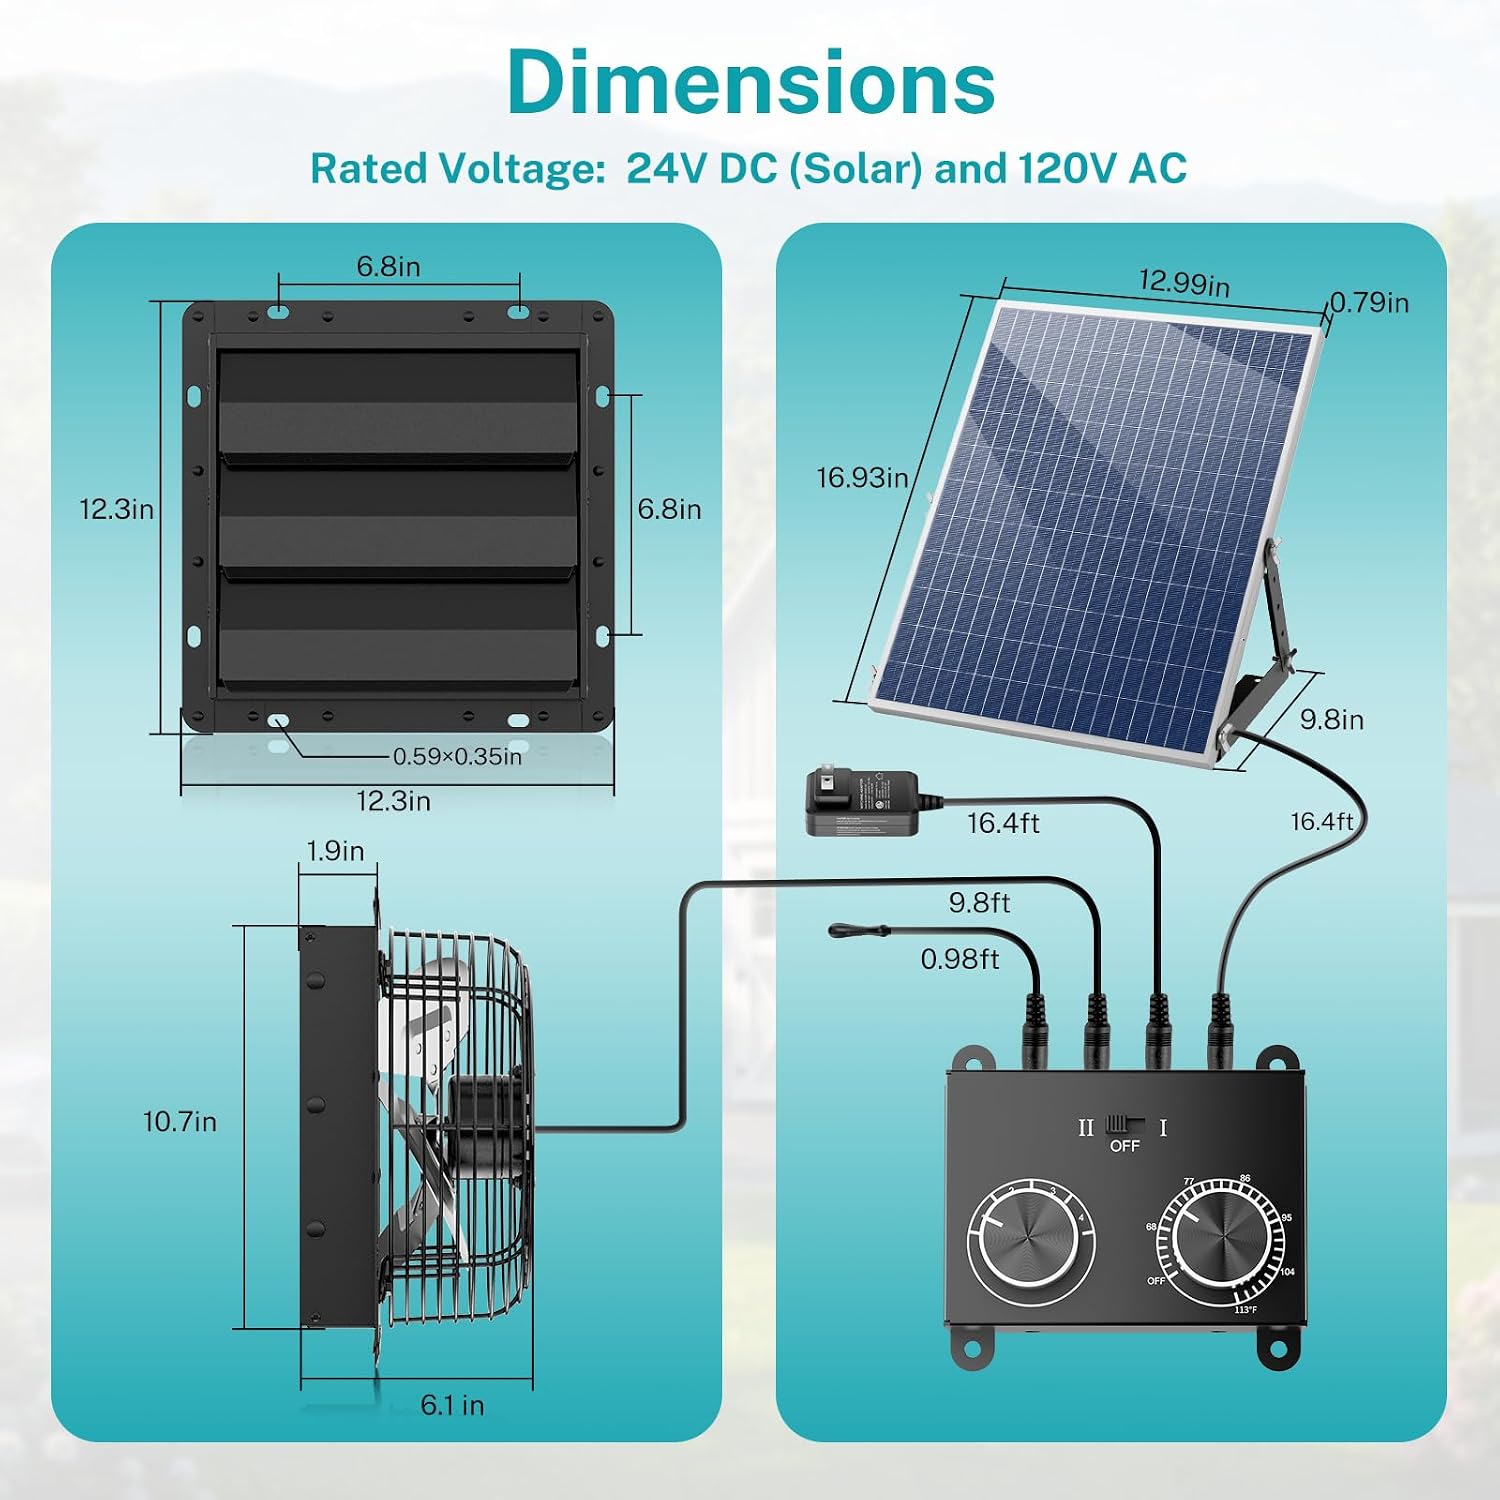
Image: Detailed dimensions of the 10-inch shutter fan, 30W bifacial solar panel, and smart controller for installation planning.

Image: Close-up diagram of the smart controller, indicating the temperature probe (NTC), fan output (OUT), DC power input (24V DC), solar panel input (SE), speed control knob, and temperature control knob.
Operating Instructions
The smart controller allows you to select between two operating modes and set a desired temperature.
- Power On/Off: Use the main switch on the controller to turn the unit ON or OFF.
- Select Operating Mode:
- Set the mode switch to Mode I (Energy Saving) for solar-priority operation. The fan speed will vary with sunlight intensity, with the AC adapter providing supplemental power for steady airflow.
- Set the mode switch to Mode II (Performance) to manually control the fan speed. The AC adapter must be connected for this mode.
- Adjust Fan Speed (Mode II only): When in Mode II, rotate the Speed Control Knob to select a speed level from 1 to 4.
- Set Temperature: Rotate the Temperature Control Knob to set your desired temperature between 68°F and 113°F (20°C and 45°C). The fan will automatically turn on when the ambient temperature exceeds this setting and turn off after a 10-minute delay once the temperature drops below the set point.

Image: The smart multi-function control panel, showing the temperature and speed adjustment knobs and mode selection switch.

Image: Visual representation of the two operating modes: Performance Mode (constant high speed) and Energy Saving Mode (fan speed adjusts to sunlight).

Image: Explanation of the smart temperature control feature, showing automatic on/off based on set temperature and the 10-minute delay protection.
Maintenance
- Cleaning: Periodically clean the fan blades and shutters to ensure optimal airflow. Use a soft, damp cloth. Do not use harsh chemicals.
- Solar Panel: Keep the solar panel surface clean from dust, dirt, and debris to maximize energy capture.
- Connections: Regularly check all cable connections to ensure they are secure and free from damage.
- Inspection: Inspect the fan and solar panel for any signs of wear or damage. If any issues are found, contact customer support.
Troubleshooting
| Problem | Possible Cause | Solution |
|---|---|---|
| Fan does not turn on. | No power (insufficient sunlight or AC adapter unplugged), incorrect mode selection, temperature setting not met. | Ensure solar panel is receiving direct sunlight or AC adapter is plugged in. Check mode switch. Adjust temperature setting. Verify all cables are securely connected. |
| Fan runs intermittently. | Fluctuating sunlight, temperature near set point. | This may be normal behavior in Energy Saving Mode or when the temperature is cycling around the set point (10-minute delay protection). If continuous operation is desired, use the AC adapter and Performance Mode. |
| Reduced airflow. | Dirty fan blades or shutters, obstruction. | Clean fan blades and shutters. Remove any obstructions. |
| Fan makes unusual noise. | Loose components, obstruction. | Check for loose screws or debris. Disconnect power and inspect fan blades for damage. |
Specifications
| Feature | Detail |
|---|---|
| Product Dimensions | 17 x 13 x 4 inches |
| Item Weight | 7.8 pounds |
| Manufacturer | HG Power |
| Item Model Number | Solar Exhaust Fan |
| Fan Size | 10 inches |
| Solar Panel Power | 30W |
| Airflow | 647 CFM |
| Temperature Control Range | 68–113°F (20–45°C) |
| Rated Voltage | 24V DC (Solar) and 120V AC |
Warranty and Support
For warranty information or technical support, please refer to the contact details provided on the product packaging or the official HG Power website. Keep your purchase receipt as proof of purchase for warranty claims.