
1. Introduction
Thank you for choosing the ANDELI MONER-LED Auto Darkening Welding Helmet. This helmet is designed to provide superior eye protection and enhanced visibility during various welding, cutting, and grinding operations. Featuring a 180° panoramic view, 6 arc sensors, true color technology, and integrated LED lights with motion sensing, this helmet offers advanced functionality for professional and hobbyist welders. Please read this manual thoroughly before use to ensure proper operation and safety.
2. Safety Information
Always prioritize safety when using welding equipment. Failure to follow safety guidelines can result in serious injury.
- Eye Protection: This helmet provides UV/IR protection up to Shade DIN16, safeguarding your eyes from harmful radiation during welding. Ensure the auto-darkening function is active and working correctly before beginning any welding task.
- Proper Fit: Adjust the headgear for a snug and comfortable fit to prevent the helmet from slipping during use.
- Environmental Awareness: Be aware of your surroundings. The integrated LED lights enhance visibility in dark conditions, but always ensure adequate general lighting in your workspace.
- Battery Safety: The helmet uses a rechargeable lithium battery. Do not attempt to open or modify the battery compartment. Use only the provided Type-C charging cable.
- Lens Maintenance: Regularly inspect the outer and inner lenses for scratches or damage. Replace them immediately if compromised to maintain optical clarity and protection.
- Avoid Moisture: Do not expose the helmet to excessive moisture or liquids.
3. Package Contents
The ANDELI MONER-LED Welding Helmet package includes the following items:
- 1 x ANDELI MONER-LED Welding Helmet
- 1 x Portable Cloth Bag
- 1 x Outer Protective Lens (Replacement)
- 1 x Inner Protective Lens (Replacement)
- 1 x Type-C Charging Cable
- 1 x User Manual (This document)
4. Product Features
- 180° Panoramic View: Offers an expansive viewing area for improved situational awareness.
- 6 Arc Sensors: Ensures rapid and reliable auto-darkening response in 1/30,000 seconds.
- True Color View: Provides enhanced clarity and natural color perception with 1/1/1/2 optical clarity.
- Integrated LED Lights: Two side-mounted LED lights provide up to 400 lumens of illumination, reducing shadows and improving visibility in low-light conditions.
- Motion Sensing for Lights: Allows hands-free control to turn the LED lights ON or OFF with a simple hand wave (from a distance of >5cm).
- Rechargeable Battery: Equipped with a 2100mAh (or 2400mAh as per feature bullets) rechargeable lithium battery for extended runtime, charged via Type-C port.
- Interference Suppression: Designed to minimize false triggers from sunlight or workshop lighting, ensuring consistent performance.
- Adjustable Headgear: Features a comfortable and lightweight headgear with angle, tightness, and distance adjustments, including a super-sized mesh support and oversized comfort cushion to reduce neck strain.
- Multiple Modes: Supports Weld (Shade 9-13), Cut (Shade 5-9), and Grind (Shade 4) modes.
5. Setup
5.1 Headgear Adjustment
Proper adjustment of the headgear is crucial for comfort and stability.
- Fit to Head: Place the helmet on your head.
- Tightness Adjustment: Use the knob at the back of the headgear to adjust the circumference until it fits snugly but comfortably.
- Distance Adjustment: Adjust the distance between the helmet and your face using the side knobs to ensure a clear view and proper balance.
- Angle Adjustment: Adjust the angle of the helmet to your preferred working position.
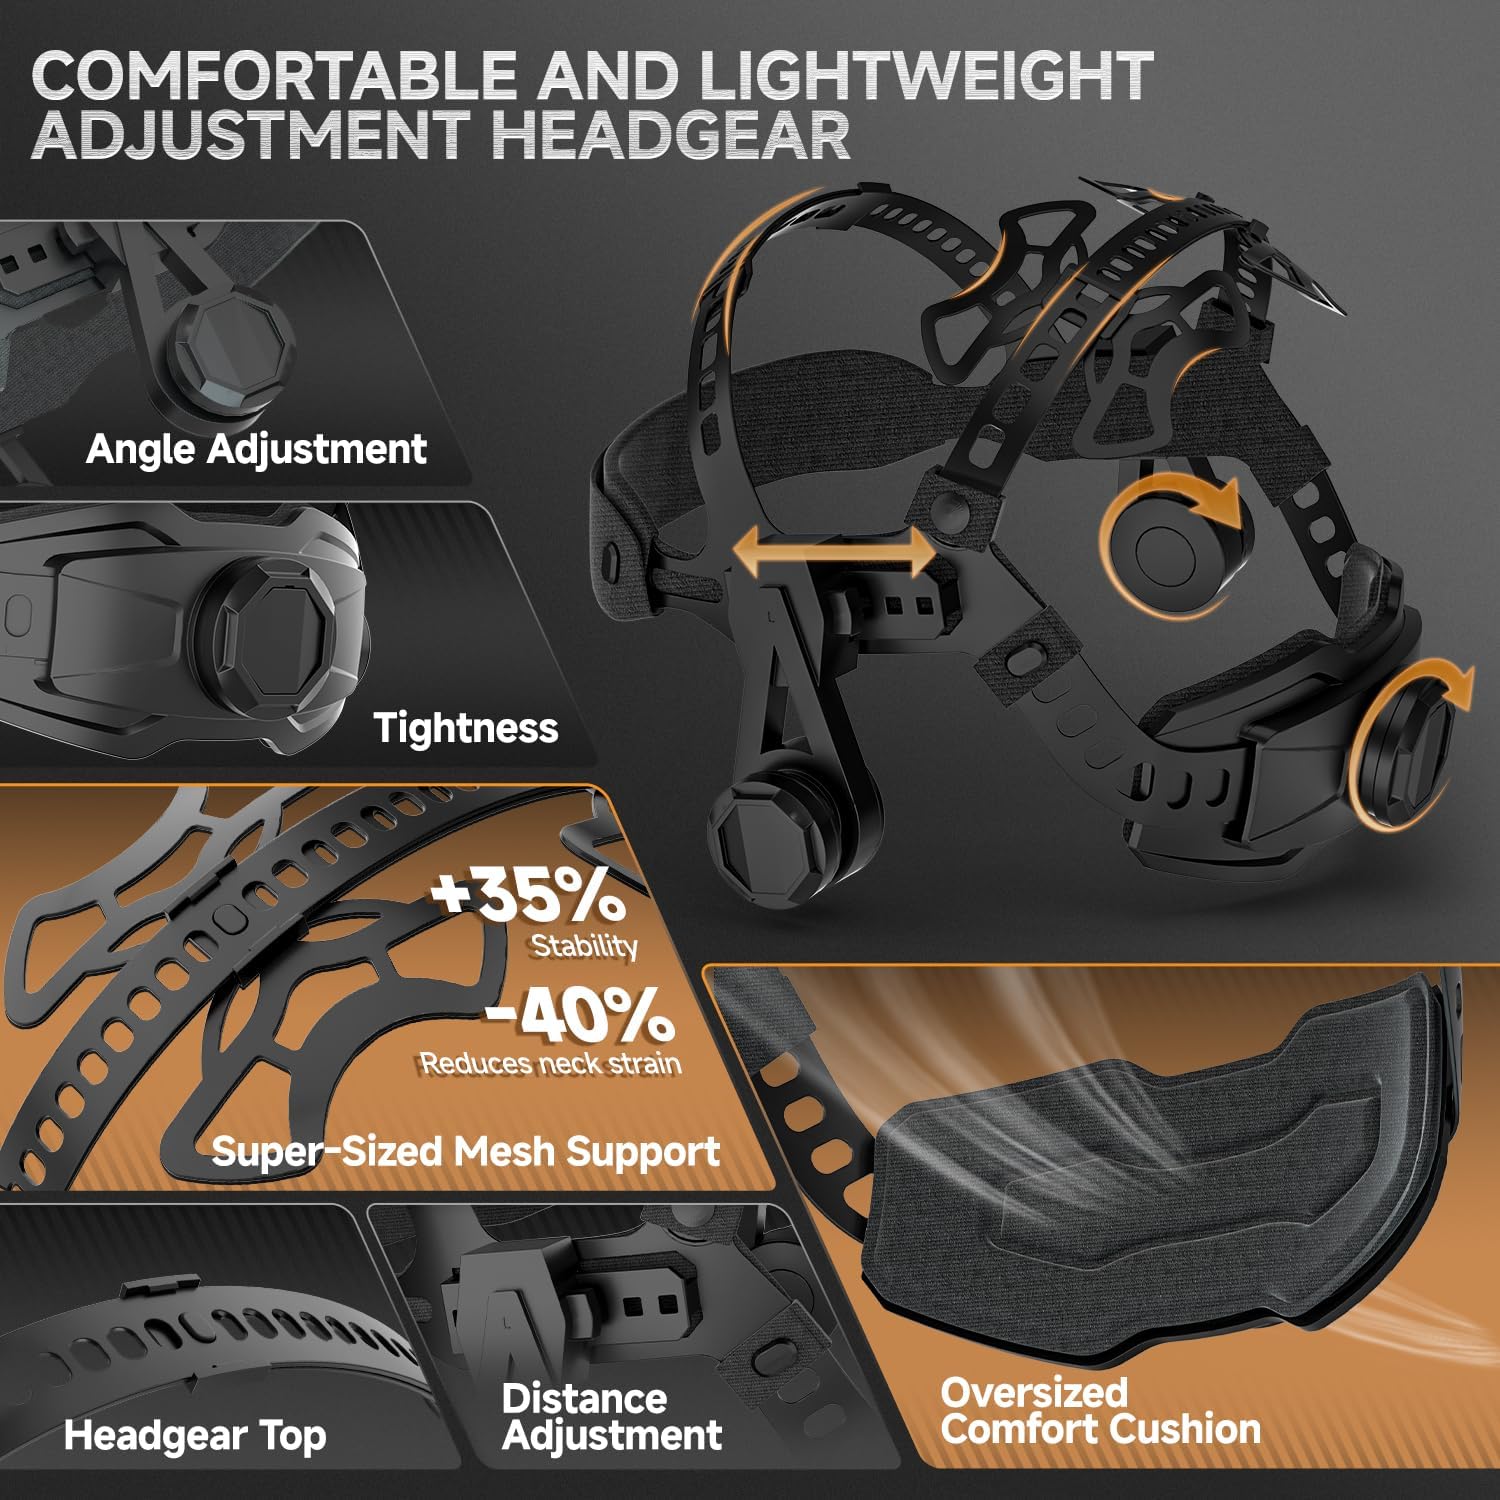
Figure 5.1: Headgear adjustment points for optimal fit and comfort.
5.2 Battery Charging
The helmet is powered by a rechargeable lithium battery.
- Locate the Type-C charging port on the helmet.
- Connect the provided Type-C charging cable to the port and a suitable USB power source.
- A built-in battery indicator allows you to monitor the remaining power. Ensure the helmet is fully charged before extended use.

Figure 5.2: Type-C charging port for the helmet's rechargeable battery.
6. Operating Instructions
6.1 Power On/Off and Auto-Darkening Function
The auto-darkening feature is activated automatically upon detecting an arc. There is no manual power on/off button for the auto-darkening lens itself; it is always ready.
- The helmet switches from light to dark in approximately 1/30,000 seconds when an arc is detected.
- To check if the lens is working properly, press the 'TEST' button on the internal control panel. The lens should momentarily darken and then return to its clear state.
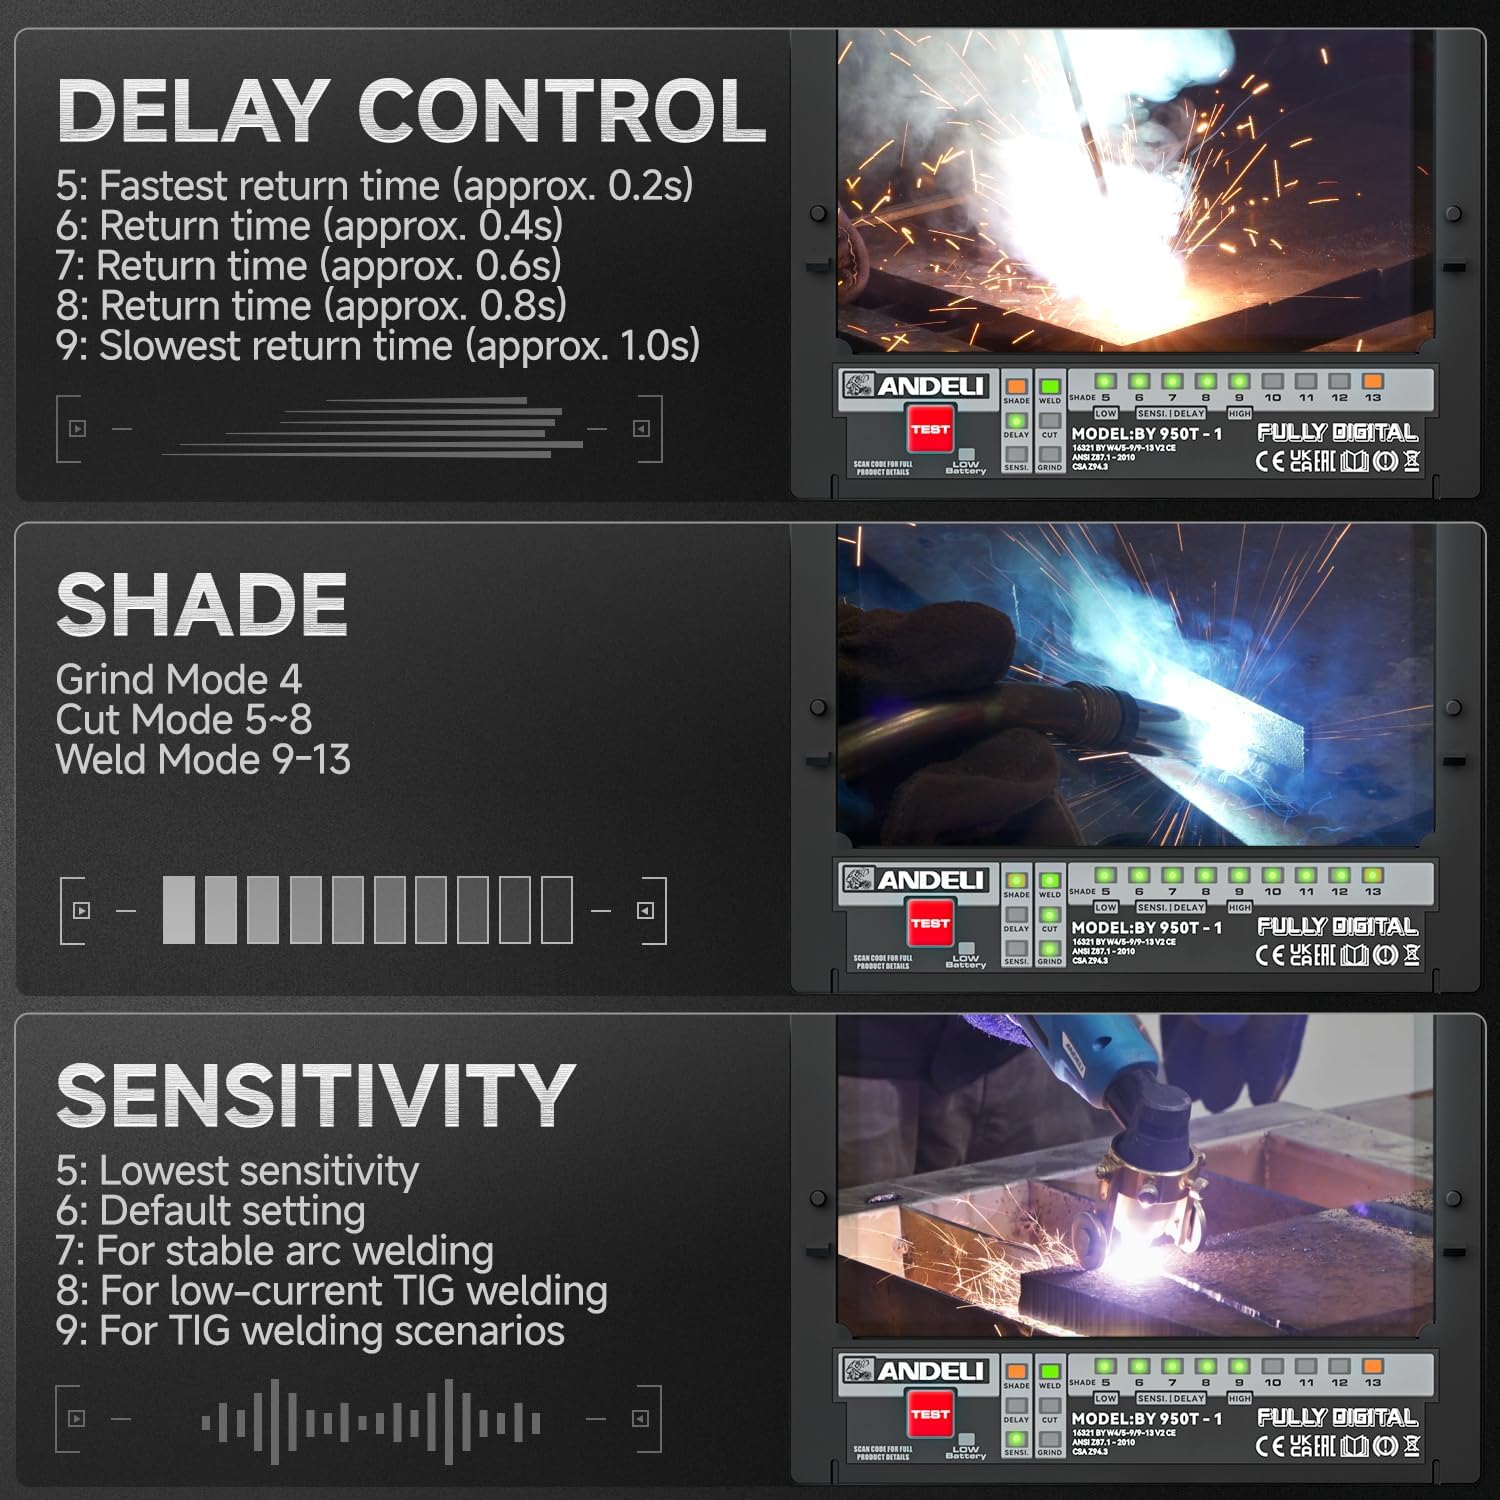
Figure 6.1: Internal control panel for lens settings.
6.2 Mode Selection (Weld, Cut, Grind)
Select the appropriate mode for your task using the control knob on the side of the helmet.
- Grind Mode: Set to DIN 4. The lens remains clear for grinding operations.
- Cut Mode: Adjustable shade from DIN 5-9.
- Weld Mode: Adjustable shade from DIN 9-13.
Figure 6.2: Mode selection for various applications.
6.3 Sensitivity and Delay Control
Adjust these settings using the external knobs on the helmet to optimize performance for different welding conditions.
- Sensitivity: Adjusts how readily the helmet detects an arc. Higher sensitivity is suitable for low-current TIG welding.
- Delay: Controls the time it takes for the lens to return from dark to light after the arc stops. A longer delay is useful for preventing eye fatigue from residual glow.
6.4 LED Lights Operation
The helmet features two integrated LED lights for improved visibility.
- Manual Control: Press the light switch button on the side control panel to cycle between high brightness, low brightness, and off.
- Motion Sensing: After turning on the power for the motion sensor switch, wave your hand slowly (from a distance of >5cm) in front of the sensor to toggle the LED lights ON or OFF. This allows for hands-free operation when your hands are occupied or dirty.

Figure 6.3: Gesture control for LED lights.

Figure 6.4: LED light brightness levels.
7. Maintenance
Regular maintenance ensures the longevity and optimal performance of your welding helmet.
- Cleaning: Clean the helmet shell with a soft, damp cloth. Avoid abrasive cleaners or solvents.
- Lens Cleaning: Gently wipe the auto-darkening lens and protective lenses with a clean, lint-free cloth. Do not use harsh chemicals.
- Lens Replacement: Replace scratched or damaged outer and inner protective lenses immediately. Refer to the included replacement lenses.
- Battery Care: Recharge the battery regularly, especially if the helmet will not be used for an extended period. Avoid fully discharging the battery frequently.
- Storage: Store the helmet in the provided cloth bag in a dry, clean environment away from direct sunlight and extreme temperatures.
8. Troubleshooting
If you encounter issues with your ANDELI welding helmet, refer to the following common solutions:
| Problem | Possible Cause | Solution |
|---|---|---|
| Lens does not darken when welding. | Low battery; Sensors obstructed; Incorrect sensitivity setting; Lens malfunction. | Charge the battery; Clean sensors; Adjust sensitivity; Press 'TEST' button to verify lens function. If still not working, contact support. |
| Lens remains dark after welding. | Incorrect delay setting. | Adjust the delay control to a shorter setting. |
| LED lights do not turn on. | Low battery; Motion sensor off; Light switch off. | Charge the battery; Ensure motion sensor mode is active; Press the light switch button. |
| Headgear loosens frequently. | Adjustment knobs not tightened sufficiently; Worn components. | Ensure all adjustment knobs are securely tightened. If components are worn, contact support for replacements. |
| Poor visibility through lens. | Scratched or dirty protective lenses. | Clean or replace the outer and inner protective lenses. |
9. Specifications
| Feature | Specification |
|---|---|
| Optical Class | 1/1/1/2 |
| LCD Viewing Area | 3.94" x 3.74" (100mm x 95mm) |
| UV/IR Protection | DIN16 |
| ARC Sensors | 6 |
| Weld Shade Range | DIN 9-13 |
| Cut Shade Range | DIN 5-9 |
| Grind Shade | DIN 4 |
| Light State Shade | DIN 4 |
| TIG Rating | AC/DC >5Amps |
| Sensitivity Control | 5 Levels |
| Delay Control (Dark to Light) | 5 Levels |
| Power Supply | Rechargeable Battery Powered |
| Charge Mode | Via Type-C Port (DC 5V) |
| Switching Speed (Light to Dark) | 1/30,000 sec |
| Recommended Operating Temp | 23°F ~ 131°F (-5°C ~ 55°C) |
| Storage Temperature | -4°F ~ 158°F (-20°C ~ 70°C) |
| Total Weight | 1.32 lbs (600g) |
| Material Type | PP |
10. Official Product Videos
ANDELI Auto Darkening Panoramic Welding Helmet with Light
This video provides an overview of the ANDELI Auto Darkening Panoramic Welding Helmet, highlighting its features and integrated light.
ANDELI Panoramic Welding Helmet With LED Lighting
A detailed video showcasing the LED lighting system and panoramic view of the ANDELI welding helmet.
11. Warranty and Support
ANDELI is committed to providing high-quality products and customer satisfaction. For any inquiries, technical assistance, or warranty claims, please contact ANDELI Official Store US customer service. We offer 7x24 after-sales support to ensure your welding experience is seamless.
For returns, please refer to the retailer's return policy, which typically offers a 30-day return window for refunds or replacements.