
1. Introduction
This manual provides essential information for the safe and efficient operation of your coocaa 40-inch QLED Smart TV, model 40CTQH38Z. Please read these instructions thoroughly before using the television and retain them for future reference.
The coocaa 40CTQH38Z is a 40-inch Full HD QLED Smart TV featuring HDR10, Dolby Audio, and a responsive operating system with 1.5GB RAM. It includes DVB-T/T2/C/S/S2 tuners and CI+ support for various broadcast standards, along with Low Blue Light technology for eye comfort.
2. Important Safety Information
Always follow basic safety precautions when using this television to reduce the risk of fire, electric shock, and injury. Do not attempt to service this product yourself. Refer all servicing to qualified service personnel.
- Do not expose the TV to rain or moisture.
- Do not block ventilation openings.
- Ensure the power cord is not pinched or walked on.
- Disconnect the power plug during lightning storms or when unused for long periods.
- Keep the TV away from heat sources and direct sunlight.
3. What's in the Box
Carefully unpack your coocaa 40CTQH38Z TV and check that all items are present and undamaged.

Image: Box contents and TV dimensions. Includes TV, remote, power cable, manual, and base screws.
- coocaa 40-inch QLED Smart TV
- Remote Control
- Power Cable
- Instruction Manual (this document)
- Base Stands and Screws
- Batteries for Remote Control (x2)
4. Physical Overview and Connections
Familiarize yourself with the TV's physical layout and available connection ports.

Image: Rear view of the TV, highlighting the port panel and VESA mounting pattern.
Available Ports:
- HDMI Ports (x2): For connecting high-definition devices like Blu-ray players, game consoles, or set-top boxes. One port supports ARC (Audio Return Channel).
- USB Ports (x2): For connecting USB storage devices to play media or for service updates.
- Ethernet (LAN) Port: For a wired internet connection.
- Antenna Input (DVB-T/T2/C): For connecting a terrestrial or cable antenna.
- Satellite Input (DVB-S/S2): For connecting a satellite dish.
- CI+ Slot: For inserting a Conditional Access Module (CAM) to decrypt pay-TV channels.
- Optical Audio Output: For connecting to an external audio system.
- Earphone Jack: For connecting headphones.
- AV In: For connecting older devices using composite video and stereo audio cables.
5. Setup
5.1. Stand Installation
If you are not wall-mounting your TV, attach the included stands:
- Place the TV face down on a soft, flat surface to prevent screen damage.
- Align each stand with the corresponding slots on the bottom of the TV.
- Secure each stand with the provided screws.
5.2. Wall Mounting
The coocaa 40CTQH38Z TV supports VESA standard wall mounts. The VESA mounting pattern is 200 x 100 mm. Ensure you use a compatible wall mount and follow the instructions provided with the wall mount kit. Professional installation is recommended for wall mounting.

Image: The TV mounted on a wall, demonstrating a common installation method.
5.3. Connecting Peripherals
- Power: Connect the power cable to the TV and then to a wall outlet.
- Antenna/Satellite: Connect your terrestrial antenna or satellite dish cable to the appropriate input.
- HDMI Devices: Connect your external devices (e.g., game console, Blu-ray player) to the HDMI ports.
- Internet: For a wired connection, connect an Ethernet cable to the LAN port. For wireless, ensure your Wi-Fi network is available during initial setup.
5.4. Initial Power On and Setup Wizard
After connecting all necessary cables, plug in the TV. Press the power button on the remote control or on the TV. The TV will guide you through the initial setup process, which includes:
- Language selection.
- Network connection (Wi-Fi or Ethernet).
- Channel scanning (DVB-T/T2/C/S/S2).
- Time zone and other basic settings.
6. Operating Your TV
6.1. Remote Control Functions
The included remote control allows you to navigate the TV's features. It supports voice control for convenient operation.

Image: Remote control with voice command functionality, simplifying TV interaction.
6.2. Smart TV Features and Applications
Your coocaa Smart TV provides access to a wide range of streaming services and applications. Navigate through the home screen to find your favorite content.

Image: The Smart TV interface showing various applications for unlimited content and personalized viewing.
The TV supports popular applications such as Netflix, YouTube, Prime Video, Disney+, HBO, LiveTV, TED, Hayu, FITE, and Kidoodle.TV. Additional apps can be downloaded from the app store.
Video: A presentation and overview of the VIDAA Smart TV operating system and its functions.
6.3. Picture Settings
Your QLED TV offers advanced picture technologies for an enhanced viewing experience.
- QLED Quantum Dot Technology: Provides vivid and realistic colors with a 90% DCI-P3 wide color gamut.
- HDR10 & HLG Support: Delivers deeper blacks, brighter highlights, and improved dynamic contrast for a cinematic depth.
- Low Blue Light: Designed to reduce eye strain during extended viewing sessions.

Image: Comparison demonstrating the vivid colors and realistic contrast provided by HDR10 and HLG.

Image: Illustration of Low Blue Light feature, showing reduced blue light for better eye care.
6.4. Audio Settings
The TV is equipped with Dolby Digital Plus and integrated surround sound technology for an immersive audio experience.

Image: Dolby Audio provides rich, layered sound for a cinematic home immersion.
6.5. Connectivity
The TV offers various connectivity options for your devices.
- Bluetooth 5.1: Connect wireless headphones, soundbars, or other Bluetooth-enabled devices.
- Dual-band Wi-Fi: For stable and fast wireless internet access.
- HDMI & USB: As described in Section 4.

Image: Bluetooth 5.1 offers faster, smarter, and more reliable connectivity for various devices.
7. Maintenance
7.1. Cleaning Your TV
- Always unplug the TV before cleaning.
- Use a soft, dry cloth to wipe the screen and TV body.
- For stubborn marks, lightly dampen the cloth with water or a mild screen cleaner. Never spray cleaner directly onto the screen.
- Avoid using abrasive cleaners, waxes, or solvents.
7.2. Software Updates
Your TV may receive software updates periodically to improve performance and add new features. Ensure your TV is connected to the internet to receive these updates. You can usually check for updates in the TV's settings menu.
8. Troubleshooting
If you encounter any issues with your TV, refer to the following common problems and solutions:
| Problem | Possible Cause | Solution |
|---|---|---|
| No power | Power cable disconnected; power outlet issue. | Check power cable connection; try a different outlet. |
| No picture, but sound is present | Incorrect input source selected; external device issue. | Press the 'Source' button on the remote to select the correct input; check external device connections. |
| No sound, but picture is present | Volume muted or too low; external audio system issue. | Unmute or increase volume; check audio cable connections to external sound system. |
| Remote control not working | Batteries are dead or incorrectly inserted; obstruction. | Replace batteries; ensure line of sight to TV's IR sensor. |
| Cannot connect to Wi-Fi | Incorrect password; router issue; TV too far from router. | Verify Wi-Fi password; restart router; move TV closer or use wired connection. |
If the problem persists after trying these solutions, please contact customer support.
9. Specifications
Detailed technical specifications for the coocaa 40CTQH38Z QLED Smart TV.
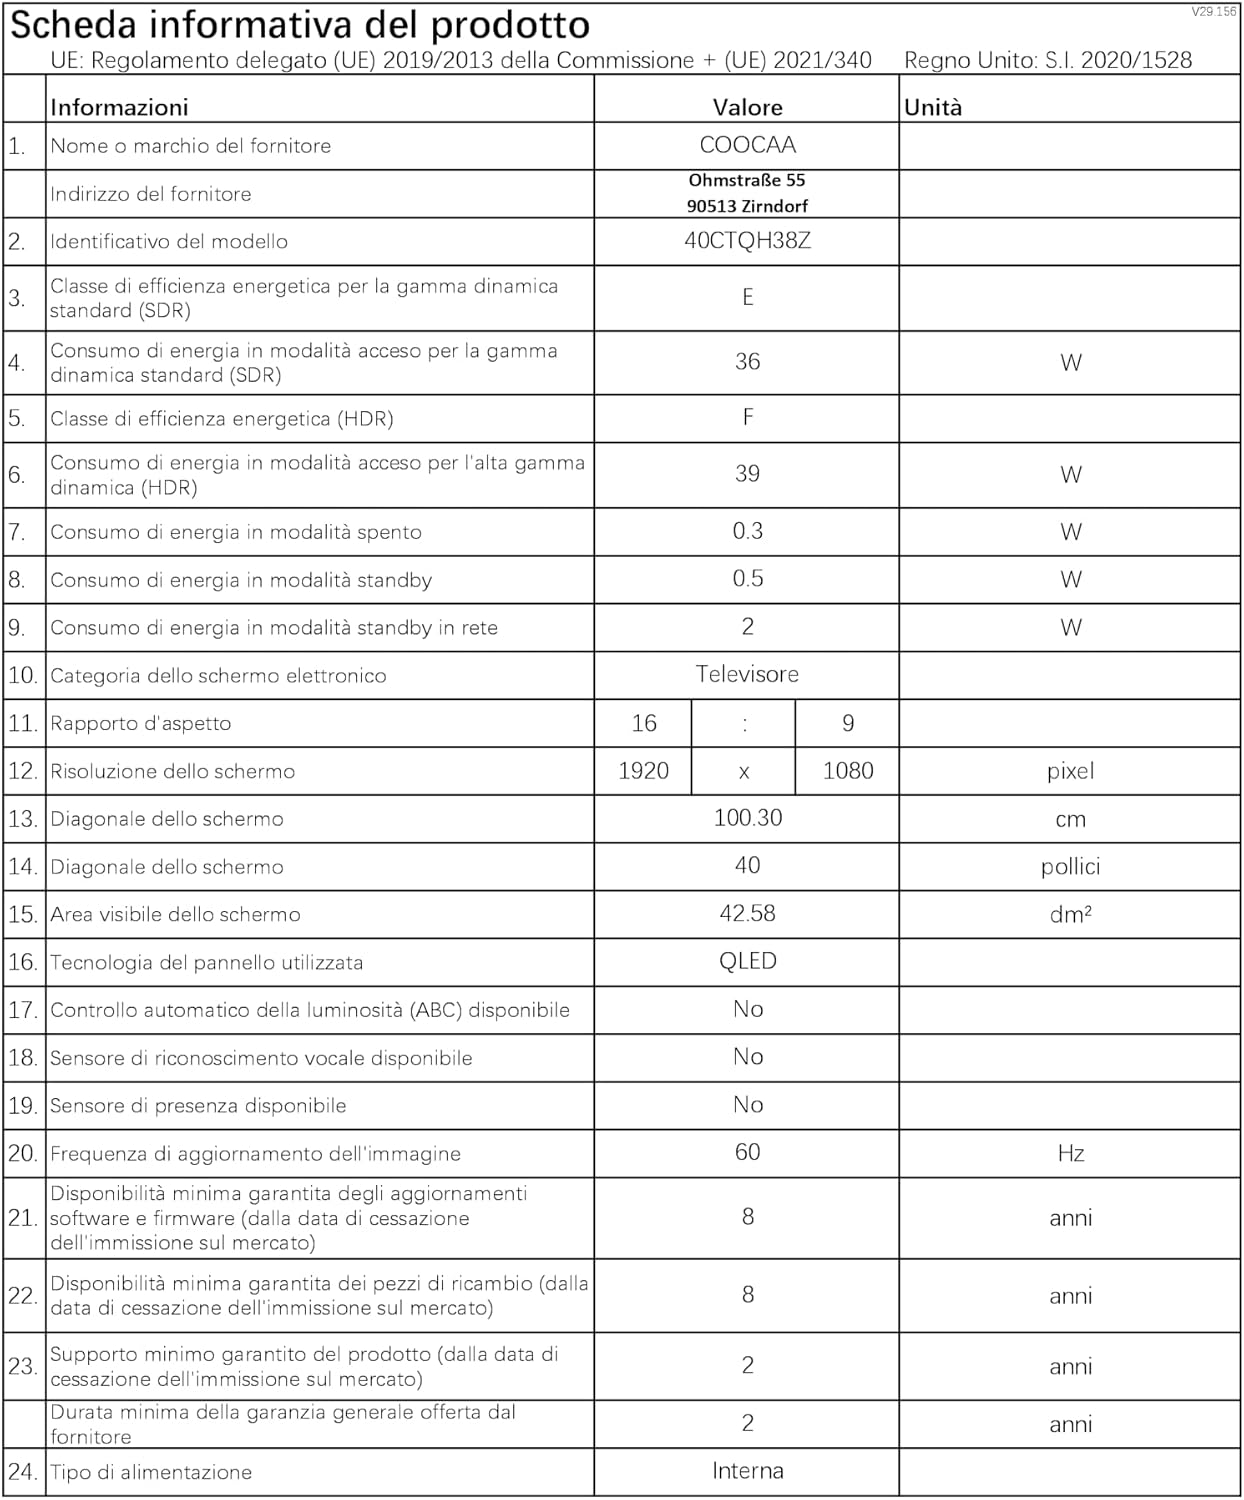
Image: Product Information Sheet providing detailed specifications.
| Feature | Specification |
|---|---|
| Model Name | 40CTQH38Z |
| Screen Size | 40 Inches (100.30 cm diagonal) |
| Display Technology | QLED |
| Resolution | 1080p (1920 x 1080 pixels) |
| Refresh Rate | 60 Hz |
| Aspect Ratio | 16:9 |
| Contrast Ratio | 3000:1 |
| HDR Support | HDR10, HLG |
| Operating System | TiVo |
| RAM | 1.5 GB |
| Connectivity | Bluetooth 5.1, Wi-Fi (Dual-band), Ethernet, 2x HDMI, 2x USB |
| Audio | Dolby Audio, Dolby Digital, Dolby Digital Plus |
| Tuners | DVB-T/T2/C/S/S2, CI+ |
| Special Features | Auto Volume Leveller, Bezel-Less Design, Chromecast, Eye Comfort Mode (Low Blue Light) |
| VESA Mounting Standard | 200 x 100 mm |
| Product Dimensions (with stand) | 89.1 cm (W) x 19.0 cm (D) x 55.6 cm (H) |
| Product Dimensions (without stand) | 89.1 cm (W) x 6.4 cm (D) x 50.7 cm (H) |
| Weight (with/without stand) | 4.8 kg / 4.68 kg |
| Energy Efficiency Class (SDR) | E |
| Energy Consumption (SDR) | 36 kWh/1000h |
| Energy Efficiency Class (HDR) | F |
| Energy Consumption (HDR) | 39 kWh/1000h |

Image: Energy Label for the 40CTQH38Z model. For more details, visit the EPREL database.
10. Warranty and Support
Your coocaa 40CTQH38Z TV comes with a 2-year product warranty from the date of purchase.
- Guaranteed Software Updates: Minimum 8 years from market cessation.
- Guaranteed Spare Parts: Minimum 8 years from market cessation.
- Support Period: Minimum 2 years from market cessation.
For technical assistance, warranty claims, or further inquiries, please refer to the contact information provided with your purchase documentation or visit the official coocaa support website.


