
1. Introduction
Thank you for choosing the ANDELI MONERAE-LED Auto-Darkening Welding Helmet. This helmet is designed to provide superior eye and face protection during various welding and grinding operations. It features a 180° panoramic true color view, 6 highly sensitive arc sensors, integrated LED lights with motion sensing, and a long-lasting rechargeable battery. Please read this manual thoroughly before use to ensure proper operation, maintenance, and safety.
2. Safety Information
Always prioritize safety when welding or grinding. Failure to follow safety guidelines can result in serious injury.
- Eye Protection: This helmet provides UV/IR protection up to shade DIN16, safeguarding your eyes from harmful radiation. Ensure the auto-darkening function is working correctly before each use.
- Head and Face Protection: The helmet protects your face and head from sparks, spatter, and radiation.
- Ventilation: Always work in a well-ventilated area to avoid inhaling welding fumes.
- Check Before Use: Inspect the helmet for any damage, cracks, or loose parts before each use. Replace any damaged components immediately.
- Temperature Range: Operate the helmet within the recommended temperature range of 23°F to 131°F (-5°C to 55°C).
- Not for Laser Welding: This helmet is not suitable for laser welding applications.
3. Product Overview and Components
The ANDELI MONERAE-LED welding helmet is comprised of several key components designed for optimal performance and user comfort.

Figure 3.1: Exploded view of helmet components.
Key Features:
- 180° Panoramic True Color View: A large main viewing area (3.94" x 3.74") combined with two non-auto-darkening side views (DIN4) for an expansive field of vision.
- 6 Arc Sensors: Ensures rapid and accurate auto-darkening response (1/30,000s) across multiple angles.
- Integrated LED Lights: Four LED lights provide up to 400 lumens of illumination in dark environments.
- Motion Sensing: Allows hands-free activation/deactivation of the LED lights by waving a hand.
- 2100mAh Rechargeable Battery: Powers the LED lights and offers extended runtime, rechargeable via Type-C port.
- Adjustable Headgear: Lightweight and ergonomic design with multiple adjustment points for comfort and stability.

Figure 3.2: Key features of the welding helmet.
4. Setup and Adjustment
4.1 Headgear Assembly and Adjustment
The headgear is designed for a comfortable and secure fit. Proper adjustment is crucial for stability and reduced fatigue.
- Fit Adjustment: Use the rear twist knob to tighten or loosen the headband around your head until it feels snug but comfortable.
- Height Adjustment: Adjust the two straps on top of the headgear to position the helmet at the desired height on your head.
- Distance Adjustment: Adjust the distance between the helmet and your face using the side knobs to ensure a clear view and proper air circulation.
- Angle Adjustment: The side knobs also allow you to set the desired angle for the helmet when in the down position. Tighten them sufficiently to prevent the helmet from dropping unexpectedly.

Figure 4.1: Headgear adjustment points.
4.2 Initial Battery Charge
The helmet's LED lights are powered by a rechargeable lithium battery. It is recommended to fully charge the battery before first use.
- Locate the Type-C charging port on the side of the helmet.
- Connect the provided Type-C cable to the helmet and a suitable USB power source (e.g., wall adapter, computer USB port).
- The battery indicator will show charging status. A full charge ensures optimal performance of the LED lights.

Figure 4.2: Type-C rechargeable battery.
5. Operating Instructions
5.1 Powering On/Off and Auto-Darkening Test
- The auto-darkening filter is solar-powered and automatically activates when exposed to light.
- Before each welding session, press the TEST button on the internal control panel to verify the auto-darkening function. The lens should momentarily darken and then return to its clear state.
- A low battery indicator light on the internal control panel will illuminate if the internal CR2032 batteries (for the auto-darkening filter) are low. Replace these batteries as needed.
Video 5.1: Demonstrates the auto-darkening feature and controls of the ANDELI welding helmet.
5.2 Adjusting Shade, Sensitivity, and Delay
The helmet features external controls for easy adjustment of welding parameters.
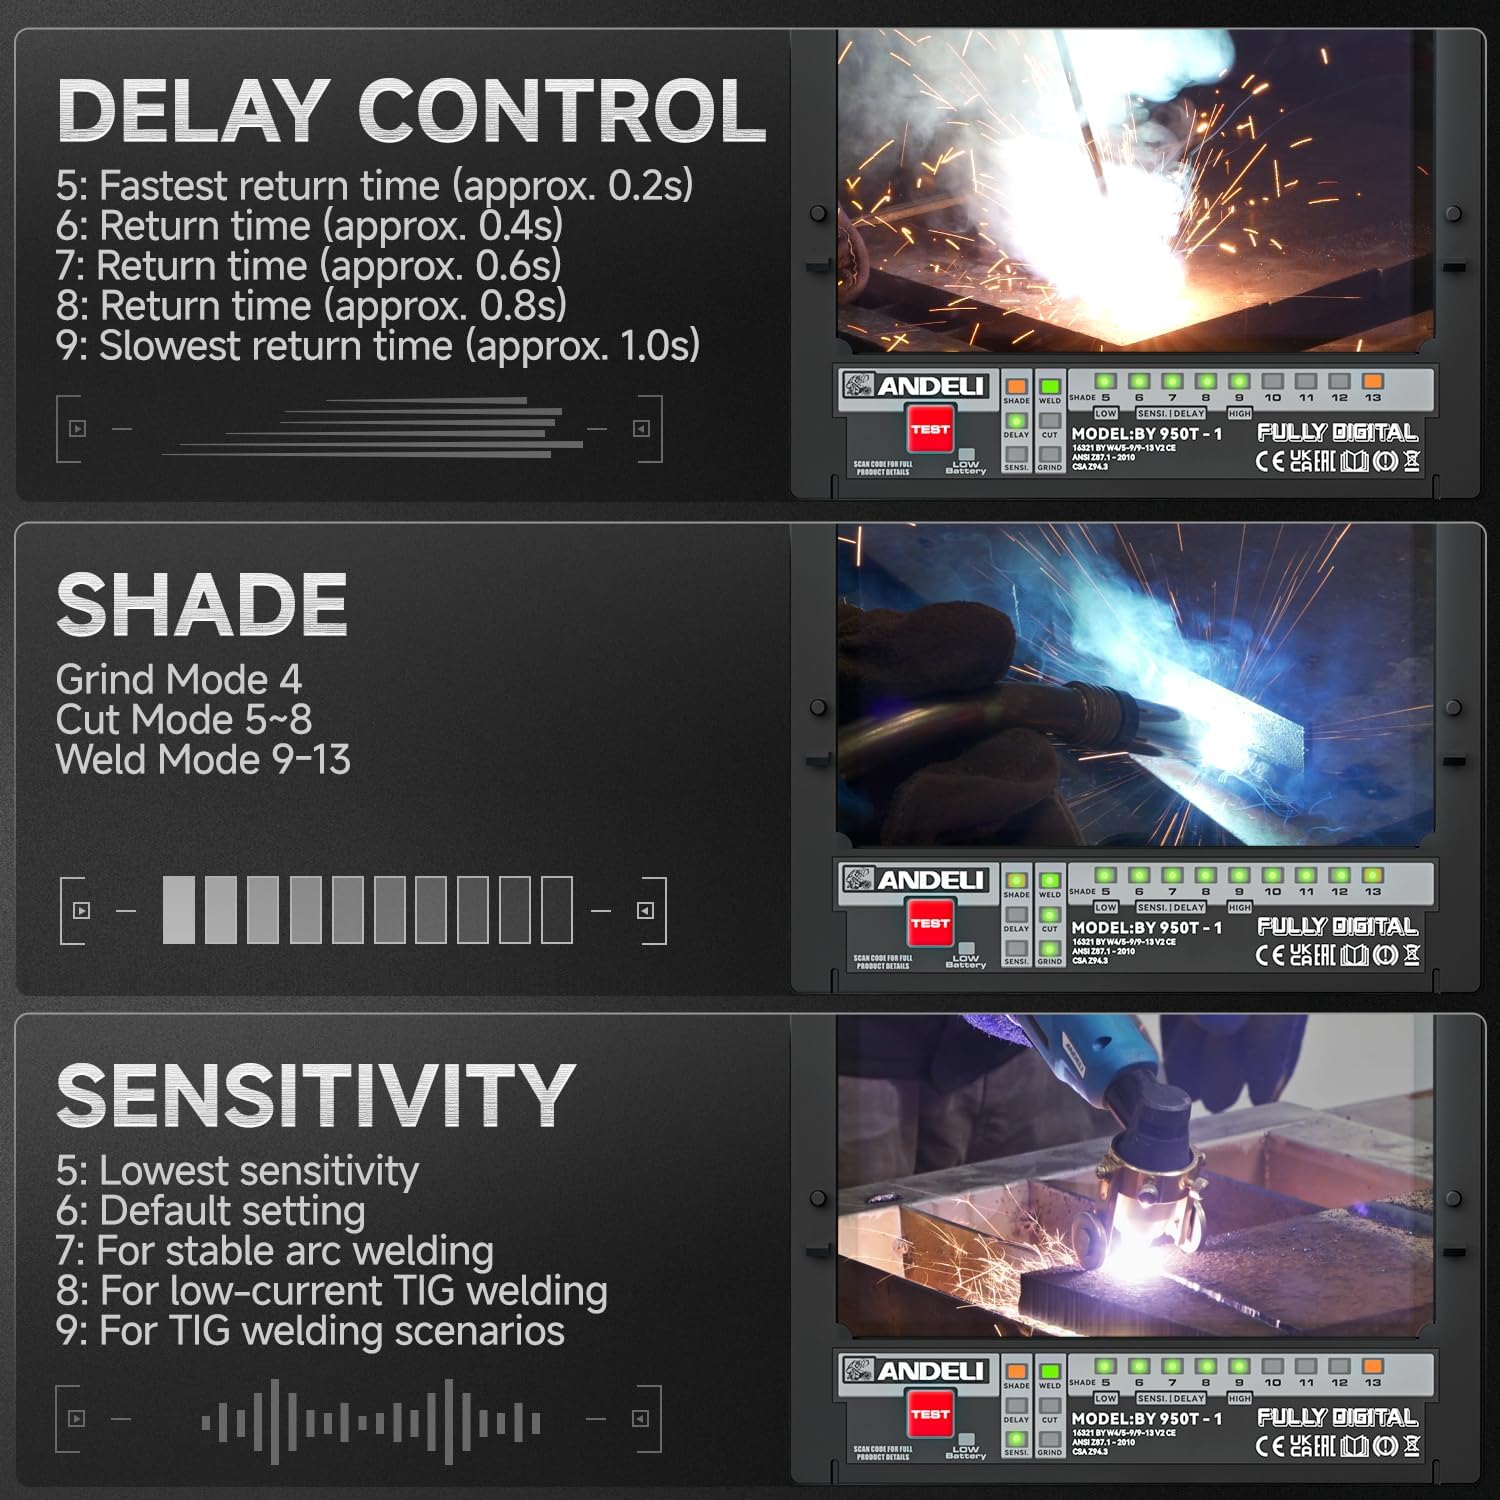
Figure 5.1: External control panel for adjustments.
- Shade Control: Rotate the SHADE knob to select the appropriate shade level for your welding process.
- Grind Mode: DIN 4
- Cut Mode: DIN 5-8
- Weld Mode: DIN 9-13
- Sensitivity Control: Adjust the SENSITIVITY knob to suit ambient light conditions and welding arc intensity. Higher sensitivity is suitable for low-current TIG welding.
- Delay Control: The DELAY knob adjusts the time it takes for the lens to return to its clear state after the arc stops. This helps prevent eye fatigue from residual glow.

Figure 5.2: Welding and grinding modes.
5.3 Using the Integrated LED Lights and Motion Sensing
The helmet's LED lights enhance visibility in dark work areas.
- Activating Lights: Press the light switch on the side control panel to turn on the LED lights. Repeated presses cycle between two brightness levels (High/Low).
- Motion Sensing: To use the motion sensor mode, turn on the power switch and then the motion sensor switch. Wave your hand slowly over the sensor (from a distance of >5cm) to toggle the LED lights ON or OFF. This feature is useful when your hands are dirty or gloved.

Figure 5.3: Gesture control for LED lights.
Video 5.2: Official product video demonstrating the panoramic view, true color, auto-darkening, and integrated light features of the ANDELI welding helmet.
6. Maintenance
Regular maintenance ensures the longevity and proper functioning of your welding helmet.
- Cleaning: Clean the helmet and lenses regularly with a soft, damp cloth. Avoid abrasive cleaners or solvents that could damage the lens coatings or helmet material.
- Lens Replacement: Replace the outer and inner protective lenses when they become scratched, pitted, or too dirty to clean effectively. The kit includes spare lenses.
- Battery Replacement (Auto-Darkening Filter): The auto-darkening filter uses two CR2032 coin batteries. If the low battery indicator illuminates, replace these batteries. Access the battery compartment carefully, often located near the internal control panel.
- Recharging LED Battery: Recharge the 2100mAh lithium battery for the LED lights via the Type-C port as needed. A built-in indicator allows you to monitor remaining power.
- Storage: Store the helmet in a clean, dry place, away from direct sunlight and extreme temperatures. Use the provided storage bag to protect it from dust and scratches.
7. Troubleshooting
Refer to the following table for common issues and their solutions.
| Problem | Possible Cause | Solution |
|---|---|---|
| Lens does not darken | Low or dead CR2032 batteries for ADF; Sensors obstructed; Incorrect sensitivity setting; Damaged ADF. | Replace CR2032 batteries; Clean sensors; Adjust sensitivity; Contact support if ADF is damaged. |
| Lens flashes during welding | Sensitivity too low; Incorrect shade setting; Sensors obstructed; Welding current too low for setting. | Increase sensitivity; Adjust shade to appropriate level; Clean sensors; Ensure settings match welding process. |
| LED lights not working | Rechargeable battery low or dead; Light switch off; Motion sensor not activated or faulty. | Recharge the 2100mAh battery; Ensure light switch is ON; Check motion sensor activation. |
| Helmet feels unstable or uncomfortable | Headgear not properly adjusted; Loose components. | Re-adjust all headgear straps and knobs for a secure and comfortable fit; Tighten any loose components. |
| Visibility is poor | Lenses are dirty or scratched; Incorrect shade setting. | Clean or replace protective lenses; Adjust shade to a lighter setting if not welding. |
8. Specifications

Figure 8.1: Detailed product specifications.
| Feature | Specification |
|---|---|
| Optical Class | 1/1/1/2 |
| LCD Viewing Area | 3.94" x 3.74" (100mm x 95mm) |
| UV/IR Protection | DIN16 |
| ARC Sensors | 6 |
| Operating Modes & Shades | WELD: Shade No.9-13, CUT: Shade No.5-9, GRIND: Shade No.4, LIGHT STATE: Shade No.4 |
| TIG Rating | AC/DC >5Amps |
| Sensitivity Control | 5 Levels |
| Delay Control (Dark to Light) | 5 Levels |
| Power Supply | Rechargeable Battery Powered (2100mAh) + Solar Cell (for ADF) |
| Charge Mode | Via Type-C Port (DC 5V) |
| Switching Speed (Light to Dark) | 1/30,000 sec |
| Recommended Operating Temp | 23°F ~ 131°F (-5°C ~ 55°C) |
| Storage Temperature | -4°F ~ 158°F (-20°C ~ 70°C) |
| Total Weight | 1.32 lbs (0.6 kg) |
| Material | Plastic |
9. Warranty
The ANDELI MONERAE-LED Welding Helmet comes with a 1-Year Manufacturer Warranty from the date of purchase. This warranty covers defects in materials and workmanship under normal use. It does not cover damage resulting from misuse, abuse, unauthorized modification, or improper maintenance. Please retain your proof of purchase for warranty claims.
10. Customer Support
For technical assistance, warranty claims, or any questions regarding your ANDELI MONERAE-LED Welding Helmet, please contact ANDELI customer support through the retailer where the product was purchased or visit the official ANDELI website for contact information.