
Introduction
This manual provides detailed instructions for the safe and efficient use of your LUITON LT-316 Two-Way Radio. Please read this manual thoroughly before operating the device to ensure proper function and to prevent damage. Keep this manual for future reference.
Product Features
- 16 channels for communication.
- Strong anti-interference capabilities.
- Dustproof design for durability.
- High-quality precision circuit design.
- Voice prompt for channel changes and battery status.
- Scanning function.
- Compact and lightweight design.
- FCC certified: FCC ID: X9MLT-316.
Package Contents
Upon unpacking, please verify that all items listed below are present and in good condition:
- LUITON LT-316 Two-Way Radio Unit (quantity as purchased)
- Li-ion Battery (1500mAh)
- Belt Clip
- USB Charging Cable
- Power Adapter
- User's Manual

Image: The LUITON LT-316 Two-Way Radio package contents, showing the radio, battery, belt clip, USB charging cable, power adapter, and a user manual.
Product Overview
Familiarize yourself with the components of your LUITON LT-316 radio:
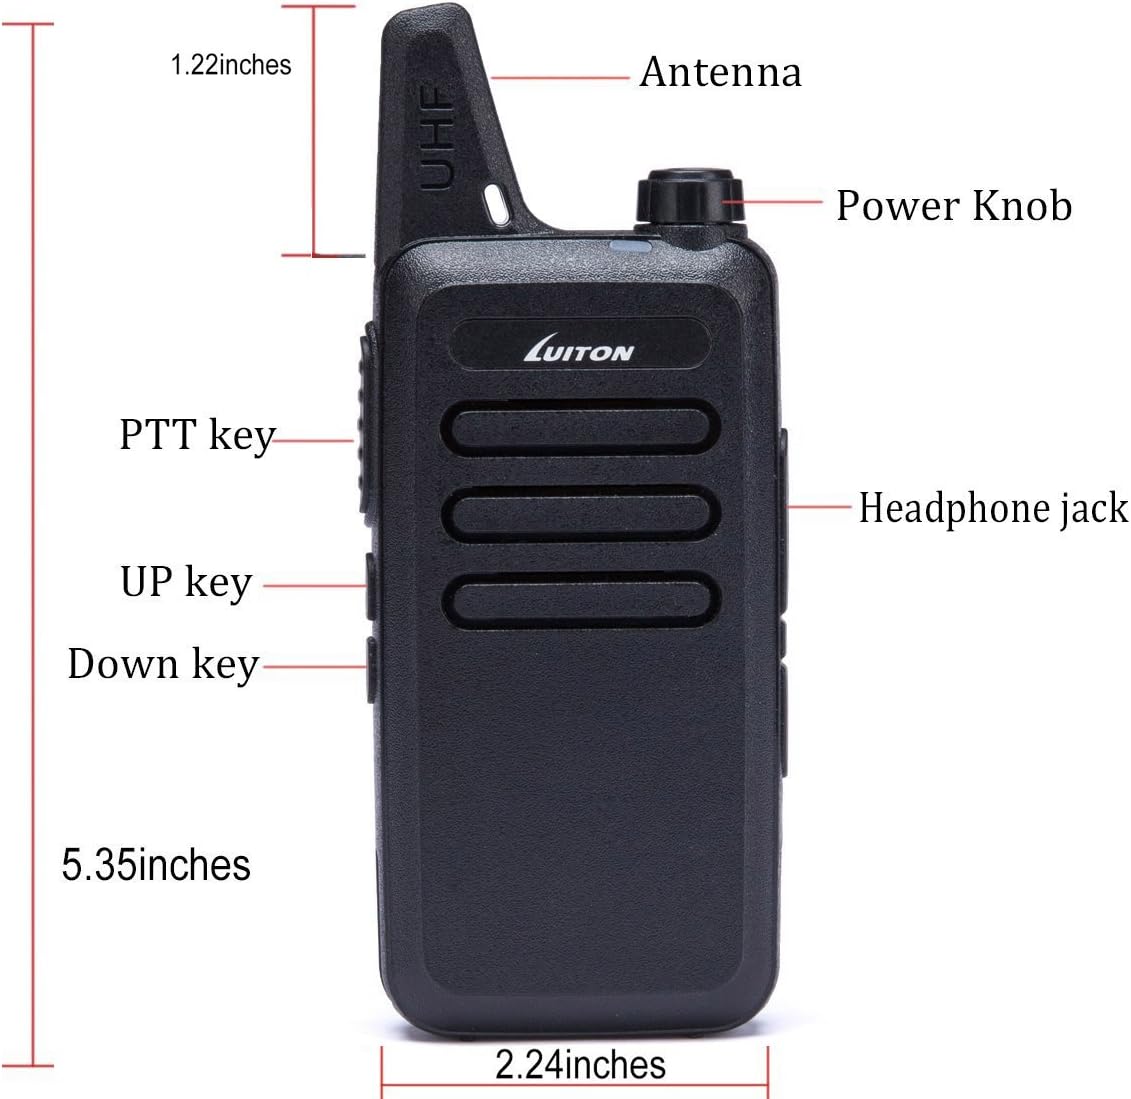
Image: A detailed diagram illustrating the key components of the LUITON LT-316 radio, including the antenna, power knob, Push-to-Talk (PTT) key, up key, down key, and headphone jack, along with its dimensions (1.22 inches antenna, 5.35 inches height, 2.24 inches width).
- Antenna: For transmitting and receiving signals.
- Power Knob: Turns the radio on/off and adjusts volume.
- PTT Key (Push-to-Talk): Press and hold to transmit, release to receive.
- UP Key: Navigates through channels or menu options upwards.
- Down Key: Navigates through channels or menu options downwards.
- Headphone Jack: For connecting an external earpiece or microphone.
Setup
1. Battery Installation and Charging
- Ensure the radio is powered off.
- Locate the battery compartment on the back of the radio.
- Insert the Li-ion battery, ensuring the contacts align correctly.
- Slide the battery into place until it clicks securely.
- Connect the USB charging cable to the radio's charging port and the power adapter.
- Plug the power adapter into a standard electrical outlet. The indicator light will show charging status.
- Charge the battery fully before first use (approximately a few hours). The radio will indicate when charging is complete.

Image: The rear of the LUITON LT-316 radio with the battery cover removed, revealing the battery slot, electrical contacts, and the product label with FCC ID: X9MLT-316.
2. Attaching the Belt Clip
- Align the belt clip with the designated slots on the back of the radio.
- Press firmly until the clip locks into place.
- To remove, gently lift the tab and slide the clip off.

Image: A side profile of the LUITON LT-316 radio, showing the attached belt clip for convenient carrying.
Operation
1. Power On/Off and Volume Adjustment
- To power on, rotate the Power Knob clockwise until you hear a click and a voice prompt.
- To power off, rotate the Power Knob counter-clockwise until you hear a click.
- Adjust the volume by rotating the Power Knob clockwise (increase) or counter-clockwise (decrease).
2. Channel Selection
- Use the UP and Down keys on the side of the radio to cycle through the available 16 channels.
- A voice prompt will announce the selected channel number.
- Ensure all radios in your group are set to the same channel for communication.
3. Transmitting and Receiving
- To transmit, press and hold the PTT (Push-to-Talk) key. Speak clearly into the microphone (located near the PTT key).
- Release the PTT key to stop transmitting and return to receive mode.
- When receiving a transmission, the radio will automatically play the incoming audio.
Maintenance
1. Battery Care
- Fully charge the battery before initial use.
- Avoid overcharging or completely draining the battery for optimal lifespan.
- Store the radio and battery in a cool, dry place when not in use for extended periods.
- If the radio indicates "Please check your battery," it requires charging.
2. Cleaning
- Wipe the radio's exterior with a soft, damp cloth.
- Do not use harsh chemicals or abrasive cleaners.
- Ensure the charging port and headphone jack are free of dust and debris.
Troubleshooting
| Problem | Possible Cause | Solution |
|---|---|---|
| Radio does not power on. | Battery is low or not installed correctly. | Charge the battery fully. Reinstall the battery, ensuring proper contact. |
| Cannot communicate with other radios. | Radios are on different channels or out of range. | Ensure all radios are on the same channel. Move closer to the other radio. Check for obstructions. |
| Poor audio quality or static. | Weak signal, interference, or low battery. | Move to an open area. Avoid sources of electrical interference. Charge the battery. |
| Voice prompt "Please check your battery". | Battery is low. | Charge the radio immediately. |
Specifications
| Feature | Detail |
|---|---|
| Brand | LUITON |
| Model Number | LT-316B |
| Color | Black |
| Number of Channels | 16 |
| Frequency Range | VHF/UHF (400-470MHz) |
| Talking Range Maximum | Up to 5 Miles (Actual range varies by terrain and conditions) |
| Voltage | 3.7 Volts |
| Battery Type | Li-ion (1500mAh) |
| Water Resistance Level | IP54 (Protected from limited dust ingress and water spray from any direction) |
| Product Dimensions (D x W x H) | 0.5" x 1" x 4.2" |
| Item Weight | 1 Pound |
| FCC ID | X9MLT-316 |
Warranty and Support
The LUITON LT-316 Two-Way Radio comes with a 1-year warranty from the date of purchase. This warranty covers manufacturing defects and malfunctions under normal use. It does not cover damage caused by misuse, accidents, unauthorized modifications, or natural disasters.
For technical support, warranty claims, or service inquiries, please contact LUITON customer service through the retailer where the product was purchased or visit the official LUITON website for contact information.
Important Note on Frequencies: The radios may come pre-programmed with commercial frequencies that require a license for use in certain regions, such as the United States. It is the user's responsibility to ensure compliance with local regulations and licensing requirements for radio operation. Programming cables and software may be required to adjust frequencies to legal, license-free bands (e.g., FRS/GMRS if applicable and licensed) or amateur radio bands (with appropriate license).


