
1. Introduction
Thank you for purchasing the Helidirect Yu Xiang F119S MD500 1:16 Scale Electric RC Helicopter. This manual provides essential information for the safe operation, setup, and maintenance of your RC helicopter. Please read this manual thoroughly before operating the product to ensure proper function and to prevent damage or injury.
The F119S MD500 is a highly detailed 1:16 scale electric RC helicopter featuring a realistic fuselage design and advanced flight capabilities. It is equipped with a flybarless dual brushless power system, GPS, and optical flow positioning for stable and precise control.
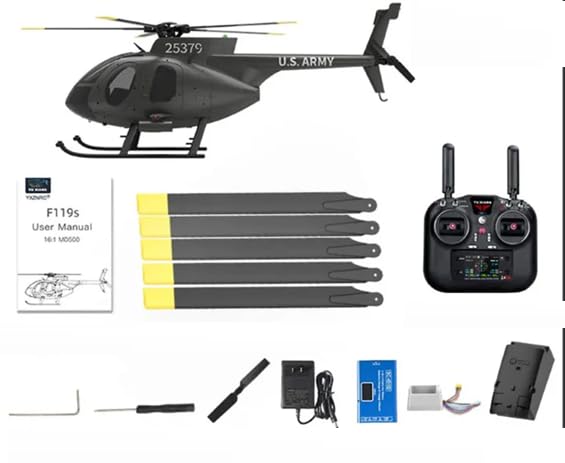
Image 1.1: Helidirect Yu Xiang F119S MD500 RC Helicopter and its remote control.
2. Safety Information
WARNING: This product is intended for users aged 15 years or older. It is not a toy and requires careful operation. Failure to operate safely and responsibly could result in injury or damage to the product or other property.
- Always operate the helicopter in open areas, away from people, animals, buildings, and power lines.
- Do not operate in strong winds or adverse weather conditions.
- Ensure the battery is fully charged and properly installed before each flight.
- Never touch the rotating blades during operation.
- Keep hands, face, and loose clothing away from the helicopter when it is powered on.
- Always turn off the helicopter and then the remote control after use.
- Store the helicopter and battery in a cool, dry place, away from direct sunlight and heat sources.
- Do not modify or disassemble the helicopter or its components.
- Use only original replacement parts and accessories.
3. Package Contents
Verify that all items listed below are included in your package. If any items are missing or damaged, please contact your retailer or Helidirect customer support.
- Helidirect Yu Xiang F119S MD500 RC Helicopter
- 2.4GHz 9CH Remote Control Transmitter
- 11.1V 3500mAh LiPo Battery
- Balance Charger
- Charging Dock
- User Manual (this document)
- Tools (e.g., screwdriver, hex wrench)
- Spare Rotor Blades (if included in specific package)

Image 3.1: Typical package contents for the F119S MD500 RC Helicopter.
4. Specifications
| Feature | Detail |
|---|---|
| Model | YX-F119S MD500 |
| Scale | 1:16 |
| Power System | Flybarless Dual Brushless (4306 560KV motor) |
| Flight Control | 6-Axis Gyroscope, GPS, Optical Flow Positioning, Laser Radar Altitude Hold, Barometer |
| Transmitter | 2.4GHz 9-Channel with Telemetry |
| Control Range | Up to 350 meters |
| Battery | 11.1V 3500mAh 30C LiPo |
| Flight Time | 15-17 minutes |
| Dimensions (L x W x H) | 19.1" x 5.4" x 7.5" |
| Weight | 7 pounds |
| Recommended Age | 15+ years |
5. Setup
5.1 Battery Charging
Before first use, fully charge the 11.1V 3500mAh LiPo battery using the provided balance charger and charging dock.
- Connect the balance charger to a power outlet.
- Connect the LiPo battery to the charging dock, ensuring correct polarity.
- Connect the charging dock to the balance charger.
- Monitor the charging process. The indicator light on the charger will change (e.g., red to green) when charging is complete.
- Disconnect the battery once fully charged. Do not overcharge.
5.2 Transmitter Preparation
Install the required batteries (not included, typically AA) into the remote control transmitter. Refer to the transmitter's specific manual for battery installation details.
5.3 Binding the Helicopter and Transmitter
The helicopter and transmitter are usually pre-bound from the factory. If re-binding is necessary:
- Ensure both the helicopter and transmitter are powered off.
- Turn on the transmitter while holding the bind button (refer to transmitter manual for location).
- Power on the helicopter.
- Wait for the indicator lights on both devices to show a solid connection, indicating successful binding.
- Turn off both devices and then power them on normally to confirm the bind.
5.4 Pre-Flight Check
- Ensure all rotor blades are securely attached and free from damage.
- Verify the battery is fully charged and securely installed in the helicopter.
- Check that the transmitter batteries are sufficient.
- Confirm that the helicopter and transmitter are successfully bound.
- Perform a visual inspection for any loose parts or damage.
6. Operating Instructions
6.1 Basic Controls (Mode 2 Transmitter)
- Left Stick (Throttle/Rudder):
- Up/Down: Controls throttle (altitude).
- Left/Right: Controls rudder (yaw/rotation).
- Right Stick (Aileron/Elevator):
- Up/Down: Controls elevator (pitch/forward-backward movement).
- Left/Right: Controls aileron (roll/left-right movement).

Image 6.1: Interior detail of the F119S MD500, showcasing the realistic design.
6.2 Intelligent Flight Modes
The F119S MD500 features advanced flight modes for enhanced stability and ease of use, utilizing GPS and optical flow positioning.
- GPS Positioning: Provides precise outdoor hovering and navigation. Ensure a clear view of the sky for optimal GPS signal acquisition.
- Optical Flow Positioning: Assists with stable hovering in indoor environments or when GPS signal is weak, by analyzing ground patterns.
- One-Key Return: Initiates an automatic return to the takeoff point.
- Low Battery Return: The helicopter will automatically return to the takeoff point when the battery level is critically low.
- Fail-Safe Return: In case of signal loss, the helicopter will automatically return to the takeoff point.
- Electronic Fence: Sets a virtual boundary to prevent the helicopter from flying outside a predefined area.
6.3 Takeoff and Landing
- Place the helicopter on a flat, level surface.
- Power on the helicopter, then the transmitter. Wait for binding to complete.
- To take off, slowly increase the throttle (left stick up) until the helicopter lifts off the ground.
- To land, slowly decrease the throttle (left stick down) until the helicopter gently touches down.
- After landing, immediately power off the helicopter, then the transmitter.
7. Maintenance
- Cleaning: Use a soft, dry cloth to clean the helicopter after each flight. Avoid using solvents or harsh chemicals.
- Blade Inspection: Regularly inspect rotor blades for cracks, chips, or deformation. Replace damaged blades immediately to ensure stable flight.
- Motor and Gear Inspection: Check motors and gears for any debris or signs of wear. Keep them clean and free of obstructions.
- Battery Care:
- Do not store batteries fully charged or fully discharged for extended periods. Store at approximately 50% charge.
- Avoid puncturing or damaging the battery.
- If the battery swells, discontinue use immediately and dispose of it safely.
- Storage: Store the helicopter and remote control in a cool, dry place, away from direct sunlight and extreme temperatures.

Image 7.1: Inspecting the main rotor mechanism for wear or damage.
8. Troubleshooting
| Problem | Possible Cause | Solution |
|---|---|---|
| Helicopter does not respond to transmitter. | Not bound, low battery (helicopter/transmitter), out of range. | Re-bind helicopter, charge/replace batteries, operate within range. |
| Helicopter drifts during hover. | Calibration needed, strong wind, damaged blades. | Perform gyroscope calibration, fly in calm conditions, inspect/replace blades. |
| Short flight time. | Battery not fully charged, aging battery, aggressive flying. | Ensure full charge, consider replacing old battery, fly more gently. |
| Motors not spinning. | Throttle not armed, motor/ESC issue, wiring problem. | Ensure throttle is at lowest position then moved up slightly to arm, check connections, contact support if issue persists. |
9. Warranty and Support
For warranty information and technical support, please refer to the documentation included with your purchase or visit the official Helidirect website.
You can also contact Helidirect customer service directly for assistance with product issues, spare parts, or operational questions.
Helidirect Contact Information:
Visit the Helidirect Store on Amazon
Refer to your purchase receipt for specific warranty terms and conditions.