Introduction
Thank you for choosing the Kinderkraft I-GROW 2 PLUS car seat. This manual provides essential information for the correct installation, safe use, and maintenance of your car seat. Please read these instructions carefully before use and keep them for future reference. This car seat is designed to accommodate children from 40 to 150 cm in height, offering versatility and safety through various growth stages.
Safety Information
Your child's safety is paramount. Always adhere to the following guidelines:
- Always ensure the car seat is correctly installed according to the instructions for your child's height and weight.
- Never leave a child unattended in the car seat.
- Ensure the harness is properly adjusted and snug against your child's body, without twisting.
- Do not use the car seat if it has been involved in an accident, even if there is no visible damage.
- Regularly check all components for wear or damage.
- The car seat features advanced safety systems: H-Guard+ (reinforced headrest for impact energy absorption) and SPS+ (side protections to reduce forces on the spine and shoulders).
- Always follow local regulations regarding car seat usage.
Setup and Installation
The Kinderkraft I-GROW 2 PLUS car seat offers versatile installation options depending on your child's size.
Rear-Facing Installation (RWF) - 40-105 cm
For children from 40 to 105 cm (approximately birth to 4 years), the car seat must be installed in the rear-facing position. This provides the highest level of safety for infants and toddlers.
- Isofix Connection: Extend the Isofix connectors from the car seat base. Align them with the Isofix anchor points in your vehicle and push until they click securely into place. Indicators will turn green when correctly installed.
- Top Tether Connection: Attach the Top Tether strap to the designated anchor point in your vehicle. Tighten the strap until it is taut, ensuring the indicator is green.
- 5-Point Harness: Secure your child using the integrated 5-point harness. Ensure the shoulder straps are at or just below your child's shoulders and the harness is snug.
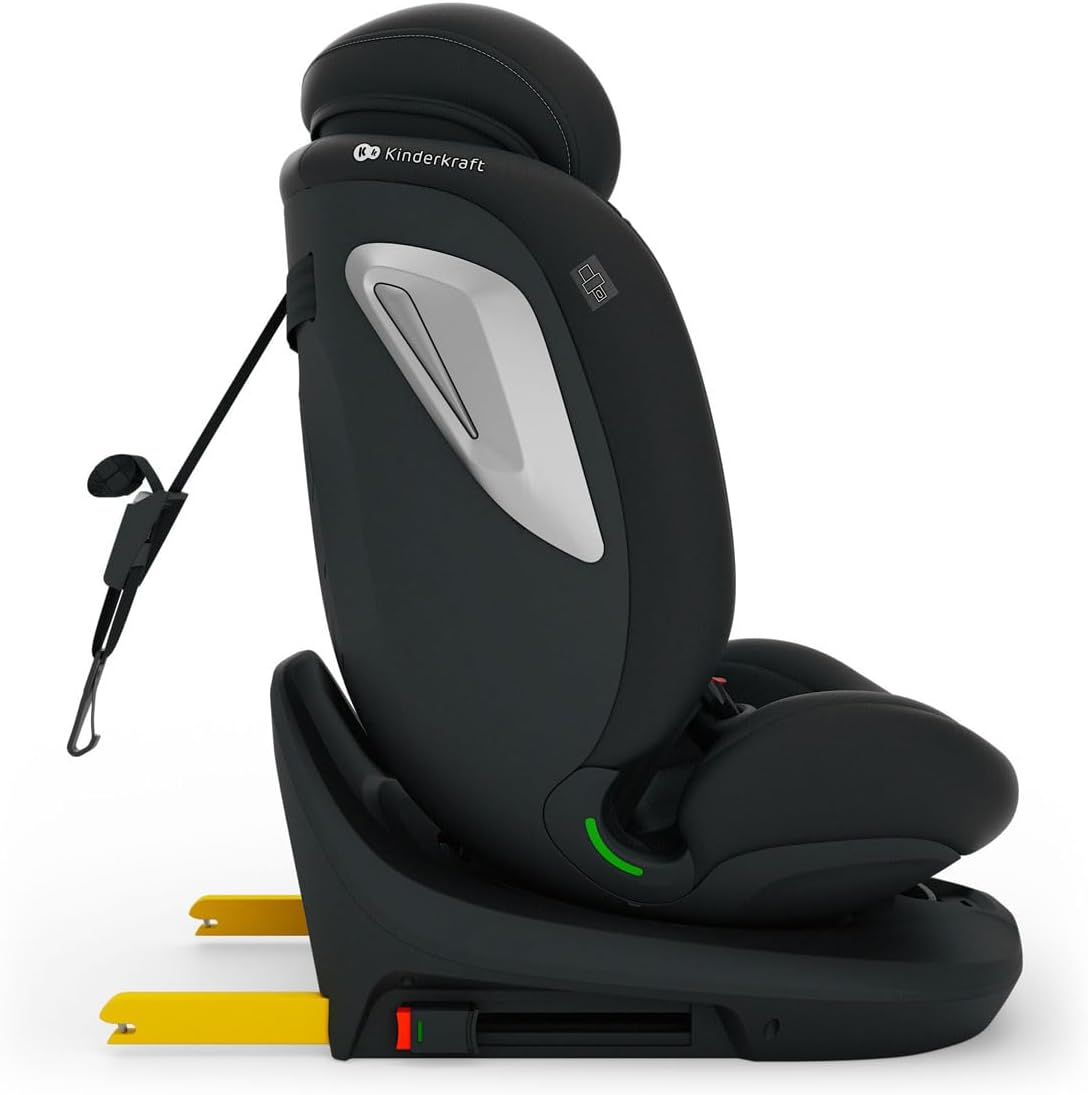
Image: Side view of the car seat demonstrating the Isofix connectors (yellow) extended from the base and the Top Tether strap attached at the rear. This setup is crucial for secure installation.
Forward-Facing Installation (FWF) - 105-150 cm
For children from 105 cm up to 150 cm (approximately 4 to 12 years), the car seat can be installed in the forward-facing position.
- Isofix Connection: Extend and connect the Isofix connectors to your vehicle's anchor points, ensuring they click securely and indicators turn green.
- Top Tether Connection: Attach and tighten the Top Tether strap to its anchor point.
- Vehicle Seat Belt: Once the child reaches 105 cm, the internal 5-point harness should be removed (refer to the manual for removal instructions). Secure your child using the vehicle's 3-point seat belt, guiding it through the designated belt guides on the car seat.

Image: The car seat shown in a reclined position, highlighting the Isofix connection points at the base. This image illustrates the secure attachment mechanism.
Operating Instructions
Easy Spin 360° Rotation System
The innovative Easy Spin 360° system allows you to rotate the car seat with a single movement, simplifying the process of placing your child in the seat and changing its orientation (rear-facing to forward-facing, or vice-versa, when appropriate).
- Locate the rotation lever at the front base of the car seat.
- Press the lever and rotate the seat to the desired position.
- Ensure the seat locks securely into place before driving.
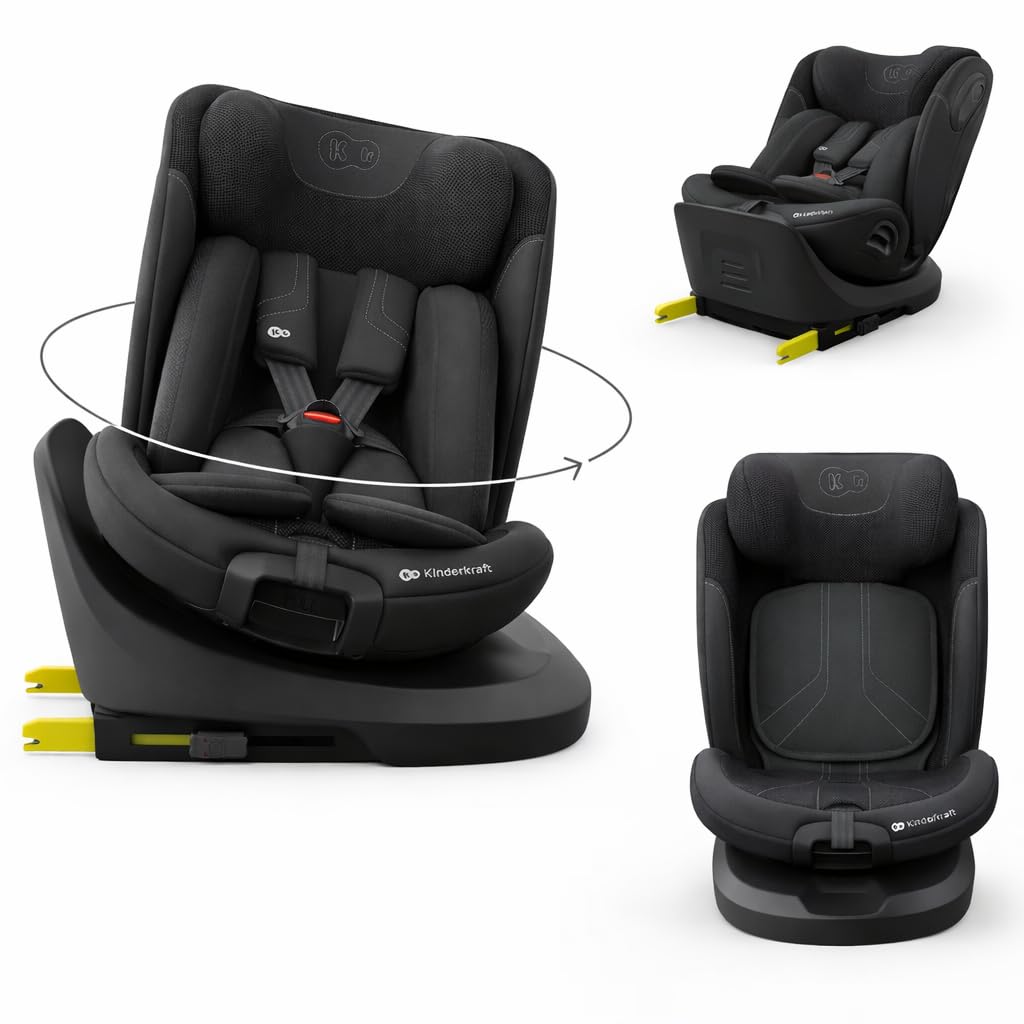
Image: The car seat illustrating its 360-degree rotation capability, with arrows indicating the swivel motion. This feature simplifies child placement and orientation changes.
Recline Positions
The car seat offers 4 recline positions to ensure your child's comfort during travel, whether awake or resting.
- Locate the recline adjustment handle, typically found under the front edge of the seat.
- Pull the handle and adjust the seat to one of the 4 available positions.
- Release the handle and ensure the seat is securely locked in the chosen recline position.
Headrest and Harness Adjustment
The headrest and harness system adjust simultaneously to correctly fit your growing child.
- Locate the headrest adjustment lever, usually at the top rear of the headrest.
- Squeeze the lever and slide the headrest up or down until the shoulder straps are at the correct height (at or just below the shoulders for rear-facing, at or just above for forward-facing).
- Release the lever to lock the headrest in place.

Image: The car seat showing the adjustable headrest mechanism, with the headrest in a raised position. This feature allows for proper fit as the child grows.
Maintenance and Care
Proper maintenance ensures the longevity and hygiene of your car seat.
- Cleaning the Fabric: The car seat features a breathable mesh upholstery (Air Flow System). The fabric covers can be removed for cleaning. Refer to the care label for specific washing instructions (typically hand wash or gentle cycle with mild detergent). Do not use harsh chemicals or bleach.
- Cleaning the Shell: Wipe the plastic and metal parts of the car seat shell with a damp cloth and mild soap. Do not use abrasive cleaners.
- Harness Care: Clean the harness straps with a damp cloth. Do not machine wash or submerge the harness straps, as this can weaken the material.
- Storage: When not in use, store the car seat in a cool, dry place away from direct sunlight.
Troubleshooting
If you encounter any issues, please refer to the following common solutions:
- Car Seat Not Securing: Ensure Isofix connectors are fully engaged (green indicators visible) and the Top Tether is taut. Check for any obstructions preventing a secure fit.
- Harness Difficulty: Ensure the harness straps are not twisted. Adjust the headrest to the correct height for proper shoulder strap positioning.
- Rotation System Stuck: Verify that the car seat is not under tension from the vehicle seat belt or other objects. Ensure the rotation lever is fully pressed.
- Recline Adjustment Issues: Check for any obstructions beneath the seat. Ensure the recline handle is fully engaged during adjustment.
If problems persist, contact Kinderkraft customer support or consult a certified car seat technician.
Specifications
Detailed technical specifications for the Kinderkraft I-GROW 2 PLUS car seat:
| Feature | Detail |
|---|---|
| Model | I-GROW 2 PLUS (KCIGRO02) |
| Child Height Range | 40 - 150 cm (i-Size) |
| Child Weight Range | 0 - 36 kg (approx. birth to 12 years) |
| Installation Type | Isofix with Top Tether |
| Orientation | Rear-Facing (40-105 cm), Forward-Facing (105-150 cm) |
| Rotation System | Easy Spin 360° |
| Recline Positions | 4 positions |
| Harness Type | 5-point harness (removable for 105-150 cm) |
| Safety Features | H-Guard+ (reinforced headrest), SPS+ (side protection system) |
| Ventilation | Air Flow System (ventilated shell, breathable mesh) |
| Product Dimensions (D x W x H) | 44 x 51 x 44 cm (approximate, varies with adjustment) |
| Product Weight | 14 kg |
| Materials | Impact-absorbing foam, reinforced plastic, breathable mesh fabric |

Image: The car seat with various dimensions labeled, including headrest width, seat width, and overall height range. This provides a visual reference for the product's size.
Support and Contact
For further assistance, warranty information, or to report any issues, please contact Kinderkraft customer support. You can find contact details on the official Kinderkraft website or through your retailer.
Official Kinderkraft Website: www.kinderkraft.com


