
Introduction
This manual provides essential information for the safe and efficient installation, operation, and maintenance of your Generic 7546J-B Multi-Functional Kitchen Sink. This workstation sink features a nano black finish, dual-function water delivery system (pull-down sprayer and rainfall waterfall spout), an integrated digital LED display for water temperature, and a stepped workstation design with a cutting board and colander slot. It is constructed from durable nano-coated stainless steel.
Safety Instructions
- Professional Installation Recommended: For optimal performance and safety, professional plumbing and electrical installation is strongly advised.
- Water Supply: Ensure all water connections are secure and leak-free before use. Do not exceed recommended water pressure.
- Electrical Safety: The LED display requires an electrical connection. Ensure all electrical connections are properly insulated and protected from water. Disconnect power before any maintenance or repair.
- Cleaning Agents: Use only mild, non-abrasive cleaning agents. Harsh chemicals can damage the nano-coating and finish.
- Hot Water: Exercise caution when using hot water. The LED display indicates temperature, but always test water temperature before direct contact.
- Children and Pets: Keep children and pets away from the sink during installation and ensure they do not tamper with controls or water flow during operation.
Package Contents
Verify that all components listed below are present and undamaged before beginning installation:
- 1 X Nano black sink
- 1 X Draining system
- 1 X Multifunctional Pull out Faucet with pipes
- 1 X Basin
- 1 X Draining basket
- 1 X Cutting Board
- 1 X Cup Washer with pipes
- 1 X Water purifier faucet
- 1 X Soap dispenser
- 1 X Draining switch
Setup and Installation
This sink is designed for undermount installation. Professional installation is highly recommended to ensure proper fit, sealing, and connection of all plumbing and electrical components.
Installation Steps:
- Unpack and Inspect: Carefully remove all components from the packaging. Inspect the sink and all accessories for any signs of damage. Report any damage immediately.
- Prepare Countertop: Ensure the countertop opening is correctly sized for the undermount sink. Clean the area thoroughly.
- Install Sink: Secure the sink to the underside of the countertop using appropriate mounting clips and sealant. Ensure a watertight seal.
- Connect Draining System: Assemble and connect the draining system to the sink's central drain outlet. Ensure all connections are tight to prevent leaks.
- Install Faucet and Accessories: Mount the multifunctional pull-out faucet, cup washer, water purifier faucet, and soap dispenser into their designated holes on the sink deck. Connect their respective water supply lines and drainage (for cup washer).
- Electrical Connection (LED Display): Connect the LED display's power cable to a suitable power source, following local electrical codes. Ensure the connection is waterproof and secure.
- Test Connections: Once all connections are made, slowly turn on the water supply and check for any leaks. Test the functionality of the faucet, cup washer, and LED display.

Figure 1: Overall view of the sink with its integrated features.

Figure 2: The anti-condensation layer helps prevent moisture buildup and noise.
Operating Instructions
Water Delivery System:
- Pull-Out Faucet: Use the main faucet handle to control water flow and temperature. The pull-out sprayer offers both powerful jet and stream modes, activated by a switch on the sprayer head. The high-arc gooseneck design allows for 360° swivel.
- Rainfall Waterfall Spout: Activate the waterfall spout via its dedicated control knob. This provides a wide, gentle flow for full-basin coverage, ideal for rinsing large items or creating a serene water feature.

Figure 3: The rainfall waterfall spout provides broad water coverage.
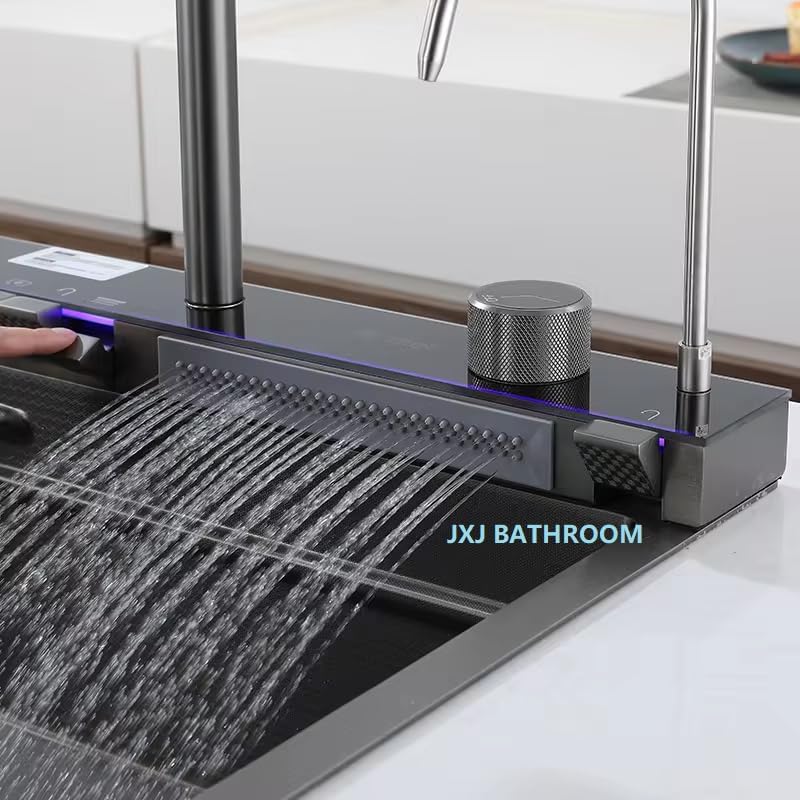
Figure 4: The integrated rain shower feature for gentle rinsing.

Figure 5: The pull-down sprayer offers versatile water delivery.
Smart LED Display:
The integrated LED display shows real-time water temperature. The ambient blue lighting activates when water is flowing, providing a visual indicator and modern aesthetic.
Workstation Features:
- Cutting Board & Colander Slot: Utilize the built-in ledge to seamlessly integrate the provided cutting board and draining basket/colander, creating an efficient prep, wash, and dry area.
- Basin: The additional basin can be used for soaking, washing smaller items, or as a secondary prep area.
Other Accessories:
- Cup Washer: Place a cup or glass upside down on the cup washer and press down to activate a powerful jet for quick rinsing.
- Soap Dispenser: Refill the integrated soap dispenser with liquid soap. Press the pump head to dispense.
- Draining Switch: Use the draining switch knob to open or close the sink's main drain without reaching into the water.

Figure 6: Detailed view of the cup washer, soap dispenser, and control panel.
Maintenance
Regular maintenance will ensure the longevity and optimal performance of your sink.
- Cleaning the Sink: The nano-coated stainless steel is designed to be easy to clean and resistant to scratches, stains, and fingerprints. Use a soft cloth or sponge with mild dish soap and warm water. Avoid abrasive cleaners, scouring pads, or harsh chemicals (e.g., bleach, ammonia-based cleaners) as these can damage the nano-coating. Rinse thoroughly and dry with a soft cloth to prevent water spots.
- Draining System: Periodically remove the drain strainer and clean any accumulated food particles or debris to prevent clogs and maintain efficient drainage.
- Faucet and Accessories: Wipe down the faucet and other accessories with a soft, damp cloth. For stubborn water spots, a solution of equal parts white vinegar and water can be used, followed by a thorough rinse.
- LED Display: Keep the LED display area dry. If it gets wet, wipe it immediately with a soft cloth. Do not submerge or spray water directly onto the electrical components.
- Anti-Condensation Layer: The sink features an anti-condensation layer to prevent dampness and reduce noise. No specific maintenance is required for this layer, but ensure the underside of the sink remains dry and free from persistent leaks.

Figure 7: Key features highlighting ease of maintenance and durability.
Troubleshooting
Before contacting support, please review the following common issues and solutions:
| Problem | Possible Cause | Solution |
|---|---|---|
| No water flow from faucet/spout. | Water supply turned off; clogged aerator; kinked hose. | Check water supply valves; clean aerator; inspect hoses for kinks. |
| Low water pressure. | Partially closed water supply; clogged aerator; low household water pressure. | Ensure water supply valves are fully open; clean aerator; consult a plumber for household pressure issues. |
| LED display not working. | No power connection; loose electrical connection; sensor malfunction. | Check power supply and connections; ensure connections are secure. If problem persists, contact a qualified electrician or support. |
| Water leaking from connections. | Loose connections; damaged seals/washers. | Tighten all connections. Replace any damaged seals or washers. If leaks persist, professional assistance is recommended. |
| Sink drains slowly. | Clogged drain or draining system. | Remove drain strainer and clean any debris. Use a drain cleaner suitable for stainless steel if necessary, or consult a plumber. |
Specifications
- Brand: Generic
- Model Number: 7546J-B
- Colour: Nano Black
- Material: Stainless Steel
- Sink Bowl Size: 16x18 inches
- Product Dimensions (D x W x H): 22D x 46W x 75H centimetres
- Style: Modern
- Installation Type: Undermount
- Finish Type: Nano Black
- Shape: Rectangular or square
- Drain Type: Central drain
- Manufacturer: JXJ BATHROOM
Warranty Information
Specific warranty details for the Generic 7546J-B Multi-Functional Kitchen Sink are not provided in the product information. Please refer to your purchase documentation or contact the retailer for warranty terms and conditions.
Support
For technical assistance, troubleshooting beyond this manual, or inquiries regarding parts and service, please contact the retailer or manufacturer directly. Contact information may be available on your purchase receipt or the product packaging.