
Introduction
Thank you for choosing the DAYTECH Door/Window Opening Sensor Security Alarm. This device is designed to enhance your home security and provide convenient alerts for various situations. It features a loud 110dB alarm, 27 selectable tones, and 5 adjustable volume levels. With 5 distinct operating modes, it can function as a visitor chime, an intrusion alarm, or a reminder for open doors like refrigerators. Its compact design and easy, wire-free installation make it suitable for various applications, including doors, windows, and cabinets.

Image: The DAYTECH Door/Window Sensor installed on both a door and a window, illustrating its function to provide immediate notification when an opening is detected. The image highlights the 110dB maximum volume and 5-stage volume adjustment.
1. Setup and Installation
Follow these steps for proper installation of your DAYTECH Door/Window Sensor.
1.1. Pre-Installation Checks
Before attaching the sensor, ensure the chosen location meets the following criteria:
- Avoid high moisture areas: Do not install in bathrooms or other places with excessive humidity.
- Stable and smooth surface: Avoid unstable or easily scratched surfaces.
- Away from strong magnets: Keep the sensor away from strong magnetic fields to prevent interference.
- Check for physical obstruction: Ensure the main unit does not collide with the magnet when the door or window opens and closes.

Image: A visual guide for pre-installation checks, advising users to avoid areas with high moisture, unstable surfaces, strong magnetic objects, and to ensure no physical obstruction during door/window operation.
1.2. Battery Installation
The sensor requires two AAA batteries (included). Open the battery compartment cover on the main unit and insert the batteries, ensuring correct polarity. Close the cover securely.
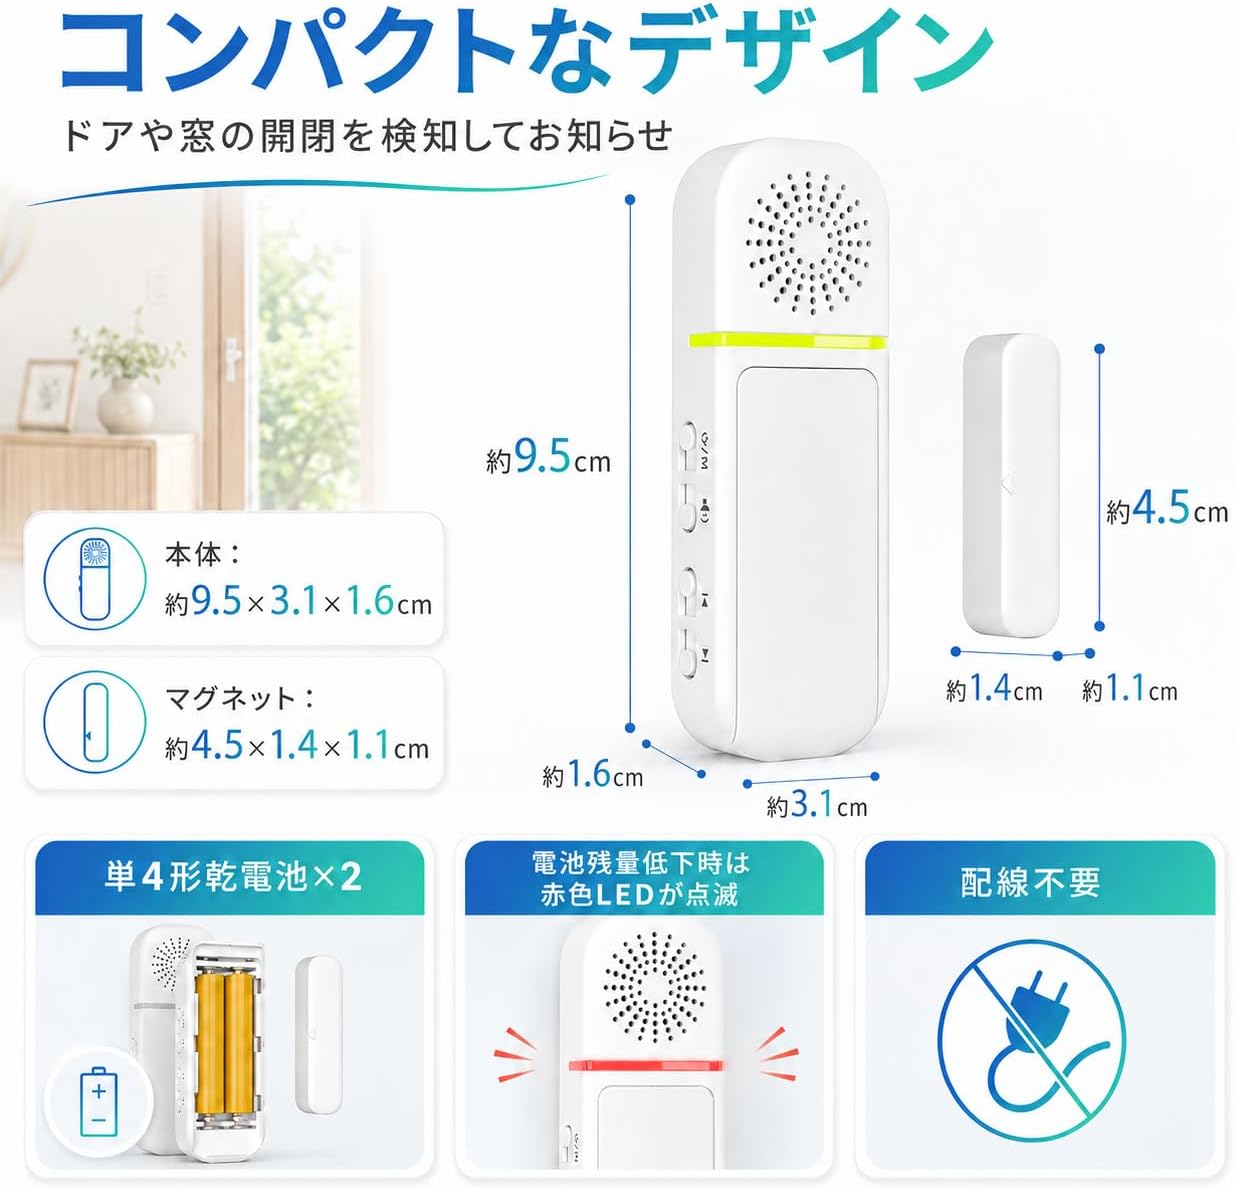
Image: This image displays the compact dimensions of the sensor and magnet, along with an illustration of how to insert two AAA batteries into the main unit. It also indicates that a red LED will flash when the battery is low.
1.3. Mounting the Sensor
The DAYTECH sensor uses a main unit and a smaller magnetic unit. For optimal performance, ensure they are aligned correctly and within the specified distance.
- Align the triangular marks: Match the triangular marks on the main unit and the magnet.
- Check the distance: The gap between the main unit and the magnet should be within 2.5 cm for metal surfaces and 2.0 cm for wood, glass, or resin surfaces.
- Test before final attachment: After temporary placement, perform an open/close test to confirm detection. Once confirmed, firmly attach using the provided double-sided tape.
The double-sided tape provides a strong hold. Once applied, repositioning may be difficult. Press firmly for about 10 seconds, and the adhesive will be fully fixed after approximately 30 minutes.

Image: This image provides a step-by-step installation guide, emphasizing the alignment of triangular marks, checking the required distance between the sensor and magnet, and testing the device before permanent adhesion to prevent installation errors.
2. Operating Instructions
Your DAYTECH sensor offers multiple modes and adjustable settings to suit various needs.
2.1. Understanding Operating Modes
The device features 5 distinct operating modes:
- Door Chime Mode (Single Chime): Ideal for visitor notification. The device emits a single chime sound when the door opens.
- Security Buzzer Mode (Continuous Alarm): For intrusion detection. The alarm sounds continuously immediately after the door/window opens.
- Delayed Notification Mode (30-second delay): Useful for refrigerator doors. Notifies after a 30-second delay if the door remains open.
- Delayed Notification Mode (1-minute delay): Similar to the 30-second delay, but with a 1-minute delay.
- Delayed Notification Mode (2-minute delay): Similar to the 30-second delay, but with a 2-minute delay.

Image: This diagram visually explains the five operating modes: a single chime for visitor alerts, an immediate continuous alarm for security, and three delayed notification options (30 seconds, 1 minute, 2 minutes) suitable for applications like refrigerator doors or areas that remain open for longer periods.
2.2. Switching Modes
To switch between modes, briefly press the power key. The LED will flash, and a chime will sound once to confirm the mode change. During an alarm, any button press can stop the alarm.
Door Chime Mode: Ideal for small shops, entryways, and indoor doors. When the door opens, a single chime sounds. Choose from 27 chime types.

Image: This image demonstrates the Door Chime Mode, where the sensor emits a single chime when a door opens, serving as a visitor notification. It emphasizes the 27 available chime sounds and 5 volume levels, making it adaptable for various environments.
2.3. Volume Adjustment and Chime Selection
The sensor offers 5 levels of volume adjustment and 27 different chime sounds. Adjust the volume and select your preferred chime using the dedicated buttons on the side of the main unit. This allows you to customize the alert to your environment, whether you need a loud alarm during the day or a subtle notification at night.
The maximum volume is 110dB, ensuring you are alerted even in noisy environments. For quiet times, you can lower the volume, and the LED indicator will still provide a visual alert.

Image: This image illustrates the sensor's application for child safety, providing immediate alerts when a child opens a door or balcony. It highlights the 110dB maximum volume, 5-stage volume adjustment, and its ability to monitor day and night, ensuring peace of mind for parents.
3. Maintenance
3.1. Battery Replacement
The sensor is powered by two AAA batteries. When the battery level is low, the LED indicator will flash to notify you. Replace the batteries promptly to ensure continuous operation. Under normal usage (approximately 60 seconds of maximum volume use per day), the batteries can last up to 3 years.
3.2. Cleaning
Wipe the sensor and magnet with a dry, soft cloth. Do not use abrasive cleaners or solvents, as these can damage the device.
4. Troubleshooting
| Problem | Possible Cause | Solution |
|---|---|---|
| Sensor does not activate when door/window opens. |
|
|
| Alarm sounds unexpectedly (false alarm). |
|
|
| Battery cover is difficult to open. | The cover is designed to fit snugly for security. | Apply gentle but firm pressure to slide or pry open the cover. Avoid excessive force to prevent damage. |
5. Specifications
| Feature | Detail |
|---|---|
| Model Number | DA12 Series (DA12WH-2) |
| Brand | DAYTECH |
| Dimensions (Main Unit) | Approx. 9.5 x 3.1 x 1.6 cm |
| Dimensions (Magnet) | Approx. 4.5 x 1.4 x 1.1 cm |
| Sound Level | Max 110 dB |
| Volume Levels | 5 stages |
| Chime Tones | 27 types |
| Operating Modes | 5 modes (Chime, Buzzer, 30s Delay, 1min Delay, 2min Delay) |
| Battery Type | 2 x AAA batteries (included) |
| Sensor Technology | Contact Sensor |
| Mounting Type | Door Mount, Window Mount |
| Origin | China |
6. Warranty Information
This DAYTECH product comes with a 30-day return guarantee and a 1-year quality warranty from the date of purchase. If you experience any initial defects or malfunctions, please contact us for assistance.
7. Customer Support
For any inquiries, issues, or warranty claims, please contact our customer support team through your Amazon order history:
- Go to "Amazon Order History".
- Select your order for this product.
- Click on "Contact Seller".
Our team is dedicated to providing prompt and helpful assistance.


