
Product Overview
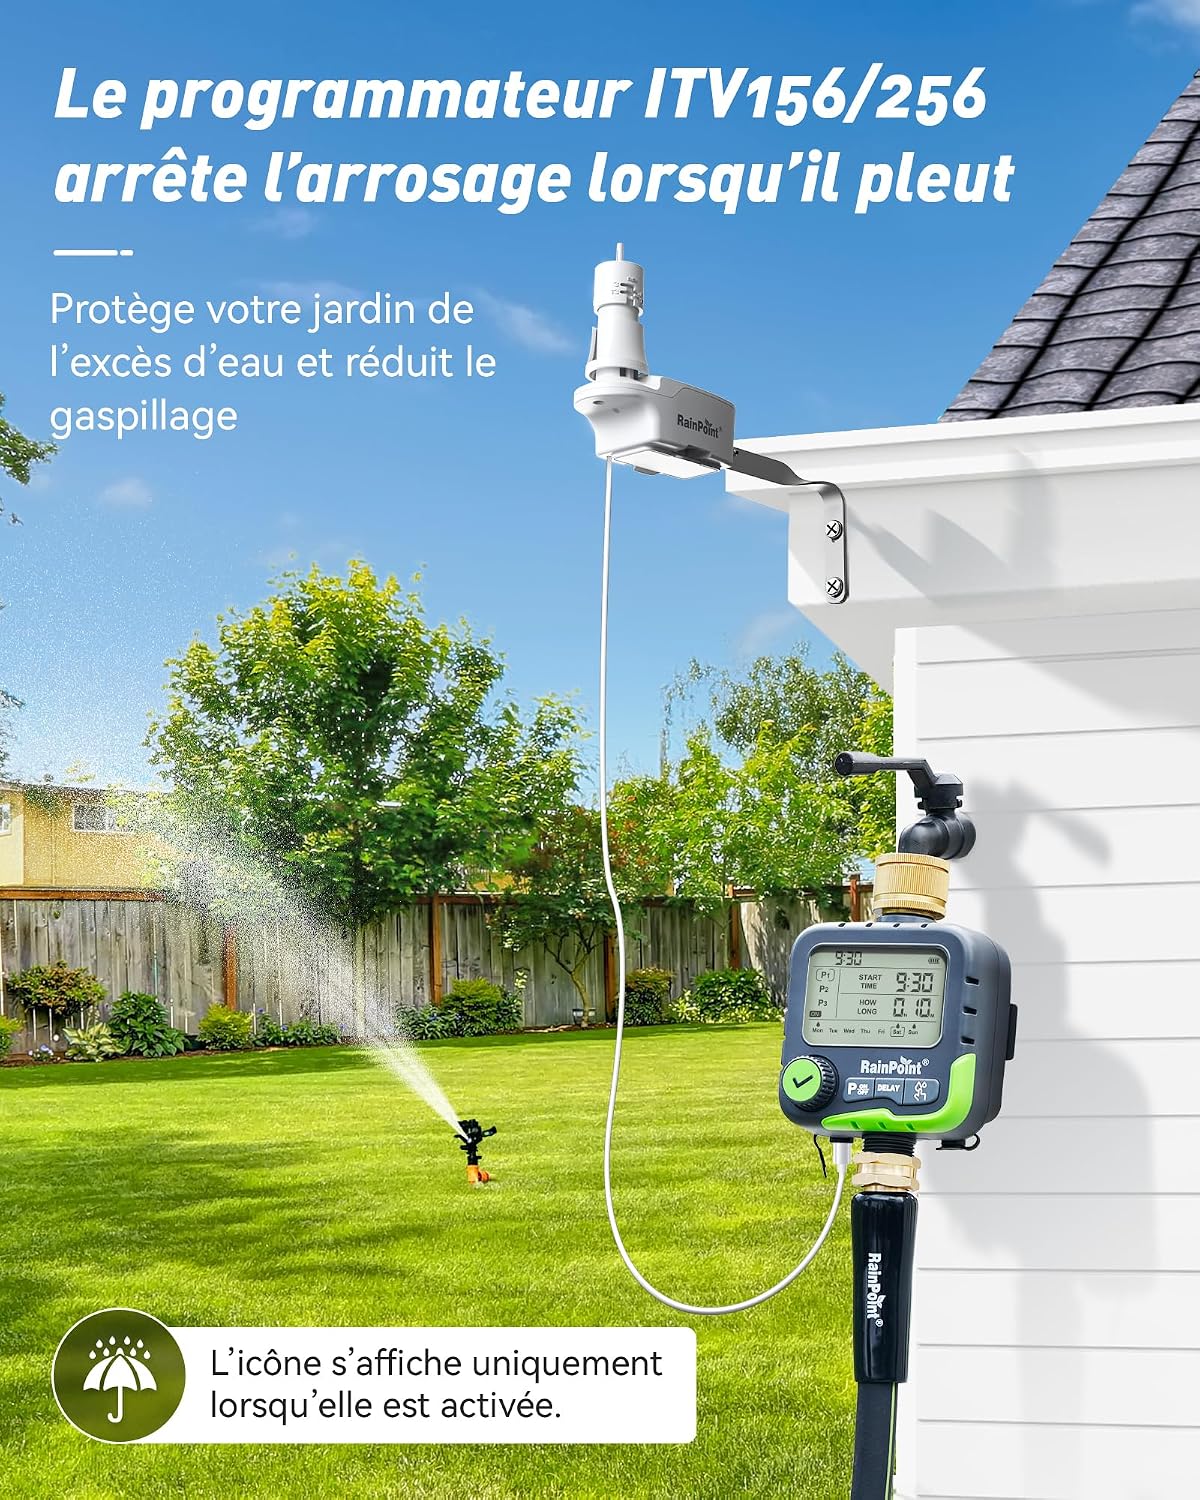
The RAINPOINT ITV156 Smart Watering Timer with Rain Sensor is designed to automate your garden and lawn irrigation, ensuring efficient water usage and healthy plant growth. This kit includes the ITV156 watering timer and a dedicated rain sensor for intelligent operation.
- Intelligent Watering System with Rain Sensor: The system automatically detects rainfall, stopping irrigation immediately and resuming once dry, ensuring efficient and effortless watering.
- Quick Plug & Play Connection: The RAINPOINT rain sensor connects directly via the DC port without tools, allowing for quick installation in minutes.
- Precise 4-Level Triggering: Adjust rain thresholds (3-19 mm) to automatically stop watering during rain, preventing soil saturation and overwatering.
- 3 Independent Watering Programs: Set up to 3 daily programs with customizable start times, durations (1 min to 7h 59min), and days (Mon-Sun) to meet your garden's specific needs.
- Durable Outdoor Design: Features an IP65 waterproof casing and a solid brass inlet for long-lasting outdoor use, ensuring reliable performance in various weather conditions.
1. Setup and Installation
1.1 Package Contents
Before installation, ensure all components are present in the package:
- 1x RAINPOINT ITV156 Watering Timer
- 1x Rain Sensor
- 1x Faucet Connector (EU 3/4" or 1")
- 1x Filter
- 1x User Manual
- 1x Teflon Tape
- 4x AA Batteries (may be pre-installed or included separately)

1.2 Installing the Rain Sensor
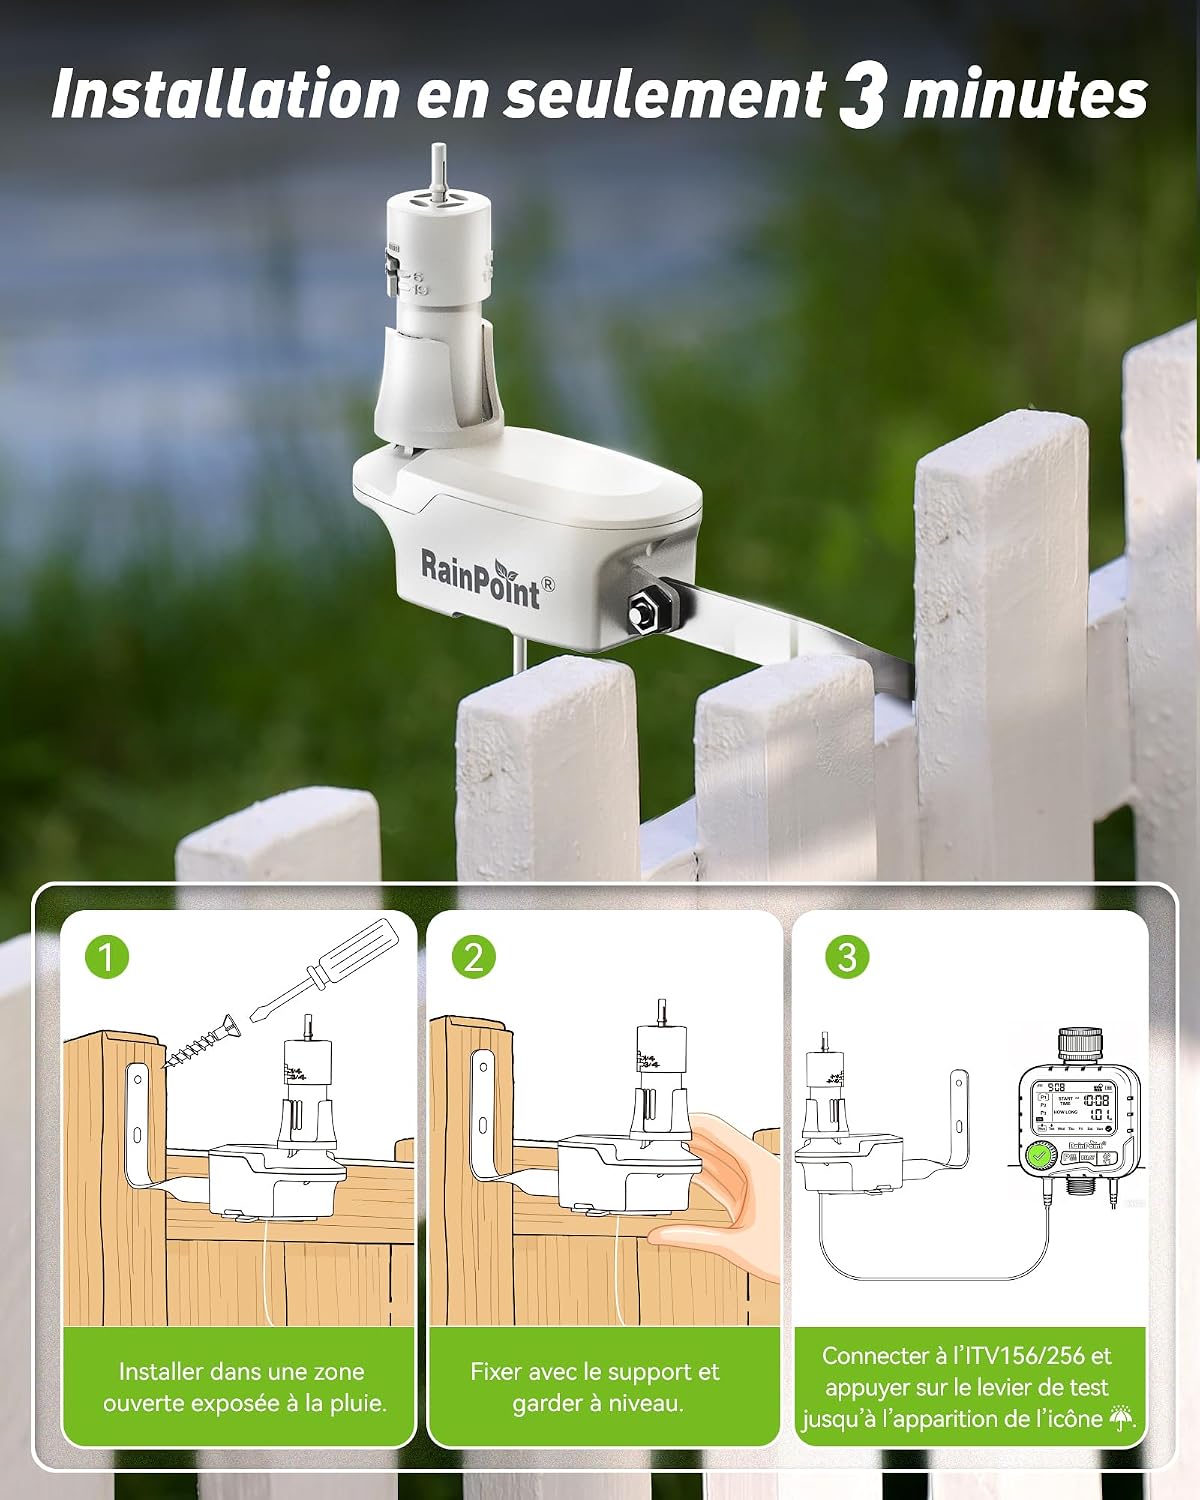
The rain sensor should be installed in an area that receives direct rainfall and is not obstructed by eaves or trees.
- Choose Location: Select an open area exposed to rain.
- Mount Sensor: Fix the sensor with its support bracket, ensuring it is level.
- Connect to Timer: Connect the rain sensor cable directly to the DC port on the ITV156 timer. Press the test lever on the sensor until the rain icon appears on the timer's display to confirm connection.
1.3 Mounting Options for Rain Sensor
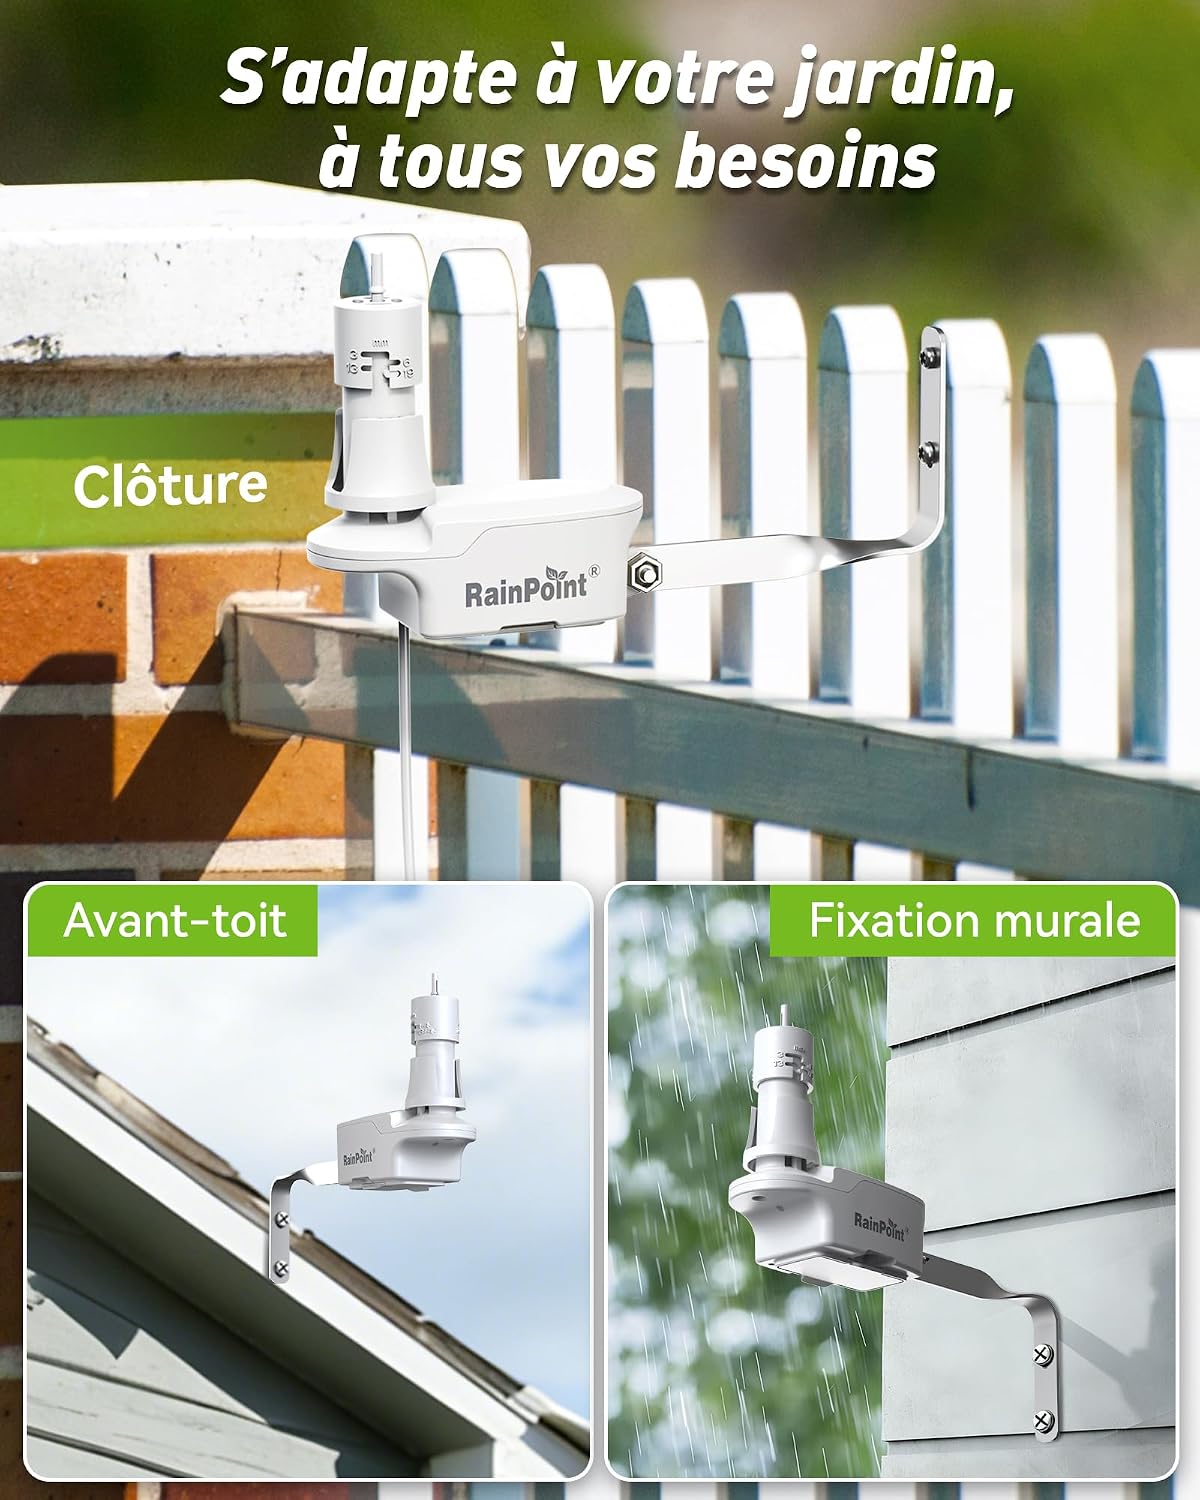
The rain sensor offers flexible mounting options to best suit your garden layout:
- Fence Mounting: Attach the sensor to a fence post.
- Eaves Mounting: Secure the sensor under the eaves of your roof.
- Wall Mounting: Directly fix the sensor to a wall.
1.4 Connecting the Timer to the Faucet
Connect the ITV156 timer to your outdoor faucet and garden hose.
- Prepare Faucet: Ensure your outdoor faucet is clean and free of debris.
- Apply Teflon Tape: Wrap the provided Teflon tape around the threads of your faucet for a watertight seal.
- Attach Timer: Screw the brass inlet of the timer onto the faucet. Hand-tighten firmly.
- Connect Hose: Attach your garden hose to the outlet of the watering timer.

2. Operation
2.1 Setting the Current Time and Day
Before programming, set the current time and day on the timer. Refer to the user manual for specific button presses to enter time/day setting mode.
2.2 Programming Watering Schedules
The ITV156 allows for up to three independent watering programs (P1, P2, P3) to customize your irrigation needs.
- Select Program: Use the program selection button to choose P1, P2, or P3.
- Set Start Time: Adjust the start time for the chosen program.
- Set Duration: Specify the watering duration from 1 minute to 7 hours and 59 minutes.
- Select Days: Choose the specific days of the week for the program to run (Monday to Sunday).

2.3 Adjustable Rain Sensitivity
The rain sensor's sensitivity can be adjusted to prevent unnecessary watering based on actual rainfall levels.
- Thresholds: Choose from four adjustable rain thresholds: 3mm (1/8"), 6mm (1/4"), 13mm (1/2"), or 19mm (3/4").
- Automatic Pause: When the selected rainfall threshold is met, the timer will automatically pause all active watering programs.

2.4 Automatic Resumption After Rain
The system is designed to automatically resume watering once the rain sensor dries, eliminating the need for manual intervention.
- Drying Mechanism: The rain sensor features a ventilation ring that adjusts the drying speed, ensuring watering resumes at the appropriate time.
- No Manual Reset: Once the sensor is dry, the timer will automatically reactivate its programmed schedules.

2.5 Manual Watering
You can initiate manual watering at any time without affecting your programmed schedules.
- Activate Manual Mode: Press the dedicated manual watering button (often labeled 'ON' or 'Manual').
- Set Duration: Use the dial or buttons to set the desired duration for manual watering.
- Start/Stop: Confirm to start manual watering. Press the button again to stop.

2.6 User Interface and Controls
The ITV156 timer features an intuitive interface for easy programming and control.
- Large 3.3-inch Screen: Provides clear visibility of all settings and current status.
- 360-degree Continuous Adjustment Dial: Allows for smooth and precise setting adjustments.
- Quick Start/Stop Button: Enables rapid activation or deactivation of programs in 5 seconds.

3. Maintenance
3.1 General Care
To ensure the longevity and optimal performance of your RAINPOINT watering timer and rain sensor:
- Keep Clean: Regularly wipe down the timer and sensor to remove dirt and debris.
- Check Connections: Periodically inspect all connections for leaks or damage.
- Winter Storage: In freezing conditions, disconnect the timer and sensor, remove batteries, and store them indoors to prevent damage.
- Durability: The IP65 waterproof rating ensures protection against water jets, but avoid submerging the device.
3.2 Battery Replacement
The timer requires 4 AA batteries for operation. Replace them when the low battery indicator appears on the display.
- Locate Battery Compartment: The battery compartment is typically on the back or side of the timer.
- Open Compartment: Use a screwdriver or coin if necessary to open the battery cover.
- Replace Batteries: Remove old batteries and insert 4 new AA alkaline batteries, ensuring correct polarity (+/-).
- Close Compartment: Securely close the battery cover to maintain water resistance.
4. Troubleshooting
If you encounter issues with your RAINPOINT ITV156 watering timer, refer to the following common troubleshooting steps:
- Timer Not Watering:
- Check if the faucet is turned on.
- Ensure batteries are installed correctly and have sufficient power. Replace if necessary.
- Verify that a watering program is set and active.
- Check if the rain sensor is wet or activated, pausing the schedule.
- Continuous Watering:
- Ensure no manual watering is active.
- Check program settings for excessively long durations.
- Inspect the timer for any physical damage or stuck buttons.
- Rain Sensor Not Detecting Rain:
- Confirm the sensor is installed in an open area receiving direct rainfall.
- Check the cable connection between the sensor and the timer.
- Ensure the sensor's test lever is functioning and the rain icon appears on the timer.
- Low Water Pressure:
- Check the water supply from your faucet.
- Clean the filter inside the timer's inlet to remove any blockages.
5. Product Specifications
| Brand | RAINPOINT |
| Model Number | ITV156-ICS044 |
| Color | Green |
| Product Dimensions | 11P x 13W x 16.2H centimeters |
| Number of Programs | 3 |
| Waterproof Rating | IP65 |
| Power Source | 4x AA Batteries |
| Rain Sensor Connection | DC Port |
| Smart Home Compatibility | Not compatible with smart home systems |
6. Warranty and Support
6.1 Warranty Information
RAINPOINT products are designed for durability and performance. For specific warranty details regarding your ITV156 watering timer and rain sensor kit, please refer to the warranty card included in your product packaging or visit the official RAINPOINT website. Keep your proof of purchase for warranty claims.
6.2 Customer Support
If you have any questions, require technical assistance, or need to report an issue, please contact RAINPOINT customer support through the following channels:
- Official Website: Visit the RAINPOINT official website for FAQs, support resources, and contact forms.
- Email Support: Refer to your user manual for the dedicated customer support email address.
- Online Retailer: For purchase-related inquiries, you may also contact the retailer where you purchased the product.