
Important Compatibility Note
This remote control is specifically designed for adjustable bed bases equipped with the Okin JLDP.15.001.015 CU358-2 control box. It is not a universal remote. To ensure compatibility, it is crucial to verify your existing control box model number and the appearance of your old remote control.
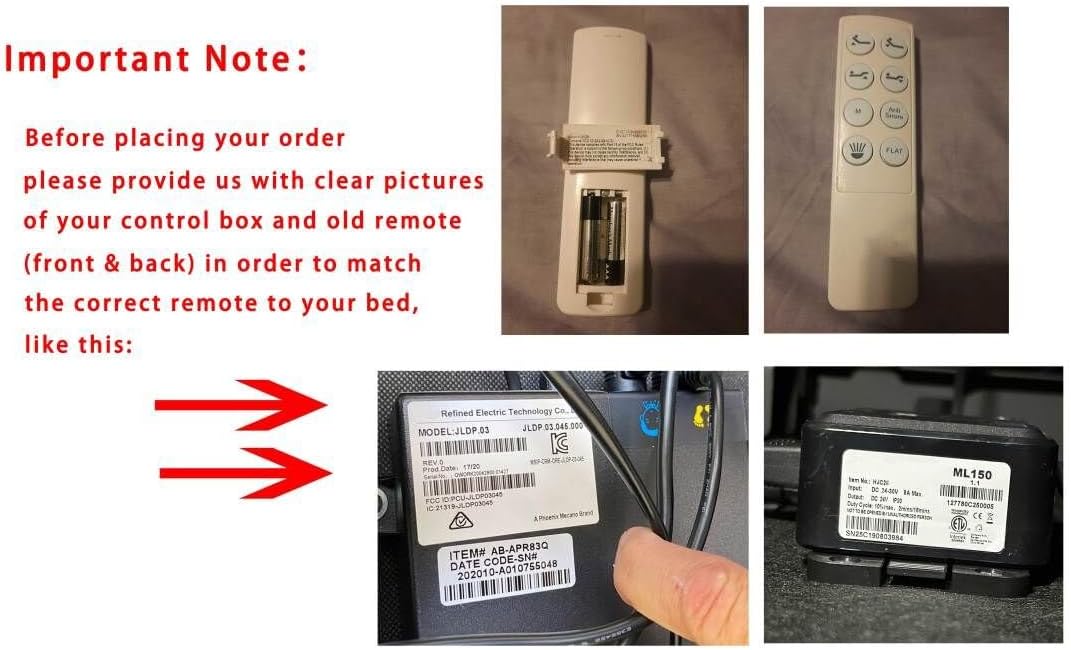
Image Description: This image displays a crucial compatibility message. It advises users to provide clear photos of their control box and old remote (front and back) to ensure the correct replacement remote is matched. Accompanying this text are images of a remote control (front and back views), a close-up of a control box label showing 'MODEL: JLDP.03.046.000' and 'ITEM #: AB-APR83Q', and another label showing 'ML150'. These visuals illustrate the type of information needed for verification.
Before purchasing or attempting to pair, please confirm that your control box matches the model JLDP.15.001.015 CU358-2. If your model number is different, this remote may not be compatible.
Setup: Battery Installation
The remote control requires 2 AAA batteries (not included). Follow these steps to install them:
- Locate the battery compartment on the back of the remote control.
- Slide the battery compartment cover downwards or outwards to open it.
- Insert 2 AAA batteries, ensuring the positive (+) and negative (-) terminals align correctly with the markings inside the compartment.
- Replace the battery compartment cover by sliding it back into place until it clicks securely.

Image Description: This image shows the remote control with its back cover detached, revealing the internal battery compartment designed for AAA batteries. This illustrates how to access the battery area for installation or replacement.
Pairing Instructions
The remote control must be paired with your adjustable bed base's control box to function. Several pairing methods may apply depending on your bed base model. Please refer to your bed base's specific manual for the most accurate instructions, or try the methods below.
Method 1: General Pairing
- Start the massage bed (if applicable) and locate the control box of the massage bed.
- Point the remote control at the control box (open the remote control battery cover to expose the pairing button if necessary) and press the 'Pair' button.
- Press and hold the 'Pair' button for 30 seconds to complete the pairing process.

Image Description: This diagram illustrates a three-step pairing process. Step 1 shows a bed and a control box. Step 2 depicts a remote control pointing towards a control box, with text indicating to press the 'Pair' button. Step 3 shows the remote with a finger holding the 'Pair' button, indicating a 30-second hold time.
Method 2: Pairing with Power Cycle
- Unplug the power cord of your adjustable bed base from the electrical outlet.
- Wait approximately 5 seconds, then plug the power cord back into the outlet.
- Within 10 seconds of plugging the power back in, press and hold the 'PAIR' button on the back of the remote control. The 'PAIR' button will illuminate blue and begin flashing.
- Continue holding the 'PAIR' button until it stops flashing and the LED light on the control box goes out.
- Release the 'PAIR' button. The remote is now paired to the adjustable base.
- Test all remote functions to confirm successful pairing.
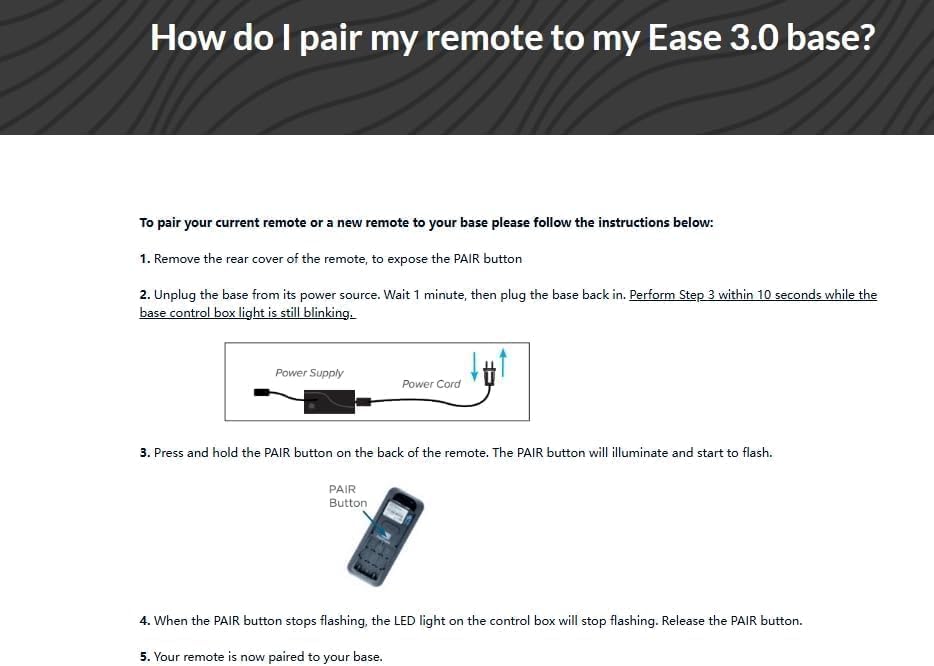
Image Description: This image provides detailed instructions on how to pair a remote to an 'Ease 3.0 base'. It outlines five steps: removing the rear cover to expose the PAIR button, unplugging the base for 1 minute then plugging it back in (performing step 3 within 10 seconds while the control box light blinks), pressing and holding the PAIR button on the remote, waiting for the PAIR button and control box LED to stop flashing, and finally, confirming the remote is paired.
Method 3: Pairing with Power Down Box (if available)
- Remove the back cover from the remote control. Remove and replace the batteries to ensure a fresh power cycle.
- Double-click the button on the Power Down Box (this action will not cause the bed base to move). The light on the Power Down Box will illuminate.
- Press and hold the 'Pair' button on the back of the remote control. The light on the remote will begin to flash, then become a continuous solid light, and then turn off.
- Both lights on the Power Down Box and the remote will be continuous, then simultaneously turn off.
- Replace the back cover of the remote. The remote is now paired.
If the Power Down Box is not available: Remove the back cover of the remote, locate the rubber button in the center of the back, and proceed with pairing as per Method 2 or 1.

Image Description: This image displays the back of a remote control with its cover removed. A small, square 'PAIR' button is visible in the center, along with the battery compartments. This illustrates the location of the pairing button for certain models.
Operating the Remote Control
Once successfully paired, your remote control is ready for use. The buttons on the remote correspond to various functions of your adjustable bed base. Common functions include:
- Head Up/Down: Adjusts the head section of the bed.
- Foot Up/Down: Adjusts the foot section of the bed.
- Flat: Returns the bed to a flat position.
- Massage (if applicable): Activates or adjusts massage functions.
- Memory Presets (if applicable): Recalls saved bed positions.
Refer to your adjustable bed base's original manual for a detailed explanation of each button's specific function.

Image Description: This image shows both the front and back views of the remote control. The front displays buttons for adjusting the head and foot sections of an adjustable bed, as well as a 'Flat' button. The back view shows the battery compartment and a label.
Maintenance
Battery Replacement
When the remote control's range decreases or buttons become unresponsive, it's time to replace the batteries. Follow the battery installation steps outlined in the 'Setup' section.
- Always use 2 new AAA batteries.
- Do not mix old and new batteries, or different types of batteries.
- Remove batteries if the remote will not be used for an extended period to prevent leakage.
Cleaning
Wipe the remote control with a soft, dry cloth. Do not use liquid cleaners or abrasive materials.
Troubleshooting
Pairing Issues
If you encounter difficulties pairing the remote control, consider the following:
- Distance: Ensure the remote and control box are within 2 meters during pairing.
- Batteries: Verify batteries are correctly inserted and have sufficient charge. Replace if necessary.
- Reset Control Box: Some control boxes have a reset button. Push this button (often requiring a pointed object) twice. A green pairing LED should illuminate.
- Remote Pairing Button: On some remotes, after resetting the control box, press and hold the silicone push button on the flipside of the remote (often above the batteries). A blue LED will blink, then become solid, then fade away, indicating successful pairing.

Image Description: This image provides troubleshooting steps for pairing. It shows a remote control with its battery cover removed and a diagram of a control box highlighting a green LED, indicating the location of a pairing indicator or reset button.
Remote Not Responding
- Check battery charge and correct insertion.
- Ensure there are no obstructions between the remote and the bed base's receiver.
- Re-attempt the pairing process.
Specifications
| Brand | Generic |
| Compatible Control Box Model | Okin JLDP.15.001.015 CU358-2 |
| Color | Black |
| Max Number of Supported Devices | 1 |
| Compatible Devices | Adjustable bed base |
| Connectivity Technology | Infrared |
| Controller Type | Button Control |
| Maximum Range | 8 Meters |
| Number of Batteries Required | 2 AAA batteries |
| Manufacturer | SZHKHXD |
Warranty Information
This product comes with a 90-day warranty from the date of purchase. This warranty covers manufacturing defects under normal use. It does not cover damage resulting from misuse, accidents, unauthorized modifications, or improper battery installation.
For warranty claims or further details, please contact your retailer or the manufacturer.
Support and Contact
If you require further assistance or have questions regarding the compatibility or operation of your remote control, please:
- Refer to the original instruction manual for your adjustable bed base.
- Contact the retailer from whom you purchased this remote control.
- For technical inquiries, it is recommended to have your control box model number and a clear description of the issue ready.