
Introduction
Thank you for choosing the HOMCOM Ergonomic Office Chair. This manual provides essential information for the safe assembly, operation, and maintenance of your new chair. Please read these instructions carefully before use and retain them for future reference.

Image: The HOMCOM Ergonomic Office Chair, featuring a grey mesh back and seat, white frame, and adjustable components, positioned in a contemporary office environment.
Setup and Assembly
This chair requires assembly. Please follow the steps below carefully. Ensure all parts are present before beginning assembly.
- Unpack Components: Carefully remove all parts from the packaging. Place them on a clean, flat, and soft surface to prevent scratches.
- Attach Casters to Base: Insert the five casters into the holes at the end of each leg of the chair base. Push firmly until they click into place.
- Insert Gas Lift: Place the gas lift cylinder into the center hole of the chair base.
- Assemble Seat and Backrest: Attach the backrest to the seat mechanism using the provided screws. Ensure all screws are tightened securely.
- Attach Armrests: Secure the armrests to the seat using the designated screws.
- Connect Seat to Gas Lift: Carefully place the assembled seat onto the gas lift cylinder, ensuring it is centered and stable.
- Attach Headrest: Slide the headrest into the designated slots at the top of the backrest.

Image: A close-up view of the chair's smooth-rolling casters, designed to be safe for various floor types including wood, carpet, and marble, ensuring fluid 360-degree movement.
Operating Instructions
Your HOMCOM Ergonomic Office Chair offers several adjustment features to customize your seating experience.
- Seat Height Adjustment: To raise the seat, lift the lever located under the right side of the seat while taking your weight off the chair. To lower the seat, lift the lever while seated. Release the lever at the desired height.
- Tilt Function: Pull the lever (often the same one as height adjustment) outwards to unlock the tilt mechanism, allowing the chair to recline. Push the lever inwards to lock the chair in an upright position. The tension of the tilt can be adjusted by rotating the round knob located under the front of the seat. Turn clockwise to increase tension, counter-clockwise to decrease.
- Lumbar Support Adjustment: The integrated lumbar support can be adjusted to provide optimal lower back comfort. Refer to the diagram for specific adjustment points, typically a knob or lever on the backrest.
- Headrest Adjustment: The headrest can be pivoted and adjusted in height to support your neck and head comfortably. Adjust by gently pushing or pulling the headrest to the desired position.
- Flip-Up Armrests: The armrests can be flipped up to allow the chair to be pushed closer to your desk, saving space. Simply lift the armrests upwards until they lock into a vertical position. To lower, pull them down.

Image: A detailed diagram illustrating the adjustable headrest, showing how it can be pivoted and moved vertically to provide customized neck support.
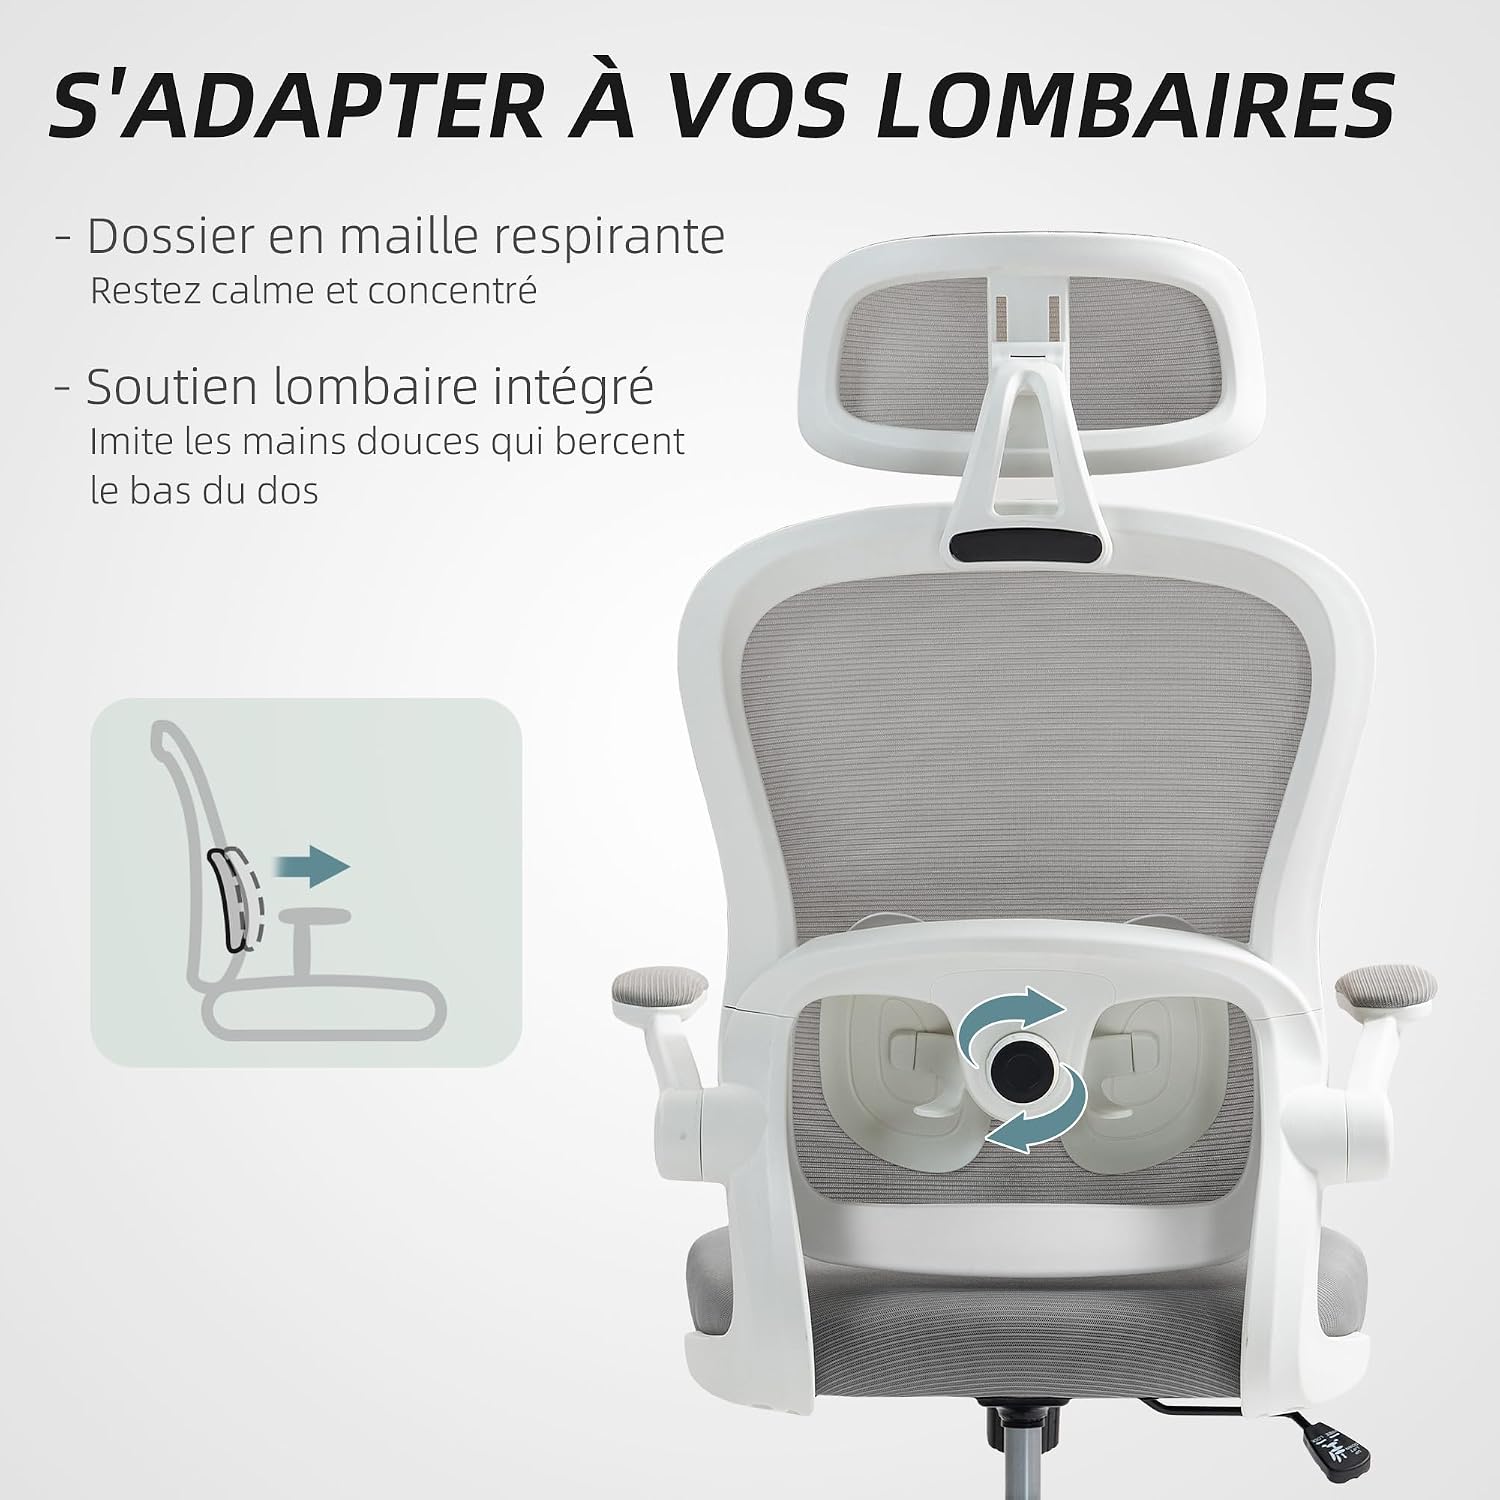
Image: A visual guide demonstrating the integrated lumbar support system, designed to adapt to the natural curve of your lower back for enhanced comfort.

Image: An illustration detailing the chair's tilt function, showing how to engage/disengage the recline and adjust the tension for personalized rocking motion.

Image: A diagram demonstrating the space-saving feature of the flip-up armrests, allowing the chair to be neatly tucked under a desk when not in use.
Maintenance
Proper maintenance ensures the longevity and performance of your chair.
- Cleaning: For general cleaning, use a soft, dry cloth. For deeper cleaning of the mesh and fabric components, dry cleaning is recommended. Avoid harsh chemicals or abrasive cleaners.
- Regular Inspection: Periodically check all screws and bolts to ensure they are tight. Re-tighten if necessary to maintain stability and safety.
- Caster Care: Keep casters free of hair and debris to ensure smooth movement.
- Avoid Overloading: Do not exceed the maximum weight capacity of 120 kg (265 lbs).
Troubleshooting
If you encounter any issues with your chair, refer to the following common solutions:
- Chair Squeaks: Check all bolts and screws for tightness. A small amount of silicone lubricant can be applied to moving parts if the squeaking persists.
- Difficulty Adjusting Height: Ensure the gas lift lever is fully engaged or disengaged. If the gas lift is unresponsive, it may need replacement.
- Chair Feels Unstable: Verify that all casters are securely inserted into the base and that the chair base is not damaged. Ensure all assembly screws are tightened.
- Casters Not Rolling Smoothly: Remove any hair or debris from the caster wheels.
Specifications
Detailed specifications for the HOMCOM Ergonomic Office Chair Model 921-879V00GY:
| Feature | Specification |
|---|---|
| Model Number | 921-879V00GY |
| Overall Dimensions (L x W x H) | 62 x 64 x 107-121 cm (24.4 x 25.2 x 42.1-47.6 inches) |
| Seat Dimensions (W x D) | 51 x 50 cm (20.1 x 19.7 inches) |
| Seat Height Range | 40-48 cm (15.7-18.9 inches) |
| Backrest Height | 76 cm (29.9 inches) |
| Armrest Height (from seat) | 22 cm (8.7 inches) |
| Weight Capacity | 120 kg (265 lbs) |
| Net Weight | 10.5 kg (23.1 lbs) |
| Materials | Mesh, Plastic, Polyester, Foam |
| Color | Grey |
| Special Features | Adjustable Headrest, Adjustable Lumbar Support, Adjustable Height, Flip-up Armrests, Tilt Function, 360° Swivel |

Image: A comprehensive diagram illustrating the key dimensions of the ergonomic office chair, including overall height, seat width and depth, and armrest height.
Warranty and Support
This product comes with a standard manufacturer's warranty. For specific warranty details, please refer to the documentation included with your purchase or contact HOMCOM customer service.
If you have any questions, require assistance with assembly, or need to report a missing/damaged part, please contact HOMCOM customer support through the retailer where you purchased the product or visit the official HOMCOM website for contact information.


