
Introduction
This manual provides essential information for setting up, operating, maintaining, and troubleshooting your ASUS V500 Business Tower Desktop Computer. Please read this manual thoroughly before using your computer to ensure proper operation and to maximize its lifespan. Keep this manual for future reference.
Setup
1. Unpacking the System
Carefully remove all components from the packaging. The box should contain the ASUS V500 desktop tower, a wired keyboard, and a wired mouse. Inspect all items for any signs of damage. If any item is damaged or missing, contact your retailer immediately.

Figure 1: ASUS V500 Desktop Computer with keyboard and mouse.
2. Connecting Peripherals
- Connect the Monitor: Use an HDMI or DisplayPort cable to connect your monitor to the corresponding port on the rear of the computer.
- Connect the Keyboard and Mouse: Plug the wired keyboard and mouse into any available USB-A ports on the front or rear of the computer.
- Connect to Network (Optional): For a wired internet connection, connect an Ethernet cable from your router or modem to the RJ-45 port on the rear of the computer. For wireless connectivity, ensure your Wi-Fi network is available.
- Connect Power: Plug the power cord into the power connector on the rear of the computer, then plug the other end into a grounded electrical outlet.
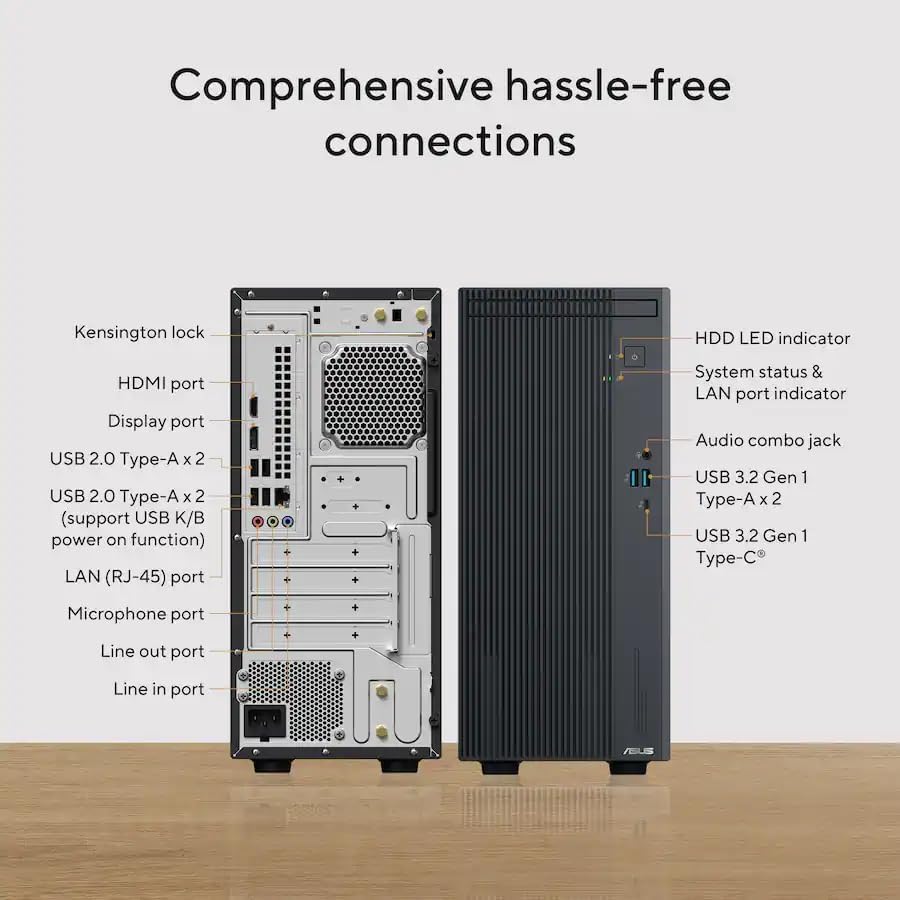
Figure 2: Overview of front and rear connectivity ports.
3. Initial Power On
Press the power button located on the front of the computer. The system will boot up, and you will be guided through the Windows 11 initial setup process. Follow the on-screen instructions to configure your operating system settings, user accounts, and network preferences.

Figure 3: Front panel of the ASUS V500, highlighting the power button.
Operating the Computer
Windows 11 Operating System
Your ASUS V500 comes pre-installed with Windows 11 Home (64-bit, English). Familiarize yourself with the Windows 11 interface, including the Start Menu, Taskbar, and File Explorer. Microsoft provides extensive online documentation and tutorials for Windows 11.
Connectivity
- Wi-Fi 6: Connect to wireless networks for internet access. Access Wi-Fi settings via the Windows Taskbar network icon.
- Bluetooth 5.4: Pair with Bluetooth-enabled devices such as headphones, speakers, or mobile phones. Manage Bluetooth devices through Windows Settings.
- Ethernet (RJ-45): Provides a stable, high-speed wired internet connection.
Using Ports
The ASUS V500 offers a variety of ports for connecting external devices:
- Front Ports:
- 1x USB-C (USB 5Gbps / USB 3.2 Gen 1)
- 2x USB-A (USB 5Gbps / USB 3.2 Gen 1)
- 1x Headphone / Microphone Combo Jack (3.5mm)
- Rear Ports:
- 4x USB-A (Hi-Speed USB / USB 2.0)
- 1x HDMI 1.4
- 1x DisplayPort 1.4
- 1x Ethernet (RJ-45)
- 1x 7.1 Channel Audio (3 ports)
- 1x Power Connector

Figure 4: Rear panel ports for external connections.
Maintenance
Cleaning the Computer
To maintain optimal performance and prevent overheating, regularly clean the exterior of your computer and ensure ventilation openings are free from dust. Use a soft, dry cloth for general cleaning. For stubborn dirt, a slightly damp cloth with a mild cleaning solution can be used, ensuring no liquid enters the system. Avoid abrasive cleaners.
Software Updates
Keep your operating system and drivers updated. Windows Update automatically handles OS updates. For driver updates, visit the official ASUS support website for your V500 model to download the latest drivers.
Troubleshooting
If you encounter issues with your ASUS V500, refer to the following common troubleshooting steps:
- No Power: Ensure the power cord is securely connected to both the computer and the electrical outlet. Verify the outlet is functional.
- No Display: Check that the monitor is powered on and the video cable (HDMI or DisplayPort) is securely connected to both the computer and the monitor. Try a different video cable or monitor if possible.
- No Internet Connection: If using Wi-Fi, check your router and ensure the Wi-Fi adapter is enabled in Windows settings. If using Ethernet, ensure the cable is properly connected and your router/modem is working.
- Slow Performance: Close unnecessary applications running in the background. Check disk space and consider running a disk cleanup. Ensure your system has the latest updates.
- Peripheral Not Working: Ensure the peripheral (keyboard, mouse, etc.) is correctly plugged into a functional USB port. Try a different port or restart the computer.
For more complex issues, consult the ASUS support website or contact technical support.
Specifications
The following table outlines the key specifications for the ASUS V500 Business Tower Desktop Computer:
| Feature | Detail |
|---|---|
| Model Name | ASUS V500 |
| Processor | Intel Core i7-13620H (10 Cores, 16 Threads, 24 MB Cache, 2.4 GHz Base, up to 4.9 GHz Max Turbo) |
| Operating System | Windows 11 Home, 64-bit, English |
| Graphics | Intel UHD Graphics for 13th Gen Intel Processors (Integrated) |
| RAM | 16GB DDR5 (Expandable up to 64GB) |
| Storage | 512GB PCIe M.2 SSD (Configurable up to 4TB) |
| Wireless Connectivity | Wi-Fi 6, Bluetooth 5.4 |
| Front Ports | 1x USB-C (USB 3.2 Gen 1), 2x USB-A (USB 3.2 Gen 1), 1x Headphone/Mic Combo Jack |
| Rear Ports | 4x USB-A (USB 2.0), 1x HDMI 1.4, 1x DisplayPort 1.4, 1x Ethernet (RJ-45), 1x 7.1 Channel Audio (3 ports), 1x Power Connector |
| Dimensions (W x D x H) | 6.1 x 11.65 x 13.66 inches |
| Weight | 13.23 lbs |
| Included Peripherals | ASUS Black Wired Keyboard and Mouse |

Figure 5: Key specifications of the ASUS V500.
Warranty Information
The ASUS V500 Business Tower Desktop Computer comes with a 1-Year Manufacturer Warranty. This warranty covers defects in materials and workmanship under normal use. For specific terms and conditions, please refer to the warranty card included with your product or visit the official ASUS support website.
Support
For technical assistance, driver downloads, or further product information, please visit the official ASUS support website. You can typically find support resources by searching for your product model (ASUS V500) on their website. Keep your product's serial number handy when contacting support.
ASUS Support Website: https://www.asus.com/support/