
1. Introduction
Thank you for choosing the Generic SK-KF-6871 Fully Automatic Capsule Coffee Maker. This manual provides essential information for the safe operation, maintenance, and troubleshooting of your new appliance. Please read it thoroughly before first use and keep it for future reference.
Important Safety Instructions
- Read all instructions before using the appliance.
- Do not immerse the appliance, power cord, or plug in water or other liquids.
- Ensure the voltage specified on the appliance matches your local power supply.
- Keep the appliance out of reach of children.
- Unplug from the outlet when not in use and before cleaning.
- Do not operate any appliance with a damaged cord or plug.
- Use only manufacturer-recommended accessories.
- Avoid contact with hot surfaces.
- This appliance is for household and office use only.
2. Product Overview
The SK-KF-6871 is a fully automatic capsule coffee maker designed for convenience and versatility, featuring a milk frothing wand and a 900ML water tank.
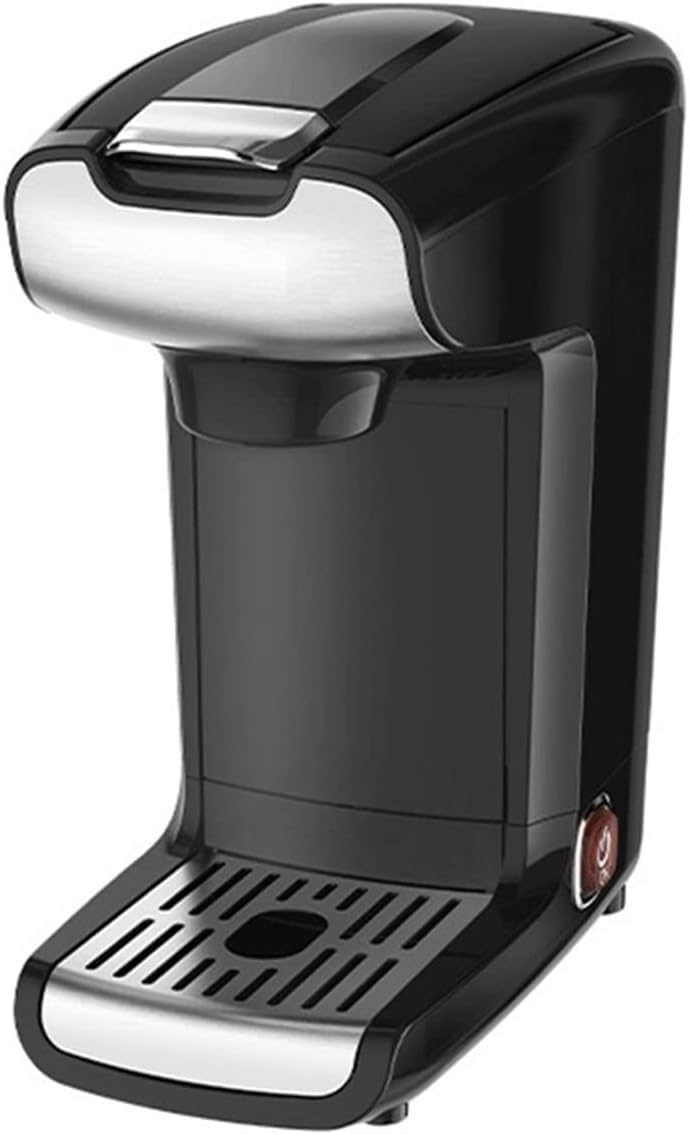
Figure 2.1: Generic SK-KF-6871 Coffee Maker and its retail packaging. This image shows the overall design of the coffee machine, highlighting its compact footprint and modern aesthetic.
Key Features:
- Compact Design: Seamlessly integrates into any kitchen or office space.
- Powerful Motor: Ensures quick heating and precise brewing.
- Fully Automatic Operation: User-friendly control panel for personalized coffee.
- High-Pressure Pump: Maximizes flavor extraction for rich espresso.
- Versatile Frothing Wand: Perfect for crafting lattes and cappuccinos.
- Detachable Milk Reservoir: Easy cleaning and storage for milk-based beverages.

Figure 2.2: Internal view illustrating the new heating system of the SK-KF-6871. This system ensures consistent temperature and volume for various brew sizes (6oz, 8oz, 10oz), contributing to optimal coffee extraction.
Components:
- Water Tank (900ML capacity)
- Capsule Holder
- Brewing Lever/Button
- Coffee Spout
- Drip Tray
- Milk Frothing Wand
- Detachable Milk Reservoir
- Power Button
- Control Panel (Buttons for various functions)
3. Setup
3.1 Unpacking
- Carefully remove all packaging materials from the coffee maker.
- Check that all components listed in the "Components" section are present and undamaged.
- Retain packaging for future transport or storage.
3.2 Initial Cleaning
- Wash the water tank, drip tray, capsule holder, and milk reservoir with warm, soapy water. Rinse thoroughly and dry.
- Wipe the exterior of the machine with a damp cloth.
- Do not use abrasive cleaners or scourers.
3.3 Filling the Water Tank
- Remove the water tank from the back of the machine.
- Fill the tank with fresh, cold drinking water up to the MAX fill line (900ML capacity).
- Place the water tank back onto the machine, ensuring it is securely seated.
3.4 Power Connection
- Place the coffee maker on a stable, flat, heat-resistant surface.
- Plug the power cord into a grounded electrical outlet.
- Press the Power Button to turn on the machine. The indicator light will illuminate.
3.5 Priming the Machine (First Use)
- Before making coffee, run a cycle without a capsule to prime the system.
- Ensure the water tank is filled.
- Place an empty cup under the coffee spout.
- Press the brew button. Hot water will dispense, cleaning the internal components and preparing the pump.
- Repeat this process 2-3 times.
4. Operating Instructions
4.1 Making Coffee (Capsule)
- Ensure the water tank is filled with fresh water.
- Turn on the machine and wait for it to preheat (indicator light will stop flashing or turn solid).
- Lift the brewing lever to open the capsule holder.
- Insert a coffee capsule into the holder, ensuring it is correctly seated.
- Close the brewing lever firmly.
- Place a cup on the drip tray under the coffee spout.
- Select your desired cup size (e.g., 6oz, 8oz, 10oz) using the control panel buttons. The machine will automatically brew and stop.
- Once brewing is complete, lift the lever to eject the used capsule into the internal waste bin.
- Close the lever.
4.2 Milk Frothing
- Fill the detachable milk reservoir with cold milk (dairy or non-dairy). Do not exceed the MAX fill line.
- Attach the milk reservoir to the machine.
- Position a cup under the milk frothing wand.
- Select the milk frothing function on the control panel. The machine will heat and froth the milk automatically.
- Once frothing is complete, remove the cup.
- Important: Clean the frothing wand immediately after use to prevent milk residue from drying.
5. Maintenance & Cleaning
Regular cleaning ensures optimal performance and extends the lifespan of your coffee maker.
5.1 Daily Cleaning
- Drip Tray: Empty and rinse the drip tray daily.
- Used Capsule Bin: Empty the used capsule bin and rinse it.
- Water Tank: Empty any remaining water and rinse the tank. Refill with fresh water for next use.
- Milk Frothing Wand/Reservoir: Immediately after each use, detach the milk reservoir and frothing wand components. Wash them with warm, soapy water and rinse thoroughly. Use a small brush if necessary to clear any milk residue from the frothing nozzle.
- Exterior: Wipe the exterior of the machine with a soft, damp cloth.
5.2 Descaling
Descaling is crucial to remove mineral buildup and maintain brewing performance. The frequency depends on water hardness and usage, typically every 2-3 months.
- Empty the water tank and fill it with a descaling solution mixed according to the descaler manufacturer's instructions.
- Place a large container (at least 1 liter) under the coffee spout.
- Initiate the descaling cycle (refer to your machine's specific descaling mode if available, or run several large brew cycles without a capsule).
- Once the tank is empty, rinse it thoroughly and refill with fresh water.
- Run 2-3 full water tanks through the machine to rinse out any descaling solution residue.
Note: Use only descaling solutions specifically designed for coffee machines.
6. Troubleshooting
| Problem | Possible Cause | Solution |
|---|---|---|
| Machine does not turn on. | No power supply. | Check if the power cord is securely plugged into the outlet and the machine. Test the outlet with another appliance. |
| No coffee dispenses. | Water tank empty; capsule not inserted correctly; machine not primed; clogged needle. | Fill water tank; ensure capsule is seated properly; prime the machine; clean the capsule piercing needle (refer to maintenance). |
| Coffee is cold or not hot enough. | Machine not preheated; descaling needed. | Allow machine to fully preheat; perform a descaling cycle. |
| Milk frother not working or producing poor foam. | Milk reservoir/wand clogged; incorrect milk type/temperature; insufficient milk. | Clean frothing wand and reservoir thoroughly; use cold, fresh milk; ensure sufficient milk quantity. |
| Water leaking from machine. | Water tank not seated correctly; drip tray overflowing. | Ensure water tank is firmly in place; empty and re-seat drip tray. |
7. Specifications
| Model Number | SK-KF-6871 |
| Brand | Generic |
| Type | Fully Automatic Capsule Coffee Maker with Milk Frother |
| Wattage | 750 watts |
| Water Tank Capacity | 900 ML |
| Product Dimensions (D x W x H) | 36D x 17W x 30H centimetres |
| Human Interface Input | Buttons |
| Specific Uses | Cappuccino, Espresso, Mocha |
| Recommended Uses | Home-use, Office-use |
8. Warranty & Support
This product is covered by a standard manufacturer's warranty against defects in materials and workmanship. Please refer to the warranty card included with your purchase for specific terms and conditions, including the warranty period and coverage details.
For technical support, troubleshooting assistance beyond this manual, or warranty claims, please contact your retailer or the manufacturer's customer service department. Keep your proof of purchase for warranty validation.
Manufacturer: China