
1. Introduction
This manual provides essential information for the installation, operation, and maintenance of the Generic Alternator Assembly, Part Number 27060-78701-71. This alternator is designed for specific Toyota forklift models and engine types. Please read this manual thoroughly before attempting any installation or service to ensure proper function and safety.
2. Product Overview
The alternator is a key component of your vehicle's electrical system, responsible for generating electricity to power the electrical loads and recharge the battery. This specific assembly is a direct replacement for the original part in compatible Toyota forklift models.
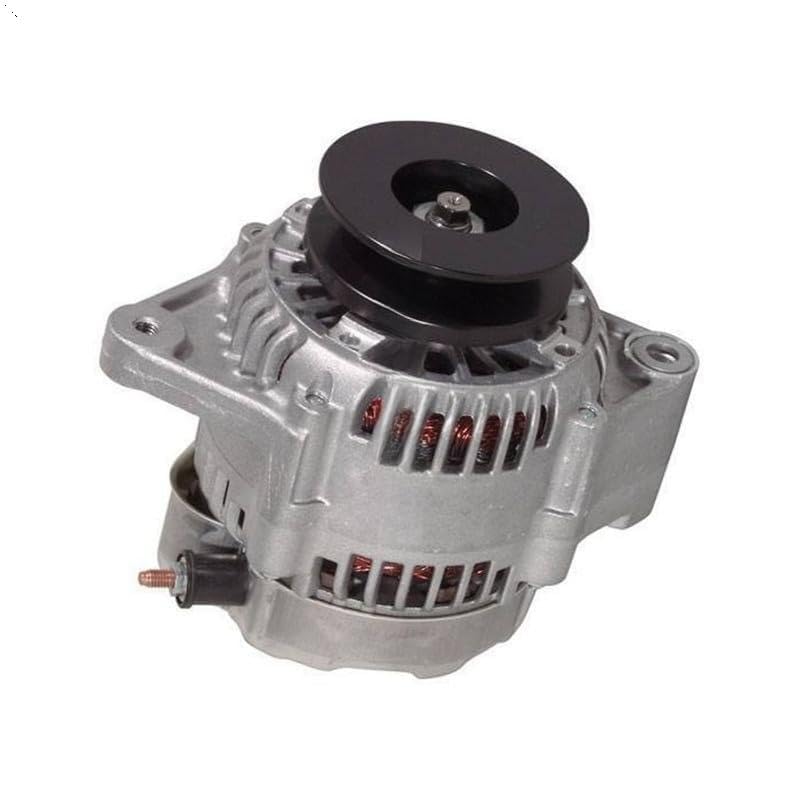
Figure 2.1: Generic Alternator Assembly 27060-78701-71. This image shows the overall structure of the alternator, including its casing, pulley, and electrical connections.
2.1 Key Features
- Part Number: 27060-78701-71, 270607870171, TY27060-78701-71, TY270607870171
- Direct replacement for specified Toyota forklift models.
- Designed for Toyota Engine 13Z, 1DZ, 14Z, 3Z.
- Compatible with Forklift models: 7FD35, 7FD40, 5FD50, 5FD70, 8FDU30, 7FDU35, 7FDU32, 7FDU45.
3. Setup and Installation
Warning: Disconnect the battery's negative terminal before beginning any electrical work to prevent electrical shock or damage to the vehicle's electrical system. Professional installation is recommended.
3.1 Tools Required
- Socket wrench set
- Open-end wrench set
- Torque wrench
- Battery terminal cleaner
- Safety glasses and gloves
3.2 Installation Steps
- Preparation: Ensure the engine is off and cool. Disconnect the negative battery cable.
- Remove Old Alternator:
- Locate the alternator on the engine.
- Loosen the tensioner and remove the serpentine belt from the alternator pulley.
- Disconnect the electrical connections (main power wire and regulator plug) from the old alternator. Note their positions for reinstallation.
- Unbolt the mounting bolts securing the alternator to the engine bracket.
- Carefully remove the old alternator from the engine compartment.
- Install New Alternator:
- Position the new alternator assembly into the mounting bracket.
- Insert and hand-tighten the mounting bolts. Do not fully tighten yet.
- Reconnect the electrical connections, ensuring they are secure and correctly oriented.
- Reinstall the serpentine belt onto the alternator pulley.
- Adjust the belt tensioner to the manufacturer's specifications. The belt should have minimal deflection.
- Fully tighten the alternator mounting bolts to the recommended torque specifications (refer to your forklift's service manual).
- Final Checks:
- Double-check all electrical connections and mounting bolts for tightness.
- Ensure the serpentine belt is properly seated on all pulleys.
- Reconnect the negative battery cable.
4. Operating Instructions (Post-Installation Check)
After installation, perform the following checks to ensure the alternator is functioning correctly:
- Start the Engine: Start the forklift engine and let it idle.
- Check Charging Light: The battery warning light on the dashboard should turn off shortly after the engine starts. If it remains on, there may be an issue with the installation or the alternator.
- Voltage Measurement: Using a multimeter, measure the voltage across the battery terminals with the engine running. It should typically read between 13.8V and 14.7V. If the voltage is outside this range, further diagnosis is required.
- Load Test (Optional): Turn on various electrical accessories (lights, radio, etc.) and observe if the voltage remains stable. A significant drop in voltage under load may indicate a problem.
5. Maintenance
Proper maintenance ensures the longevity and optimal performance of your alternator. While alternators are generally low-maintenance, periodic checks are beneficial.
- Belt Inspection: Regularly check the serpentine belt for cracks, fraying, or excessive wear. Ensure it has proper tension. A loose belt can lead to insufficient charging.
- Electrical Connections: Periodically inspect all electrical connections to the alternator for corrosion or looseness. Clean terminals as necessary.
- Battery Health: A healthy battery is crucial for alternator performance. Ensure your battery is in good condition and fully charged.
- Cleanliness: Keep the alternator free from excessive dirt, oil, and debris, which can hinder cooling and affect performance.
6. Troubleshooting
If you experience issues with your alternator, refer to the table below for common symptoms and potential solutions. Always ensure safety precautions are followed.
| Symptom | Possible Cause | Solution |
|---|---|---|
| Battery warning light stays on | Loose or damaged belt, faulty alternator, wiring issue, dead battery | Check belt tension and condition. Inspect wiring. Test alternator output. Test battery. |
| Dim headlights or interior lights | Undercharging alternator, weak battery, high electrical load | Check alternator output voltage. Test battery. Reduce unnecessary electrical loads. |
| Growling or whining noise from engine | Worn alternator bearings, loose pulley | Inspect alternator for physical damage or play in the pulley. Replacement may be necessary. |
| Battery constantly drains | Alternator not charging, parasitic drain, faulty battery | Test alternator charging output. Check for parasitic drains. Test battery health. |
If troubleshooting steps do not resolve the issue, consult a qualified technician or contact customer support.
7. Specifications
| Attribute | Detail |
|---|---|
| Part Number | 27060-78701-71, 270607870171, TY27060-78701-71, TY270607870171 |
| Brand | Generic |
| Model Number | JC65WOFYTOcu871 |
| Application | Toyota Engine 13Z, 1DZ, 14Z, 3Z Forklift Models: 7FD35, 7FD40, 5FD50, 5FD70, 8FDU30, 7FDU35, 7FDU32, 7FDU45 |
| Item Weight | 1.76 ounces |
| Product Dimensions | 0.39 x 0.39 x 0.39 inches |
| Exterior Finish | Machined |
8. Warranty and Support
Information regarding specific warranty terms for this Generic Alternator Assembly is not provided in the product details. Please refer to the seller's return policy or contact the seller directly for warranty inquiries.
For technical support or further assistance, please contact the seller or a certified automotive technician.
Seller Information: YUE XUN MAO YI SHANG HANG
Return Policy: 30 days (refund/replacement)