
1. Introduction
Thank you for choosing the MINIBEAR D03 2.7K Thumb Action Camera. This compact and versatile camera is designed to capture high-quality video and photos in various environments, offering hands-free recording and easy sharing. This manual provides essential information for setting up, operating, and maintaining your device.
2. Product Overview
2.1 Key Features
- Compact and Lightweight Design: Weighing just 1.69 oz (48g) and sized at 2.83 × 0.9 × 1.1 inches, designed for portability.
- 2.7K High-Resolution Video: Records smooth, shake-free 2.7K HD video and captures 12MP still photos.
- 1.47-inch HD Screen: Provides clear live framing and instant playback directly on the device.
- Electronic Image Stabilization (EIS): Ensures stable footage even during dynamic activities.
- 135° Ultra-Wide-Angle Lens: Captures expansive scenes with a broad field of view.
- Magnetic Lanyard: Allows for easy and secure hands-free attachment to clothing or metal surfaces.
- Long-Lasting Battery: Up to 120 minutes of continuous recording, with full recharge in 30 minutes. Supports recording while charging.
- Wireless Connectivity: Wi-Fi enabled for syncing and sharing via a dedicated companion app.
- Built-in 64GB Storage: Provides ample space for recordings.
2.2 Camera Components
Familiarize yourself with the camera's physical layout:

An overview of the MINIBEAR D03 camera's physical components and their functions.
- Up Button: Used for navigation and selection.
- Power Button: Turns the camera on/off and initiates/stops recording.
- Down Button: Used for navigation and selection.
- Magnetic Surface: For attaching the magnetic lanyard or other magnetic mounts.
- Memory Card Slot: For the included 64GB TF card.
- Charging Port: Type-C port for charging the device.
3. Setup
3.1 Initial Charging
Before first use, fully charge the camera. Connect the provided Type-C charging cable to the camera's charging port and a USB power source. The camera supports recording while charging.

The camera supports recording while charging and offers up to 120 minutes of continuous recording on a full charge, with Type-C fast charging.
3.2 Memory Card Installation
The camera comes with a built-in 64GB TF card. Ensure it is properly seated in the memory card slot before use.

The camera comes with a 64GB TF card, providing ample storage for your recordings.
3.3 App Download and Wi-Fi Connection
To unlock full functionality, download the dedicated companion app. The app allows for remote control, live view, and wireless file transfer.
- Step 1: Long press the UP button on the camera to activate Wi-Fi.
- Step 2: On your mobile phone, go to Wi-Fi settings and connect to the camera's Wi-Fi network (e.g., "JWS-D03_xxxxxx"). The default password is 12345678.
- Step 3: Launch the JarvisCam App. If you don't have it, download it from https://www.6zhentan.com/app/jarvis/index.html.
- Step 4: Once connected, you can control the camera and access files through the app.
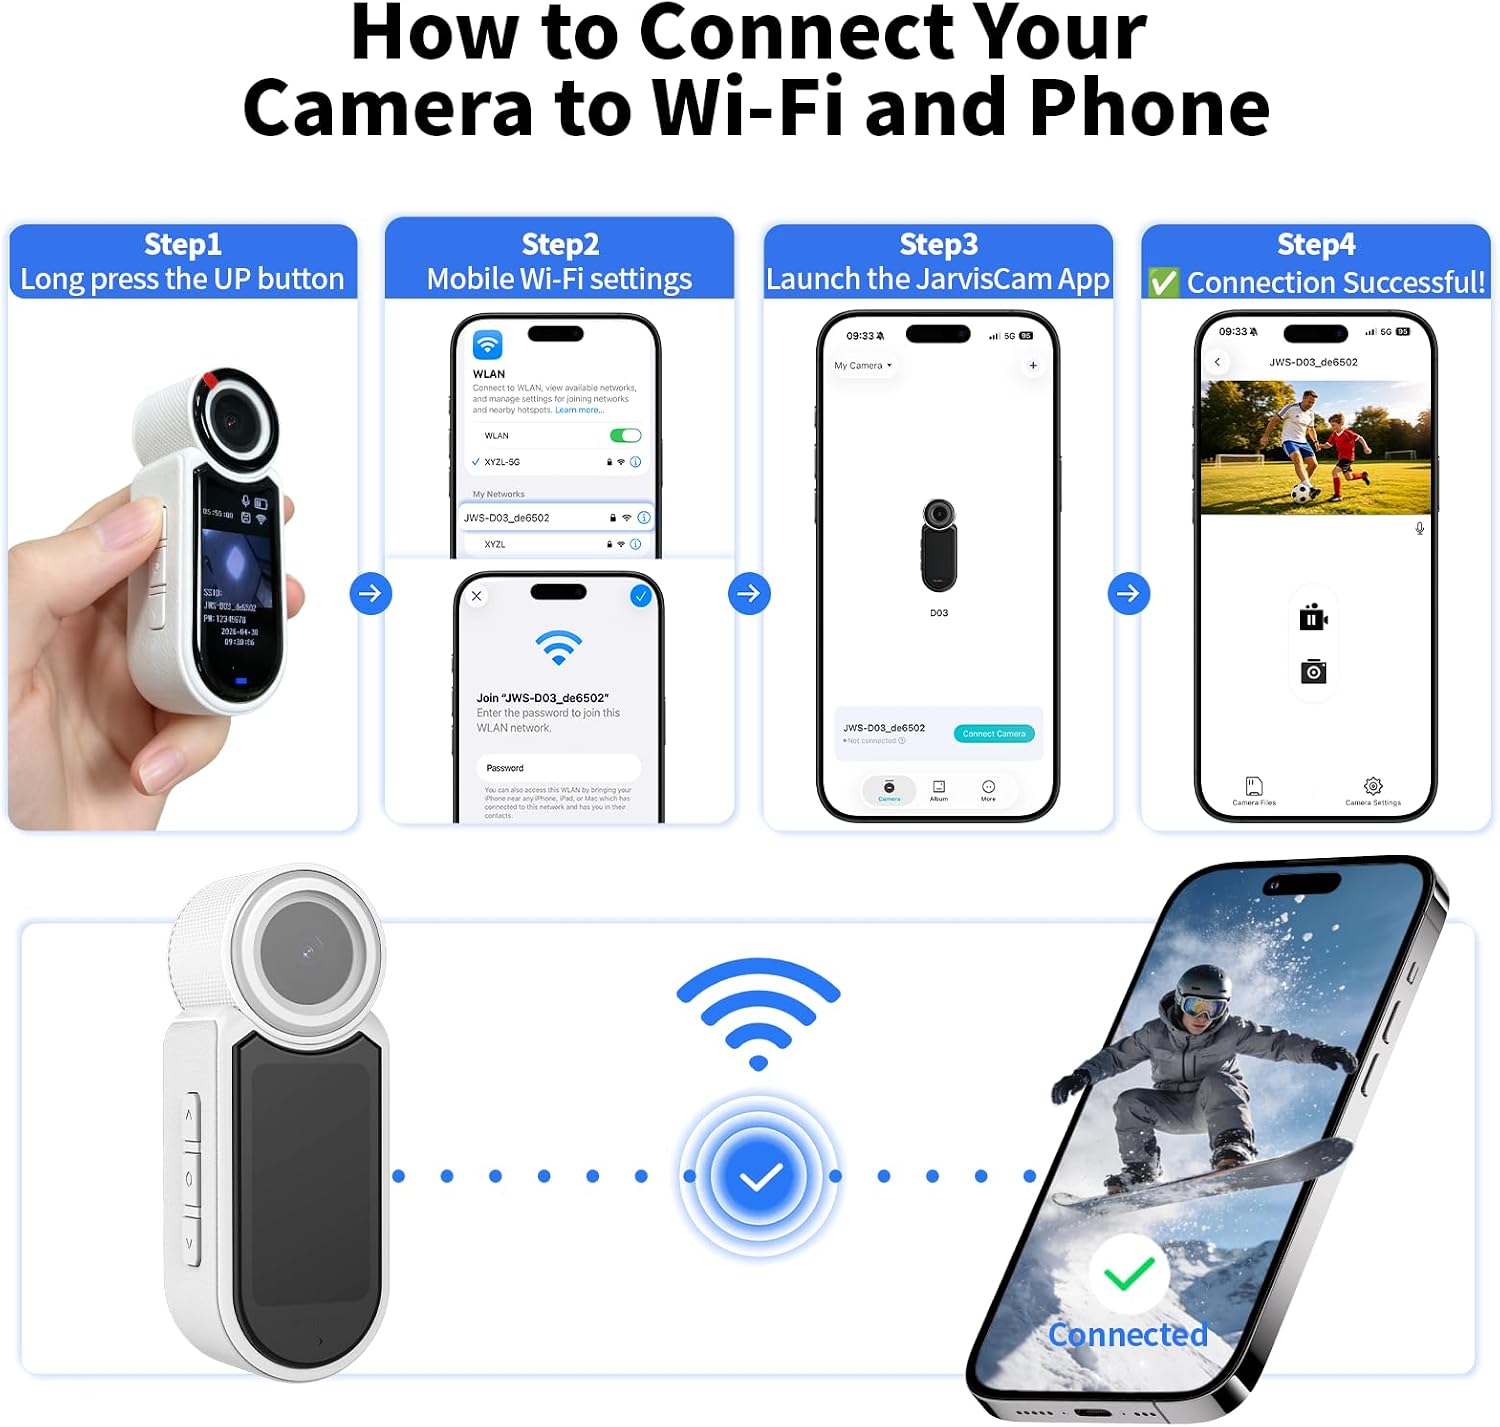
Follow these steps to connect your camera to your smartphone via Wi-Fi using the companion app for remote control and file transfer.
4. Operating Instructions
4.1 Power On/Off and Basic Recording
- Power On: Press and hold the Power Button until the screen illuminates.
- Power Off: Press and hold the Power Button until the screen turns off.
- Start Recording: Briefly press the Power Button once while the camera is on. The recording indicator will light up.
- Stop Recording: Briefly press the Power Button again. The recording indicator will turn off.
4.2 Using the Magnetic Lanyard
The included magnetic lanyard allows for convenient hands-free recording.
- Attach the camera to the magnetic disc of the lanyard.
- Wear the lanyard around your neck, positioning the camera to capture your desired perspective.
- The strong magnetic attraction also allows the camera to be mounted on any iron surface.

The magnetic neck mount allows for hands-free recording during activities like skiing.

The camera features strong magnetic attraction, allowing it to be securely mounted on any iron surface.
4.3 Wireless Sync and Sharing
After connecting to the app via Wi-Fi, you can:
- View a live feed from the camera.
- Browse and download recorded videos and photos to your smartphone.
- Share content directly to social media platforms.

Wirelessly sync and share photos and videos to your smartphone via the dedicated app for instant sharing on social media platforms.
4.4 Video Demonstration
This video demonstrates the MINIBEAR D03 Thumb Action Camera, showcasing its compact size, magnetic lanyard attachment, and general usage.
5. Maintenance
- Cleaning: Use a soft, dry cloth to clean the camera body. For the lens, use a specialized lens cleaning cloth and solution. Avoid harsh chemicals.
- Storage: Store the camera in a cool, dry place away from direct sunlight and extreme temperatures.
- Battery Care: To prolong battery life, avoid fully discharging the camera frequently. Charge it regularly, even if not in use for extended periods.
- Firmware Updates: Check the manufacturer's website or the companion app for any available firmware updates to ensure optimal performance.
6. Troubleshooting
| Problem | Possible Cause | Solution |
|---|---|---|
| Camera does not power on. | Low battery; device malfunction. | Charge the camera for at least 30 minutes. If the issue persists, contact support. |
| Cannot connect to Wi-Fi. | Incorrect password; Wi-Fi not enabled on camera; app issue. | Ensure Wi-Fi is enabled on the camera (long press UP button). Verify the password (default: 12345678). Restart both camera and phone. |
| Poor video quality / blurry images. | Dirty lens; insufficient lighting; camera shake. | Clean the lens. Ensure adequate lighting. Utilize the Electronic Image Stabilization (EIS) feature and minimize camera movement. |
| Camera freezes or becomes unresponsive. | Software glitch; memory card issue. | Perform a soft reset by holding the Power Button for 10 seconds. If possible, try a different memory card. |
7. Specifications
| Brand | MINIBEAR |
| Model Number | D03 |
| Video Capture Resolution | 2.7K |
| Video Capture Format | MP4 |
| Screen Size | 1.47 Inches |
| Connectivity Technology | Wi-Fi |
| Image Stabilization | Electronic (EIS) |
| Lens Type | Wide Angle (135°) |
| Battery Average Life | 120 minutes |
| Item Dimensions (D x W x H) | 2.83"D x 2.83"W x 1.1"H |
| Water Resistance Level | Not Water Resistant |
| Compatible Devices | Smartphone |
8. What's in the Box
- MINIBEAR D03 Action Camera
- Magnetic Lanyard
- Charging Cable (Type-C)
- User Manual
- Button Operation Instructions
- Built-in 64GB TF Card
9. Warranty and Support
9.1 Warranty Information
The MINIBEAR D03 Action Camera comes with a 12-month warranty from the date of purchase. This warranty covers manufacturing defects and workmanship under normal use. It does not cover damage caused by misuse, accidents, unauthorized modifications, or natural disasters.
9.2 Customer Support
For technical assistance, warranty claims, or any questions regarding your MINIBEAR D03 camera, please refer to the contact information provided with your purchase or visit the official MINIBEAR website for support resources.