
1. Introduction
This manual provides detailed instructions for the setup, operation, and maintenance of your Bmax Mini PC B6 Turbo. This compact desktop computer features an Intel Core i5-8257U processor, 16GB DDR4 RAM, and a 512GB NVMe SSD, designed for various applications including home, office, and educational use.

Figure 1: Bmax Mini PC B6 Turbo, front view showing USB ports and power button.
2. What's in the Box
Verify that all items are present in the package:
- 1x B6 Turbo Intel i5-8257U MINI PC
- 1x Power Adapter (US Plug)
- 1x User Guide (Multi-language)
- 1x VESA Mount (with Screws)
- 1x HDMI Cable (1.5m)
3. Setup Guide
3.1 Connecting Peripherals
Before powering on your Mini PC, connect your monitor, keyboard, and mouse.
- Connect your monitor(s) to the HDMI and/or DisplayPort (DP) outputs. The B6 Turbo supports dual 4K displays.
- Connect your keyboard and mouse to the available USB 3.2 or USB 2.0 ports.
- Connect the power adapter to the DC-in port on the Mini PC, then plug it into a power outlet.

Figure 2: Rear view of the Mini PC showing HDMI, DisplayPort, Ethernet, USB 2.0, and Power In ports.

Figure 3: Diagram illustrating the front and rear ports of the B6 Turbo Mini PC.
3.2 First Boot and Operating System
Press the power button located on the front of the Mini PC. The system comes with Windows 11 Pro pre-installed. Follow the on-screen instructions to complete the initial Windows setup.

Figure 4: The B6 Turbo Mini PC supports Windows 11 Pro, Ubuntu, and other Linux operating systems.
3.3 Network and Bluetooth Connectivity
The Mini PC supports Wi-Fi 6 and Bluetooth 5.2 for wireless connectivity, as well as a Gigabit Ethernet port for wired connections.
- Wi-Fi: After initial setup, Windows will prompt you to connect to a Wi-Fi network. Select your network and enter the password.
- Ethernet: For a wired connection, connect an Ethernet cable from your router or modem to the Ethernet port on the Mini PC.
- Bluetooth: To pair Bluetooth devices, go to Windows Settings > Bluetooth & devices, and follow the instructions to add a new device.

Figure 5: The B6 Turbo Mini PC features Wi-Fi 6 and Bluetooth 5.2 for fast and stable wireless connections.
3.4 VESA Mount Installation
The included VESA mount allows you to attach the Mini PC to the back of a compatible monitor or to a wall, saving desk space.
- Attach the VESA bracket to the back of your monitor using the provided screws. Ensure your monitor has VESA mounting holes.
- Slide the B6 Turbo Mini PC onto the mounted bracket until it clicks securely into place.

Figure 6: The B6 Turbo Mini PC can be VESA mounted behind a monitor for a clean workspace.
4. Operating Instructions
4.1 Basic Operation
Once powered on and Windows is set up, you can use your Bmax Mini PC like any standard desktop computer. The Intel Core i5-8257U processor with 8 threads and 16GB DDR4 RAM provides smooth performance for multitasking, web browsing, office applications, and multimedia consumption.

Figure 7: The B6 Turbo Mini PC is suitable for various uses including office work, education, meetings, home theater, and light gaming.
4.2 Dual Display Configuration
To utilize the dual 4K display capability, connect two monitors to the HDMI and DisplayPort outputs. Windows will automatically detect the second display. You can configure display settings (extend, duplicate, or second screen only) by right-clicking on the desktop and selecting "Display settings."
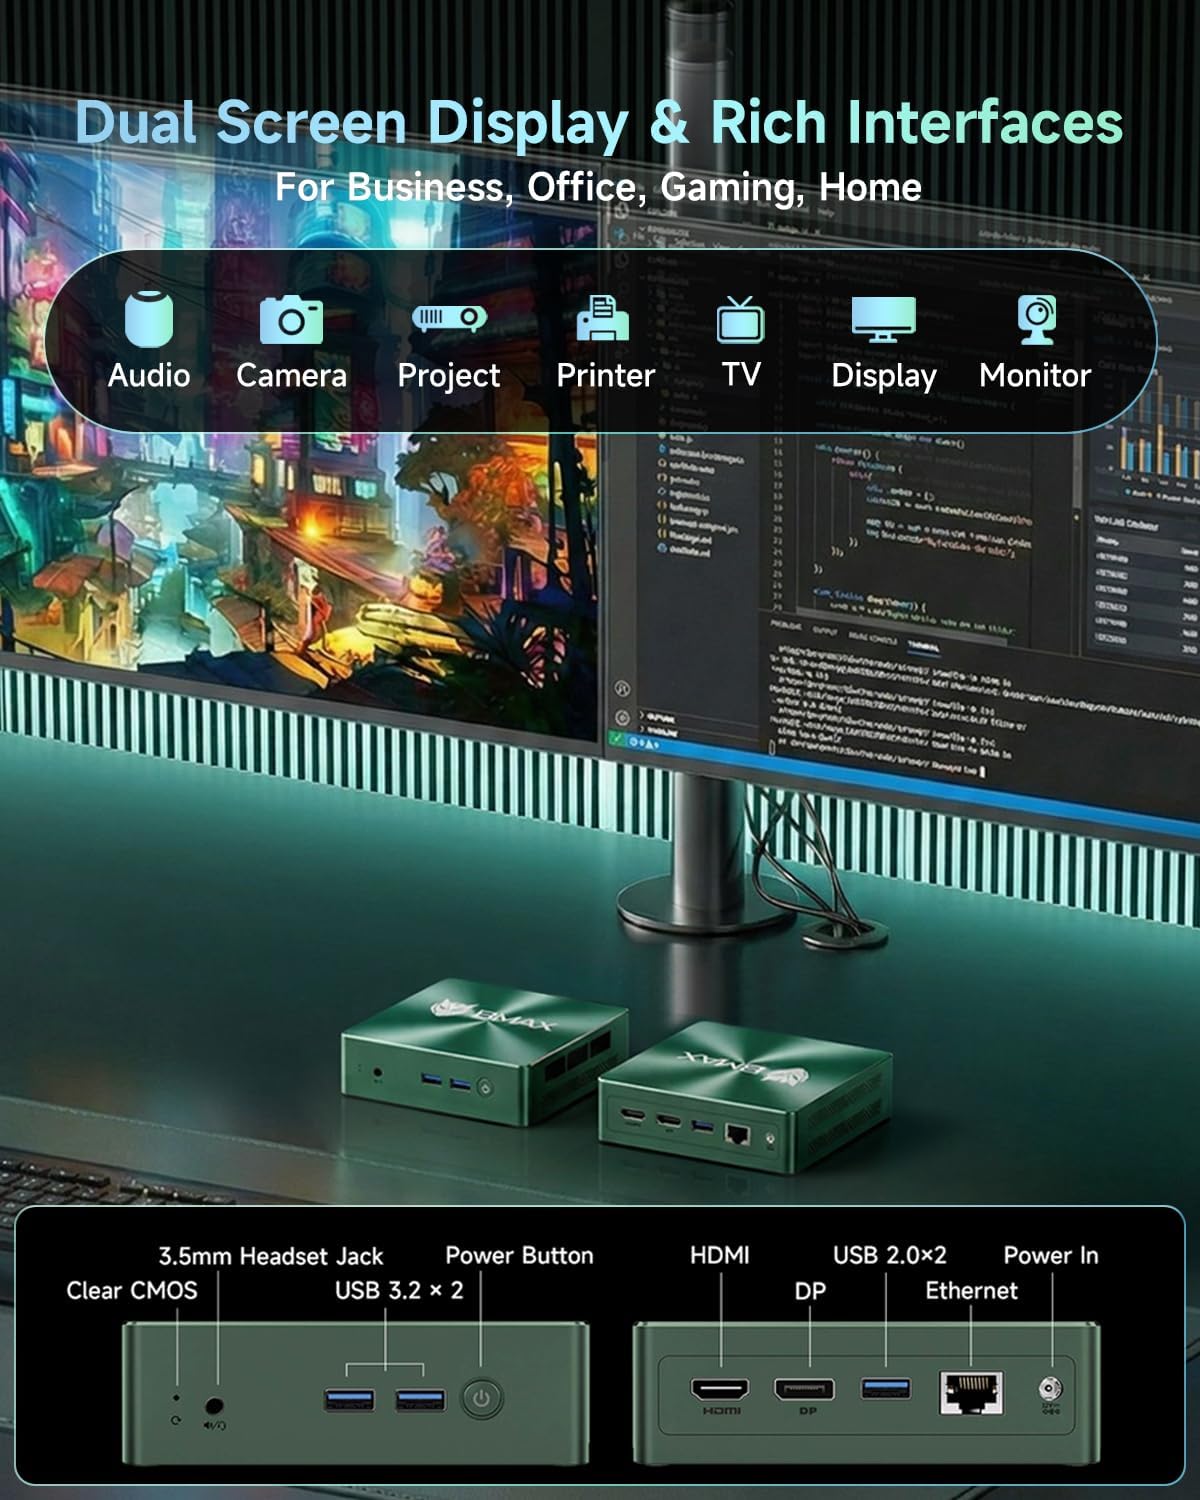
Figure 8: Dual 4K display setup with the B6 Turbo Mini PC, enhancing productivity.
4.3 Storage Expansion
The B6 Turbo Mini PC allows for storage expansion. It features an additional M.2 slot for NVMe or SATA SSDs, supporting up to 4TB.
- To install an additional M.2 SSD, carefully open the Mini PC casing.
- Locate the empty M.2 slot and insert the new SSD.
- Secure the SSD with the provided screw (if applicable).
- Close the casing and power on the device. You may need to initialize and format the new drive in Windows Disk Management.
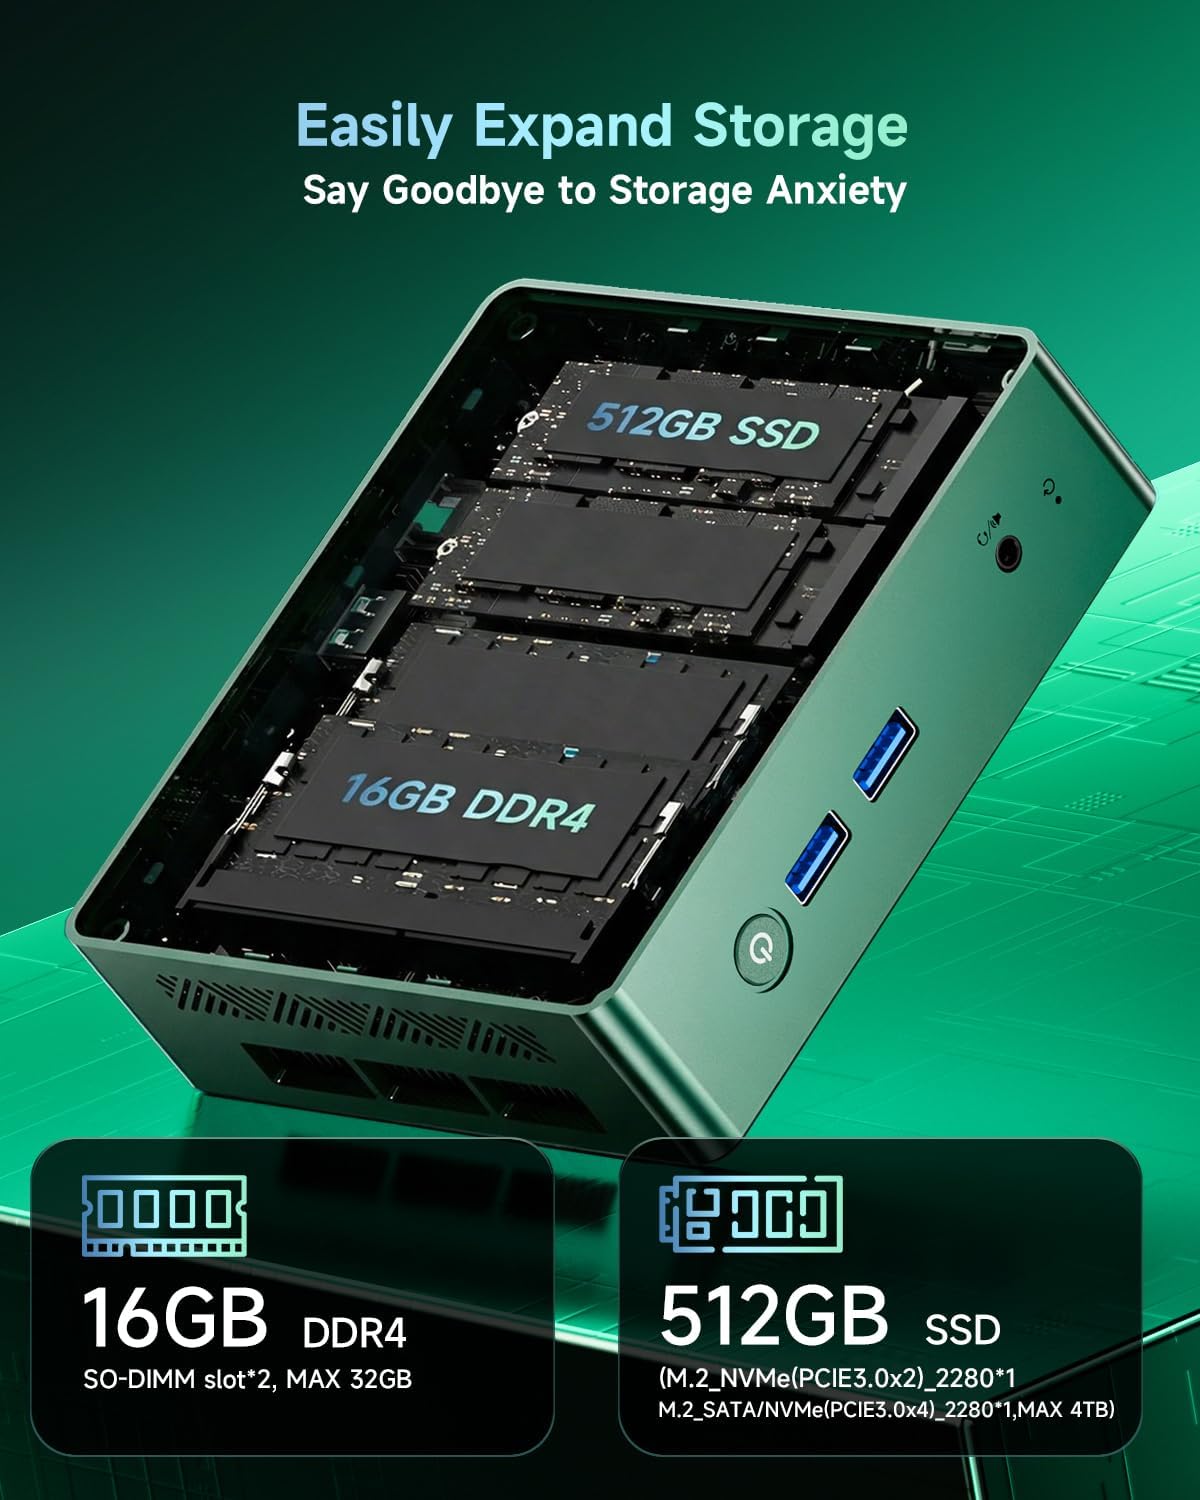
Figure 9: Internal view highlighting the 16GB DDR4 RAM and 512GB M.2 SSD, with an additional M.2 slot for expansion.
4.4 BMAX Factory Reset
The B6 Turbo includes a "Smart Recovery" feature for factory resetting your Windows system.
- To access Smart Recovery, power on the PC and repeatedly press the designated key (refer to the on-screen prompt during boot, usually F7 or F11) to enter the boot menu.
- Select the "Smart Recovery" option.
- Follow the on-screen instructions to perform a factory reset. Warning: This will erase all data on your primary drive. Back up important files before proceeding.

Figure 10: The BMAX Smart Recovery interface for performing a factory reset.
5. Maintenance
5.1 Cooling System
The B6 Turbo Mini PC features a Copper Heat Pipe Cooling System with an intelligent cooling fan and direct air exhaust to maintain optimal operating temperatures and ensure quiet operation.
- Ensure the ventilation openings on the Mini PC are not obstructed to allow for proper airflow.
- Periodically clean dust from the exterior vents using a soft brush or compressed air.

Figure 11: Exploded view of the B6 Turbo's cooling system, showing dual copper strips, intelligent fan, and air exhaust.
5.2 General Care
- Keep the Mini PC in a clean, dry environment away from direct sunlight and extreme temperatures.
- Avoid placing heavy objects on top of the Mini PC.
- Clean the exterior with a soft, damp cloth. Do not use harsh chemicals.
6. Troubleshooting
| Problem | Possible Cause | Solution |
|---|---|---|
| No power | Power adapter not connected, power outlet issue | Ensure power adapter is securely connected to the PC and a working power outlet. Try a different outlet. |
| No display on monitor | Monitor cable loose, incorrect input selected on monitor | Check HDMI/DP cable connections. Ensure monitor is on and set to the correct input source. |
| No Wi-Fi connection | Wi-Fi disabled, incorrect password, router issue | Check Wi-Fi settings in Windows. Verify Wi-Fi password. Restart your router. |
| System slow or unresponsive | Too many applications running, system overheating | Close unnecessary applications. Ensure proper ventilation. Restart the PC. |
If you encounter issues not listed here or if the suggested solutions do not resolve the problem, please contact Bmax customer support.
7. Specifications
| Feature | Detail |
|---|---|
| Processor | Intel Core i5-8257U (4 Cores, 8 Threads, up to 3.9GHz) |
| Graphics | Intel Iris Plus Graphics 645 |
| RAM | 16GB DDR4 (2400 MHz), expandable to 64GB |
| Storage | 512GB M.2 NVMe 2280 SSD, expandable with additional M.2 slot (up to 4TB) |
| Operating System | Windows 11 Pro |
| Wireless Connectivity | Wi-Fi 6 (802.11ax), Bluetooth 5.2 |
| Wired Connectivity | Gigabit Ethernet Port |
| Video Output | 1x HDMI 1.4b, 1x DisplayPort 1.2 (Dual 4K UHD @ 60Hz support) |
| USB Ports | 2x USB 3.2, 2x USB 2.0 |
| Audio | 3.5mm Headset Jack |
| Dimensions | 4.9 x 4.4 x 1.3 inches (125 x 112 x 33 mm) |
| Weight | 1.5 pounds |
| Cooling System | Smart Copper Heat Pipe Cooling System |
8. Warranty and Support
Bmax offers a 12-Month Satisfaction Warranty for your B6 Turbo Mini PC. Additionally, lifetime technical support is available to assist you with any setup, operating system, or hardware-related inquiries.
For technical assistance or warranty claims, please contact Bmax customer service. Refer to the contact information provided in your product packaging or on the official Bmax website.

