1. Introduction
Thank you for choosing the ASHATA 15.6" Smart Digital Calendar Planner. This device is designed to streamline family scheduling, task management, and meal planning through an intuitive full HD touchscreen interface. It also functions as a digital photo frame, enhancing your home decor. This manual provides essential information for setup, operation, and maintenance to ensure optimal performance and longevity of your device.
2. Safety Information
- Read all instructions carefully before using the device.
- Use only the provided power adapter. Using an unauthorized adapter may damage the device and void the warranty.
- Do not expose the device to water, moisture, or extreme temperatures.
- Avoid dropping or subjecting the device to strong impacts.
- Do not attempt to disassemble or repair the device yourself. Contact customer support for assistance.
- Keep the device away from direct sunlight and heat sources.
- Ensure proper ventilation when operating the device.
3. Package Contents
Verify that all items are present in the package:
- 1 x ASHATA 15.6 Inch Smart Digital Calendar
- 1 x Stand
- 1 x Power Adapter (US Plug)
- 1 x Instruction Manual
4. Product Overview
The ASHATA Smart Digital Calendar features a 15.6-inch IPS touchscreen display with a 1920x1080 resolution, providing a clear and interactive experience for managing your family's activities.

Figure 4.1: Front view of the ASHATA 15.6 Inch Smart Family Calendar, highlighting its multi-functional display.
4.1. Device Components
Familiarize yourself with the various ports and components of your device:

Figure 4.2: Rear ports of the device, including DC power, USB 2.0, SD/MMC slot, Audio, and Type-C.
- DC Port: For connecting the power adapter.
- USB 2.0 Port: For connecting USB devices.
- SD/MMC Slot: For inserting SD or MMC memory cards (card not included).
- Audio Port: For connecting external audio devices.
- Type-C Port: For additional connectivity options.
5. Setup
5.1. Assembling the Stand
- Carefully unpack the Smart Digital Calendar and its stand.
- Attach the stand to the back of the device according to the stand's design. Ensure it is securely fastened for stability.
5.2. Powering On the Device
- Connect the provided power adapter to the DC port on the back of the device.
- Plug the power adapter into a standard wall outlet.
- The device will automatically power on or prompt you to press the power button (if available).
- Follow the on-screen instructions for initial setup.
5.3. Wi-Fi Connection
- During the initial setup or via the settings menu, navigate to the Wi-Fi settings.
- Select your desired Wi-Fi network from the list of available networks.
- Enter the Wi-Fi password if prompted.
- Once connected, the device will be able to sync with online calendars and access app features.
5.4. Calendar Sync
The Digital Calendar syncs effortlessly with iOS and other compatible calendars via Wi-Fi.
- After establishing a Wi-Fi connection, access the calendar synchronization settings on the device.
- Follow the on-screen prompts to link your preferred calendar accounts (e.g., Google Calendar, Apple Calendar).
- Once linked, the device will consolidate multiple schedules into a single view. Authorized devices can then access and update events remotely.
6. Operating Instructions
The 15.6-inch full HD touchscreen allows for seamless interaction with the device's features.
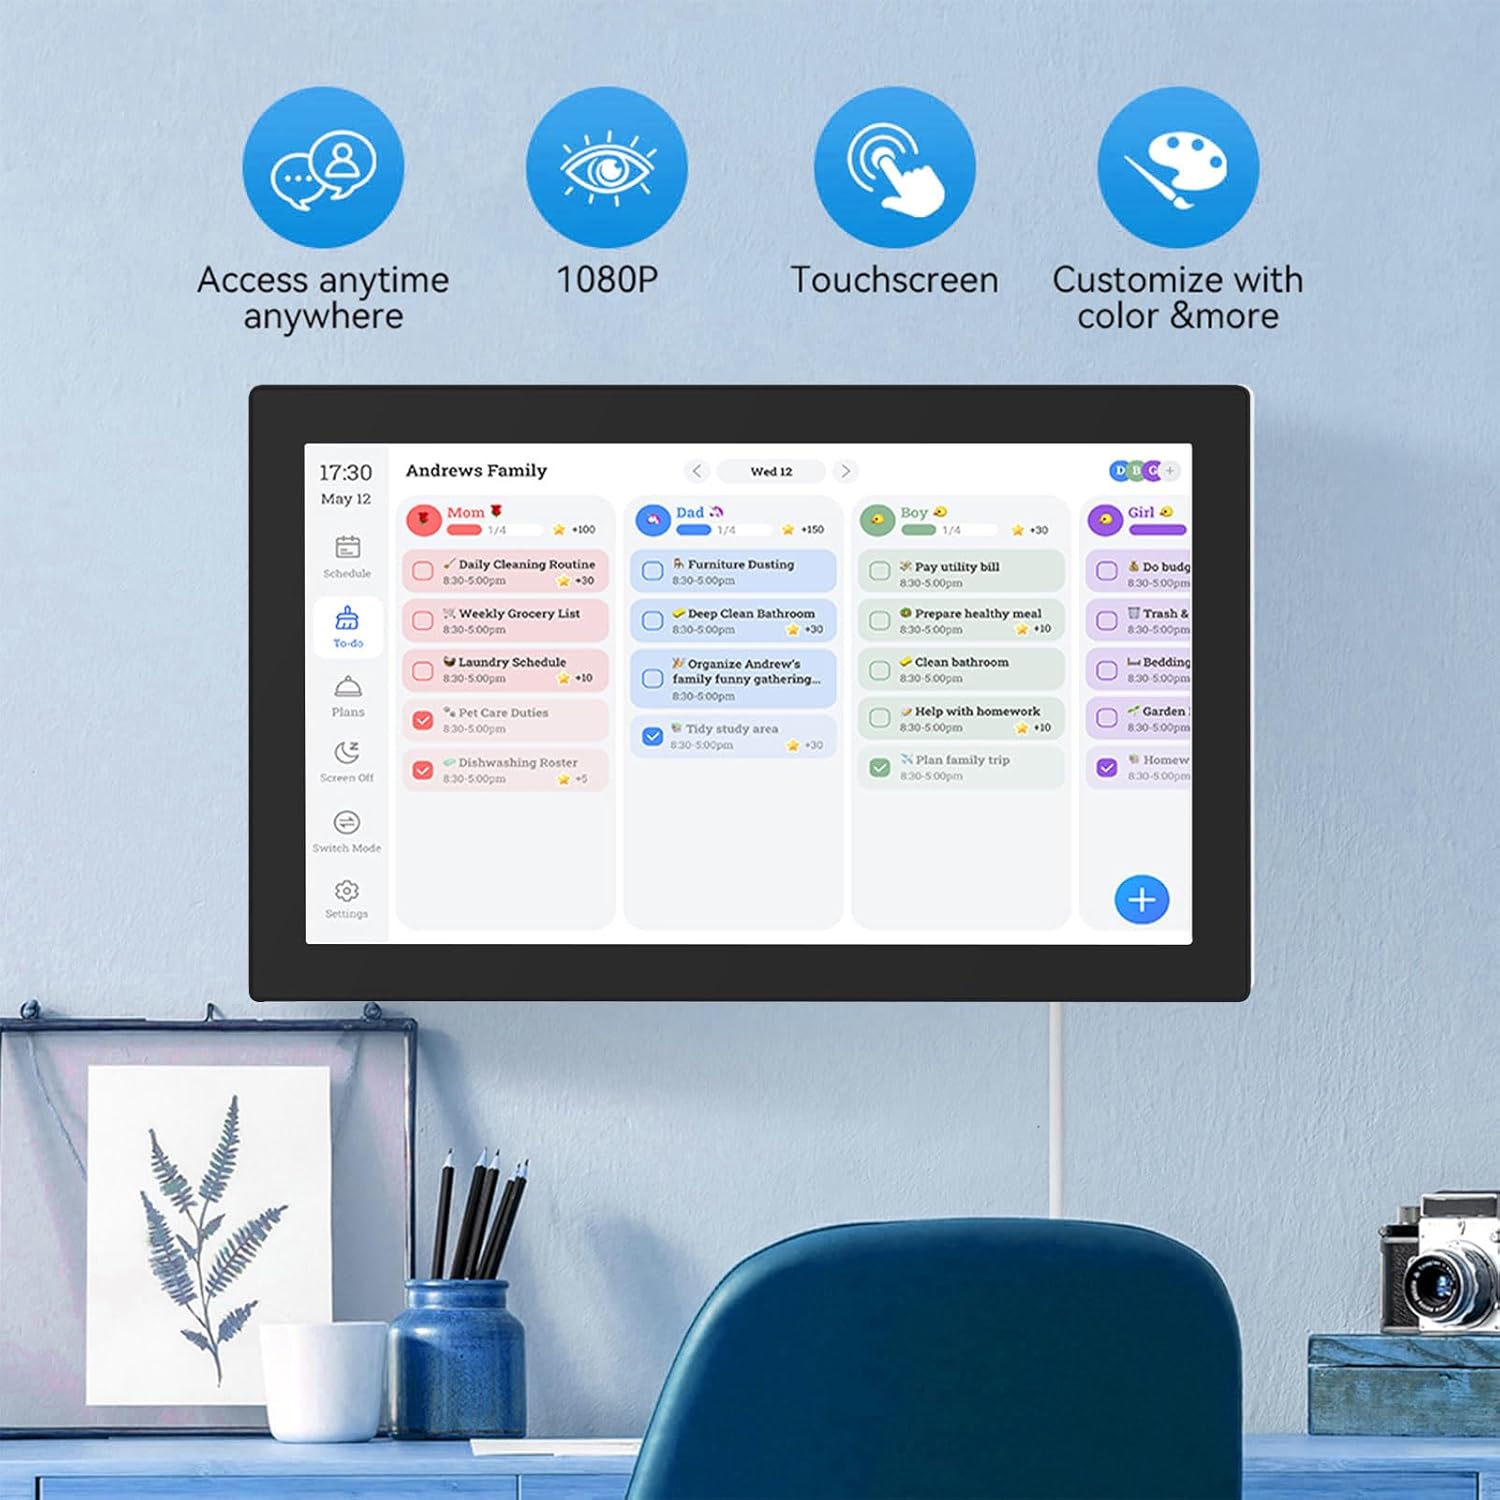
Figure 6.1: The interactive display showing family scheduling and task management.
6.1. Smart Family Planner
The Smart Family Planner allows you to manage schedules and tasks for each family member.
- Assigning Tasks: Tap on the 'Schedule' or 'To-Do' section. You can create new tasks and assign them to specific family members.
- Color Coding: Assign different colors to family members or task categories for easy visual identification.
- Tracking Progress: Mark tasks as complete directly on the touchscreen.
6.2. Interactive Chore Chart
Motivate children and manage household responsibilities with the interactive chore chart.

Figure 6.2: Family members engaging with the customizable chore chart.

Figure 6.3: Interactive chore chart in use, showing task selection.

Figure 6.4: Chore chart with visual rewards to encourage task completion.
- Task Creation: Add daily, weekly, or one-time chores.
- Reward System: Utilize the built-in reward system to make tasks engaging for children.
- Collaborative Planning: Involve family members in planning chores and responsibilities.
6.3. Meal Planning
Plan your weekly meals directly on the device to simplify dinner decisions.

Figure 6.5: Weekly meal planning interface.
- Add Meals: Input breakfast, lunch, and dinner plans for each day of the week.
- Recipe Integration: (If available) Link to recipes or add notes for meal preparation.
6.4. Digital Photo Frame Mode
When not actively using the calendar features, transform your device into a digital photo frame.
- Accessing Photos: Navigate to the 'Photos' or 'Digital Frame' section.
- Uploading Photos: Upload family photos via a connected USB drive, SD card, or through the companion app.
- Slideshow Settings: Customize slideshow intervals, transitions, and display order.
6.5. Companion App
Manage schedules and access additional features from anywhere using the Smart Digital Calendar Planner app.
- Download: Download the official app from your device's app store (iOS/Android).
- Remote Management: Update schedules, tasks, and meal plans remotely.
- Free Features: Access shopping lists and meal plans.
- Premium Features: Consider upgrading for advanced tools like automated event imports (subscription may be required).
7. Maintenance
- Cleaning the Screen: Use a soft, lint-free cloth to gently wipe the touchscreen. Do not use abrasive cleaners or sprays directly on the screen.
- Cleaning the Device Body: Wipe the device body with a dry or slightly damp cloth.
- Software Updates: Periodically check for and install software updates to ensure optimal performance and access to new features.
- Storage: When not in use for extended periods, store the device in a cool, dry place.
8. Troubleshooting
| Problem | Possible Cause | Solution |
|---|---|---|
| Device does not power on. | Power adapter not connected or faulty. | Ensure the power adapter is securely connected to the device and a working power outlet. Try a different outlet. |
| Cannot connect to Wi-Fi. | Incorrect password, out of range, or network issue. | Verify the Wi-Fi password. Move closer to the router. Restart your router and the device. |
| Touchscreen is unresponsive. | Temporary software glitch or screen obstruction. | Restart the device. Ensure the screen is clean and free of debris. |
| Calendar not syncing. | No internet connection or incorrect account settings. | Check Wi-Fi connection. Re-verify your linked calendar account settings in the device's settings. |
| Images not displaying in photo frame mode. | No images loaded or incorrect file format. | Ensure images are loaded onto the device or connected storage. Check that images are in supported formats (e.g., JPEG/JPG). |
9. Specifications

Figure 9.1: Device dimensions.
| Feature | Detail |
|---|---|
| Chipset | RK3326 |
| RAM | 2GB |
| ROM | 32GB |
| Material | ABS |
| Display | 15.6 Inch IPS Touch Screen |
| Screen Resolution | 1920x1080 Pixels |
| Screen Ratio | 16:9 |
| WiFi Connection | 802.11a/b/g/n |
| Touch Screen | Support (Dual Touch) |
| Interface | DC, USB 2.0, SD/MMC, Audio, Type-C |
| Video Format | MPEG1/2/4, AVI, VOB, MOV, MP4 |
| Audio Format | MP3/WMA/AAC etc. |
| Image Format | JPEG/JPG |
| Certifications | CE, ROHS, FCC |
| Model Number | ASHATAh7k1fms24y-14 |
10. Warranty and Support
This ASHATA product comes with a standard manufacturer's warranty. Please refer to the warranty card included in your package or visit the official ASHATA website for detailed warranty terms and conditions.
For technical support, troubleshooting assistance, or any inquiries regarding your device, please contact ASHATA customer service through the contact information provided on the official website or your purchase documentation.


