
Introduction
This manual provides detailed instructions for the installation, operation, and maintenance of your VECHTEL 4G&64G 9-inch Autoradio. This unit is designed specifically for Renault Clio 3rd Generation vehicles manufactured between 2005 and 2014, offering advanced features such as wireless CarPlay, Android Auto, Bluetooth 5.0, GPS navigation, and an AHD rear camera. Please read this manual thoroughly before use to ensure proper installation and optimal performance.
Product Overview
The VECHTEL Autoradio is an advanced multimedia system for your vehicle, featuring a 9-inch high-resolution IPS touchscreen (1280 x 720 pixels). It runs on Android 15 with a Quad-core CPU, 4GB RAM, and 64GB ROM, providing a smooth and responsive user experience. Key functionalities include:
- Wireless CarPlay and Android Auto for seamless smartphone integration.
- Bluetooth 5.0 for hands-free calling and audio streaming.
- FM/RDS Radio with stable signal reception.
- Integrated GPS for online and offline navigation.
- Wi-Fi connectivity for app downloads and internet access.
- Support for AHD rear camera input with night vision.
- Steering wheel control compatibility.
- Mirror Link functionality.
What's in the Box
Verify that all components are present before proceeding with installation:
- Android Car Radio Unit
- Power Cable
- GPS Antenna
- RCA Cable
- User Manual
- Installation Frame and Tools
- Rear Camera
- Microphone
- USB Cables (x2)
- Radio Adapter Cable
- Antenna Adapter
- Rear Camera Input Cable
- Canbus Decoder (if applicable)
- Additional Accessories
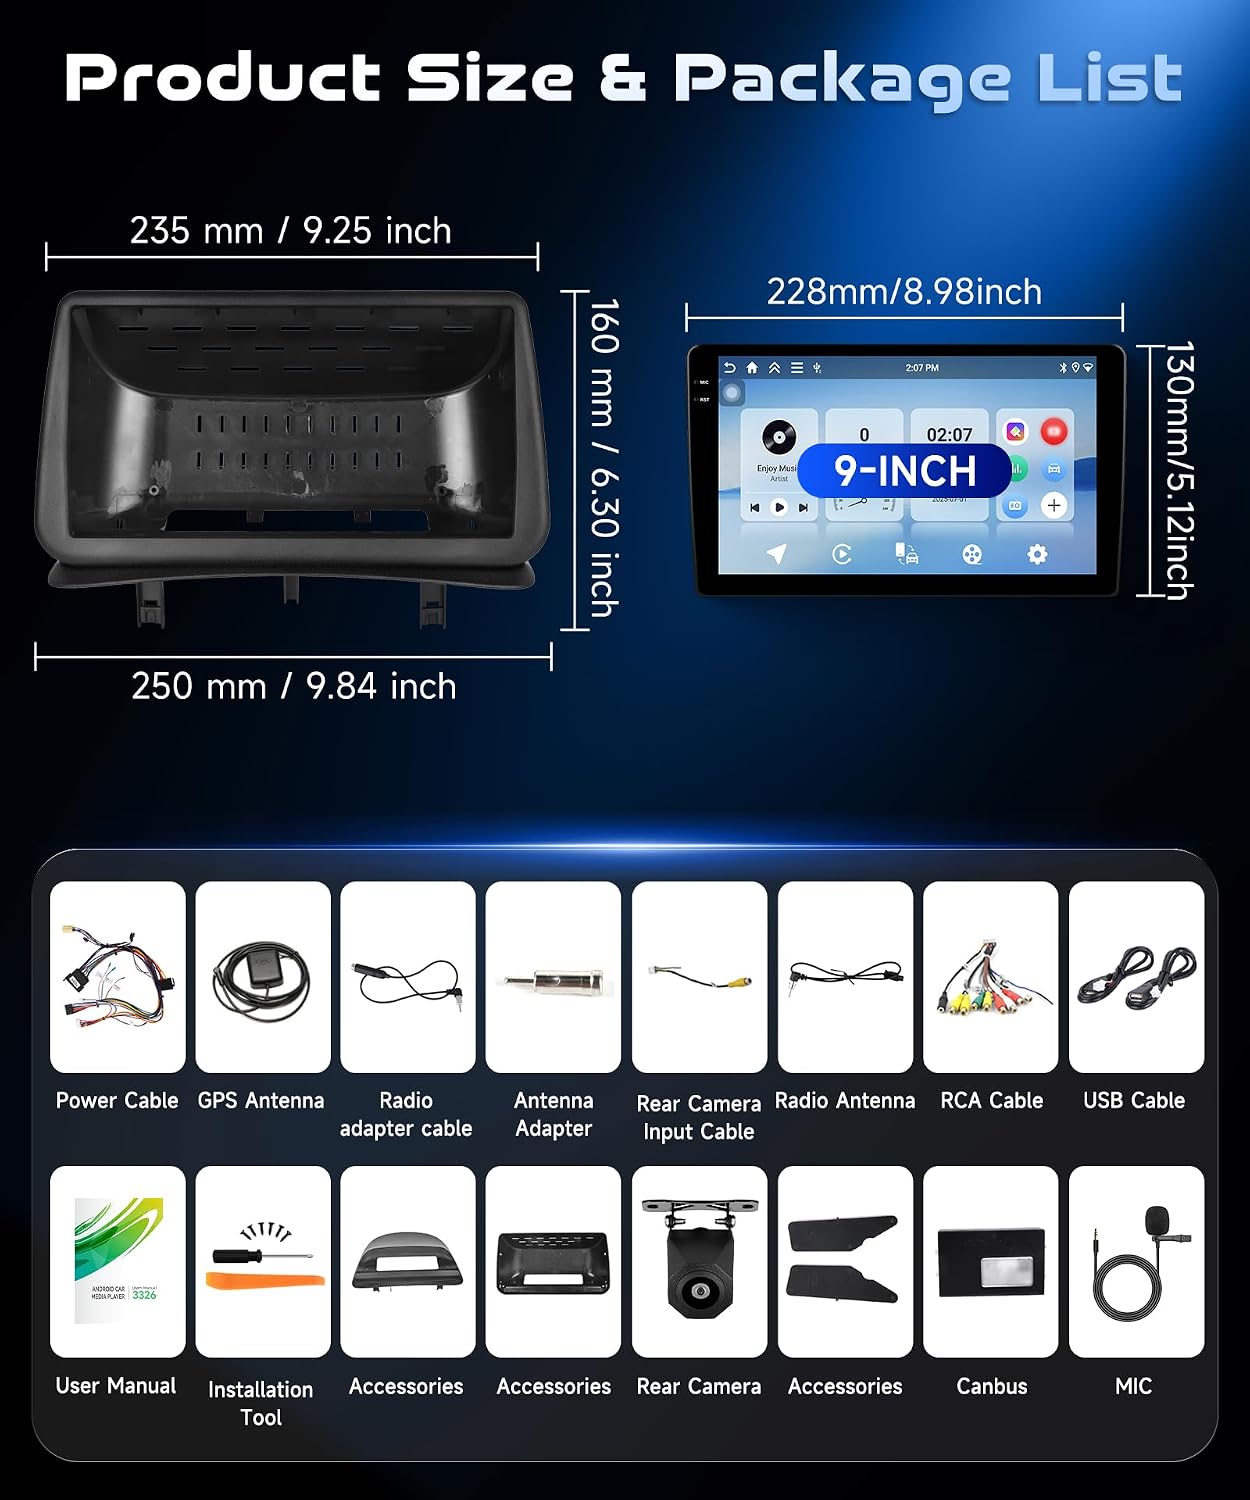
Figure 1: Product dimensions and a visual representation of all included components in the package.
Specifications
| System | Android 15 |
| CPU | Quad-core (RK3326S Chipset) |
| Screen Size | 9 Inches |
| Memory (RAM + ROM) | 4GB RAM + 64GB ROM |
| Screen Resolution | 1280 x 720 |
| Radio Chip | UMW2652 |
| Output Power | 4 x 45 W |
| Bluetooth Version | 5.0 |
| Operating Temperature | -20 °C to 75 °C |
| Steering Wheel Controls | Supported |
| Power Amplifier Chip | YD7388 |
| Radio Frequency | FM/RDS |
| Rear Camera Input | AHD/CVBS |
| External Microphone | Supported |
| Split Screen | Supported |
| Maps | Integrated offline maps (downloadable) |
| Wi-Fi | Supported |
| CarPlay/Android Auto | Wireless connection only |
| Mirror Link | Wireless connection only |
| USB Interface | Dual USB |
| Audio Formats | APE/FLAC/WAV/MP3/WMA etc. |
| Video Formats | MKV/RMVB/AVI/MP4/MDV etc. |
| Image Formats | PNG/JPEG/JPG/GIF/WBMP/BNP etc. |
| Factory Settings Code | 8888 |
| Supported Languages | Chinese/English/French/Italian/Korean/Japanese/Arabic/Spanish/Portuguese/Russian/Turkish/Vietnamese/Hebrew/Polish/German |
Setup and Installation
Vehicle Compatibility
This autoradio is designed for Renault Clio 3rd Generation models manufactured between 2005 and 2014. Ensure your vehicle falls within this range for proper fitment and functionality.
Pre-Installation Checks
- Disconnect the vehicle's battery before starting any electrical work.
- Ensure all included components are present and undamaged.
- Familiarize yourself with your vehicle's dashboard removal process.
Installation Steps
- Remove the Original Radio: Carefully remove the existing car radio and dashboard trim. Refer to your vehicle's service manual for specific instructions.
- Wiring Connections: Connect the provided power cable, RCA cables, GPS antenna, radio antenna, and USB cables to the new autoradio. Ensure all connections are secure.

Figure 2: Visual guide for replacing the original car radio with the new unit, including specific steps for connecting the steering wheel control wires.
Steering Wheel Control Connection: If your car's steering wheel buttons are not working after installation, follow these steps:
- Step 1: Insert the small end of your original vehicle's Line 1 into our Line 2 interface, as shown in Figure 2.
- Step 2: After removing the small screen from your original vehicle, reconnect the corresponding cables and then put the small screen back into your car.
- Step 3: Select the protocol path: Hiworld/Renault/Clio3. If this option is not available, then please choose Hiworld/Renault/Megane 3.
- GPS Antenna Placement: Mount the GPS antenna in a location with a clear view of the sky, typically on the dashboard or under the windshield, away from metal obstructions.
- Rear Camera Installation: Install the AHD rear camera at the back of your vehicle, ensuring it has a clear view. Route the camera cable to the autoradio and connect it to the "Rear Camera Input" port.
- Microphone Installation: Connect the external microphone and place it in an optimal position for clear voice pickup, such as near the sun visor or steering column.
- Secure the Unit: Install the new autoradio into the dashboard opening using the provided frame and installation tools. Ensure it is securely fastened.
- Reconnect Battery: Reconnect the vehicle's battery.
- Initial Power-On: Turn on the vehicle's ignition and power on the autoradio. Follow any on-screen prompts for initial setup.
Operating Instructions
Basic Operations
- Power On/Off: Press and hold the power button to turn the unit on or off. A short press typically mutes or unmutes the audio.
- Volume Control: Adjust the volume using the on-screen controls or your vehicle's steering wheel controls.
- Home Screen: Tap the Home icon to return to the main interface.
Radio (FM/RDS)
- Access the "Radio" application from the main menu.
- Use the scan function to automatically search and save available FM stations.
- Manually tune to frequencies or select from saved presets.
- RDS (Radio Data System) provides station information and traffic announcements where available.

Figure 3: Demonstrates the Bluetooth and Radio functionalities, including hands-free calls, music streaming, and sound equalization settings.
Bluetooth 5.0
- Go to the "Bluetooth" application.
- Enable Bluetooth on your mobile phone and search for available devices.
- Select the autoradio (e.g., "VECHTEL Car Radio") from your phone's list and pair.
- Once paired, you can make/receive hands-free calls using the external microphone and stream audio from your phone.
Wireless CarPlay & Android Auto
This unit supports wireless connection for both Apple CarPlay and Android Auto.
- Ensure your phone's Wi-Fi and Bluetooth are enabled.
- Open the "CarPlay" or "Android Auto" app on the autoradio.
- Follow the on-screen instructions to connect your phone wirelessly. This typically involves pairing via Bluetooth first, then confirming the Wi-Fi connection.
- Once connected, you can access phone functions like navigation, calls, messages, and music directly on the autoradio screen.

Figure 4: Illustrates the seamless integration of wireless CarPlay and Android Auto, along with Mirror Link, allowing access to smartphone features and voice commands.
GPS Navigation
- The unit comes with integrated offline maps. To download maps, connect to Wi-Fi and use the pre-installed map application.
- For online navigation, connect the unit to a Wi-Fi hotspot (e.g., from your phone) and use any compatible navigation app from the Play Store.
- Ensure the GPS antenna is properly installed for accurate positioning.

Figure 5: Displays the GPS navigation capabilities, including both online and offline map usage, supported by the unit's 4GB RAM and 64GB ROM.
Mirror Link
Mirror Link allows you to project your phone's screen onto the autoradio display wirelessly.
- Open the "Mirror Link" application on the autoradio.
- Follow the instructions to connect your smartphone. This typically involves scanning a QR code or connecting via Wi-Fi Direct.
Steering Wheel Control
After proper wiring (refer to the Installation section), you can configure your steering wheel buttons to control the autoradio functions.
- Go to "Settings" > "Steering Wheel Control" on the autoradio.
- Follow the on-screen prompts to map each physical button on your steering wheel to a desired function (e.g., volume up/down, track skip, mode change).

Figure 6: Illustrates the functionality of the AHD backup camera with night vision and the customizable steering wheel control interface.
Backup Camera
When the vehicle is shifted into reverse gear, the autoradio screen will automatically display the view from the connected AHD rear camera. The camera features IP69 waterproofing, HD image quality, night vision, and a wide-angle lens for improved visibility.
System Settings
Access the "Settings" menu to customize various aspects of the autoradio:
- Display: Adjust brightness, wallpaper, and screen timeout.
- Sound: Modify equalizer settings, balance, and fader.
- Language: Select your preferred system language from the extensive list of supported languages.
- Date & Time: Set the correct date and time, or enable automatic synchronization via GPS/network.
- Wi-Fi & Network: Connect to Wi-Fi networks or mobile hotspots.
- About Device: View system information, Android version, and storage details.
Maintenance
- Screen Cleaning: Use a soft, lint-free cloth to clean the touchscreen. For stubborn smudges, slightly dampen the cloth with water or a screen-safe cleaner. Avoid harsh chemicals.
- Software Updates: Periodically check for system software updates via the "Settings" menu to ensure optimal performance and access to new features. Connect to Wi-Fi for updates.
- General Care: Avoid exposing the unit to extreme temperatures, direct sunlight for prolonged periods, or excessive moisture.
Troubleshooting
| Problem | Possible Cause | Solution |
|---|---|---|
| Unit does not power on. | Loose power connection, blown fuse, vehicle battery issue. | Check power cable connections. Inspect vehicle fuses. Ensure vehicle battery is charged. |
| No sound. | Volume muted, incorrect audio source, loose speaker wires. | Check volume level and mute status. Select correct audio source. Verify speaker wire connections. |
| GPS signal lost or inaccurate. | GPS antenna obstructed or improperly installed. | Ensure GPS antenna has a clear view of the sky and is securely connected. |
| Bluetooth connection issues. | Bluetooth not enabled, pairing failed, interference. | Ensure Bluetooth is enabled on both devices. Delete previous pairings and re-pair. Move closer to the unit. |
| Steering wheel controls not working. | Incorrect wiring, incorrect protocol selected in settings. | Refer to the "Installation Steps" for steering wheel control wiring. Check and adjust the protocol in "Settings" > "Steering Wheel Control". |
| Rear camera not displaying. | Loose camera connection, faulty camera, incorrect wiring for reverse trigger. | Check all camera cable connections. Ensure the reverse trigger wire is correctly connected. |
| System is slow or unresponsive. | Too many apps running, low storage, temporary software glitch. | Close unnecessary applications. Clear cache. Restart the unit. If issues persist, consider a factory reset (backup data first). |
Warranty and Support
Product Warranty
This VECHTEL Autoradio comes with a 2-year warranty from the date of purchase. This warranty covers manufacturing defects and malfunctions under normal use. It does not cover damage caused by improper installation, misuse, accidents, or unauthorized modifications.
Please retain your proof of purchase for warranty claims.
Customer Support
For technical assistance, troubleshooting beyond this manual, or warranty inquiries, please contact VECHTEL customer support through the platform where you purchased the product. Provide your model number (A7267A3796A4MI2) and a detailed description of the issue for faster service.
