
1. Introduction
Thank you for choosing the Yonvim DC339S Dual Dash Cam. This device is designed to provide reliable video recording of your journeys, offering both front and rear camera coverage with high-definition clarity. This manual provides essential information for setting up, operating, and maintaining your dash cam to ensure optimal performance and safety.

Image: The Yonvim 2.5K QHD Dash Cam, highlighting its role as a reliable road companion.
2. What's in the Box
Please check the package contents upon unboxing to ensure all items are present:
- Yonvim DC339S Dash Cam (Front and Rear unit) x1
- 64GB Micro SD Card x1
- Car Charger (Cigarette lighter power cord) x1
- Quick Guide x1
- Necessary accessories (Mounting bracket, adhesive stickers, electrostatic film, rear camera cable)

Image: Visual representation of all items included in the Yonvim DC339S Dash Cam package.
3. Product Overview
Familiarize yourself with the main components of your Yonvim DC339S Dash Cam:
- Front Camera: Records in 2.5K QHD resolution with a 160° wide-angle lens.
- Rear Camera: Records in 1080P resolution with a 160° wide-angle lens, providing comprehensive coverage.
- 3.39" IPS Screen: For real-time viewing, playback, and menu navigation.
- Micro SD Card Slot: Supports up to 256GB (64GB card included).
- Power Port: USB connection for the car charger.
- Mounting Point: For attaching the dash cam to the windshield mount.

Image: Front view of the dash cam, showing the lens and 2.5K indicator.

Image: The compact rear camera unit.

Image: Close-up of the 3.39-inch IPS screen.

Image: The included 64GB Micro SD card.
4. Setup and Installation
Follow these steps to properly install your dash cam in your vehicle:
- Prepare the Windshield: Clean the area on your windshield where you intend to mount the dash cam. Ensure it is free of dust and grease.
- Apply Electrostatic Film: Place the electrostatic film on the cleaned area of the windshield. This allows for easy removal of the mount without leaving residue.
- Attach the Mount: Secure the dash cam's mounting bracket to the electrostatic film using the adhesive. Press firmly for 30 seconds.
- Insert Micro SD Card: Insert the provided 64GB Micro SD card into the dash cam's card slot until it clicks.
- Mount the Front Camera: Slide the main dash cam unit onto the mounting bracket. Position it to ensure a clear view of the road ahead without obstructing your driving vision.
- Install the Rear Camera: Mount the rear camera on the inside of your rear windshield, ensuring a clear view behind your vehicle. Run the rear camera cable discreetly along the headliner and pillar trim to connect it to the main dash cam unit.
- Connect Power: Plug the car charger into your vehicle's cigarette lighter socket. Connect the other end to the dash cam's power input. Route the power cable neatly to avoid interference with driving controls.
- Initial Power On: Start your vehicle. The dash cam should power on automatically and begin recording. Format the SD card through the dash cam's menu settings for first-time use.
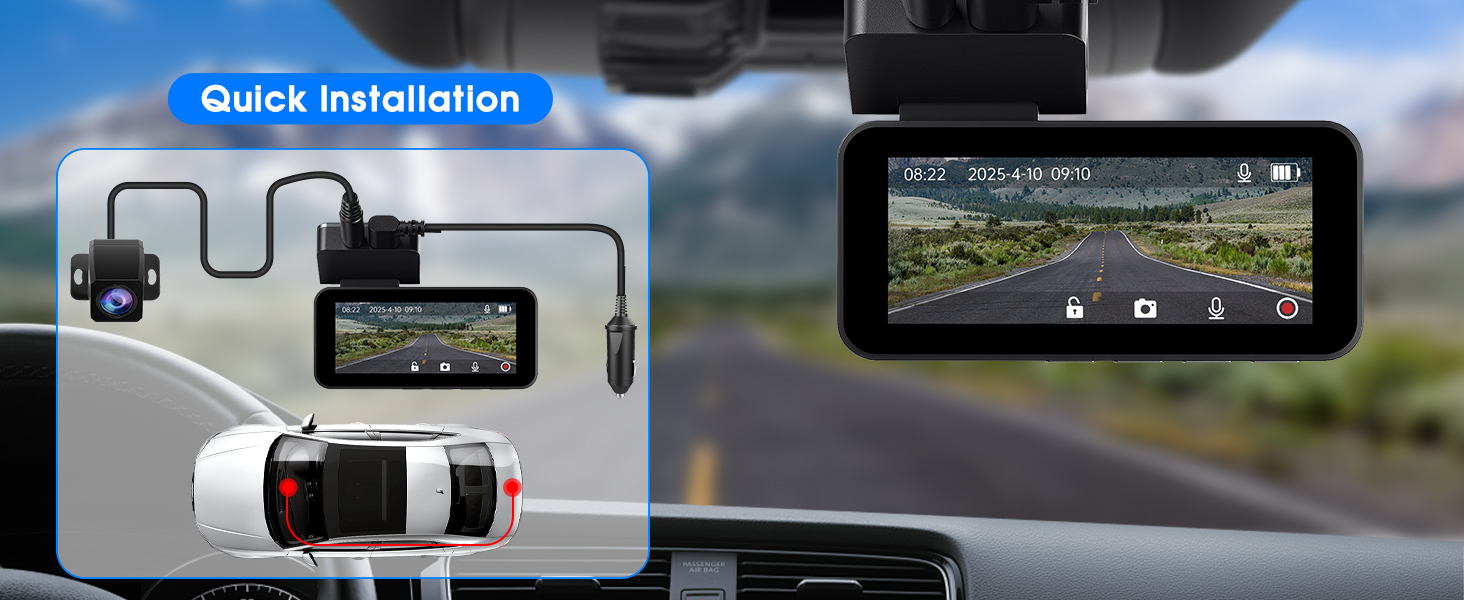
Image: Diagram illustrating the quick installation process for the dash cam and cable routing.
Installation Video Guide
Video: Detailed guide on installing and setting up the Yonvim DC339S Dash Cam.
5. Operating Instructions
Understand the basic operations of your dash cam:
- Automatic Recording: The dash cam will automatically power on and begin recording when your vehicle's ignition is turned on. It will save footage in short segments (e.g., 1, 3, or 5 minutes) based on your loop recording settings.
- Manual Recording: Press the designated button (refer to your Quick Guide for exact button layout) to manually start or stop recording.
- Emergency Lock: In case of an incident, press the emergency lock button to protect the current recording segment from being overwritten by loop recording. This footage will be saved in a separate, protected folder.
- Menu Navigation: Use the buttons on the dash cam to navigate through the settings menu on the 3.39" IPS screen. Here you can adjust resolution, loop recording duration, G-sensor sensitivity, date/time, and other preferences.
- Playback: Access the playback mode through the menu to review recorded videos directly on the dash cam screen. You can also remove the Micro SD card and view footage on a computer.
- Parking Monitor: If enabled and a hardwire kit is installed (sold separately), the dash cam will monitor your vehicle for impacts or motion while parked.
Operation Video Guide
Video: Guide demonstrating the operational features and menu navigation of the Yonvim DC339S Dash Cam.
6. Key Features
The Yonvim DC339S Dash Cam includes several advanced features to enhance your driving safety and recording experience:
6.1. Crystal Clear 2.5K QHD Recording
The front camera records in 2.5K QHD (2560x1440P) resolution, capturing sharp and detailed footage of the road ahead. The rear camera records in 1080P, providing clear views from the back of your vehicle.

Image: Illustrates the 2.5K front and 1080P rear recording capabilities with wide-angle coverage.
6.2. Super Night Vision
Equipped with an F1.8 aperture and WDR (Wide Dynamic Range) technology, the dash cam delivers enhanced visibility and clear recordings even in low-light conditions or at night. This ensures important details are captured regardless of ambient light.

Image: Demonstrates the dash cam's superior night vision capabilities compared to standard recording in varying light conditions.

Image: Visual of the dash cam's advanced night vision and multi-layer glass lens for clarity.
6.3. G-Sensor (Automatic Collision Detection)
The built-in G-sensor automatically detects sudden impacts, rapid acceleration, or sharp braking. When triggered, it locks the current video footage, preventing it from being overwritten by loop recording. This ensures critical evidence is securely saved.

Image: Illustration of the G-Sensor detecting a collision and locking the footage.

Image: Depicts the G-Sensor's function in detecting and protecting footage during incidents.
6.4. Seamless Loop Recording
When the Micro SD card reaches its storage limit, the loop recording feature automatically overwrites the oldest unlocked footage with new recordings. This ensures continuous recording without manual intervention. Protected files (from G-sensor or manual lock) are not overwritten.

Image: Visual representation of how loop recording continuously records by overwriting older files.

Image: Illustrates the seamless loop recording process, protecting important files.
6.5. 24-Hour Parking Monitor
With the parking monitor feature enabled, the dash cam will automatically detect impacts or motion around your parked vehicle and begin recording. For continuous 24-hour monitoring while the engine is off, a hardwire kit (sold separately, ASIN: B0FDB8KWDL) is required to provide constant power.

Image: Depicts a car under the protection of the 24-hour parking monitor.

Image: Shows the 24-hour parking monitor providing all-around protection for a vehicle.
6.6. 160° Wide Angle Lenses
Both the front and rear cameras feature a 160° wide-angle lens, providing extensive coverage of the road. This wide field of view captures up to three lanes of traffic, minimizing blind spots and ensuring comprehensive recording of your surroundings.

Image: Overhead view illustrating the 160-degree wide-angle coverage of both front and rear cameras.
6.7. Extreme Temperature Resistance
The Yonvim DC339S is designed to operate reliably in a wide range of temperatures, from -4°F (-20°C) to 158°F (70°C). This ensures continuous protection and functionality in various weather conditions.

Image: Depicts the dash cam's ability to withstand and function in extreme hot and cold temperatures.

Image: Shows the dash cam performing reliably in both snowy cold and desert hot environments.
7. Maintenance
Proper maintenance ensures the longevity and optimal performance of your dash cam:
- Clean Lenses: Regularly clean the front and rear camera lenses with a soft, lint-free cloth to ensure clear video quality. Avoid abrasive materials that could scratch the lenses.
- Format SD Card: It is recommended to format the Micro SD card once a month to prevent data corruption and ensure smooth recording. This can be done through the dash cam's menu settings.
- Check Connections: Periodically check all cable connections (power, rear camera) to ensure they are secure and free from damage.
- Firmware Updates: Check the Yonvim official website periodically for any available firmware updates. Keeping your dash cam's firmware up-to-date can improve performance and add new features.
- Storage Conditions: While the dash cam is designed for extreme temperatures, prolonged exposure to direct sunlight when parked can be harsh. If possible, park in shaded areas or remove the dash cam during extended periods of extreme heat.
8. Troubleshooting
If you encounter issues with your dash cam, refer to the following common problems and solutions:
| Problem | Possible Cause | Solution |
|---|---|---|
| Dash cam does not power on. | No power, faulty cable, or car charger. | Check car charger connection and vehicle's cigarette lighter socket. Try a different power source if available. Ensure cable is not damaged. |
| Recording stops unexpectedly. | SD card full, corrupted, or slow speed. | Format the SD card. Ensure it is a high-speed (Class 10 or U3) card. Replace if corrupted. |
| Video footage is blurry or unclear. | Dirty lens, protective film still on, or incorrect focus. | Clean the camera lenses. Remove any protective film. Ensure the dash cam is securely mounted and not vibrating. |
| Rear camera not displaying. | Loose connection or damaged cable. | Check the connection of the rear camera cable to the main unit. Ensure the cable is not pinched or damaged. |
| G-sensor is too sensitive/not sensitive enough. | G-sensor sensitivity setting. | Adjust the G-sensor sensitivity in the dash cam's settings menu. |
If these solutions do not resolve the issue, please contact Yonvim Customer Support for further assistance.
9. Specifications
| Feature | Detail |
|---|---|
| Model | DC339S |
| Front Camera Resolution | 2.5K QHD (2560x1440P) |
| Rear Camera Resolution | 1080P |
| Field of View | 160° (Front & Rear) |
| Screen Size | 3.39" IPS Display |
| Storage | Micro SD Card (64GB included, supports up to 256GB) |
| Special Features | G-Sensor, Loop Recording, Night Vision, Parking Monitor, Expandable Storage |
| Connectivity | USB |
| Operating Temperature | -4°F to 158°F (-20°C to 70°C) |
| Product Dimensions | 0.78 x 3.62 x 1.67 inches |
| Item Weight | 1.08 pounds |
| Mounting Type | Windshield Mount |
10. Warranty and Support
Yonvim is committed to providing high-quality products and customer service.
- 24-Month Warranty: Your Yonvim DC339S Dash Cam is covered by a 2-year warranty from the date of purchase, protecting against manufacturing defects.
- Lifetime Technical Support: We offer lifetime technical support for your product. Our expert team is available to assist you with any questions or issues you may encounter.
- 24/7 Customer Support: For immediate assistance, our customer support team is available 24/7 via live chat and email. We aim to respond to all inquiries within 24 hours.
For warranty claims, technical assistance, or general inquiries, please visit the official Yonvim website or contact us directly through the contact information provided in your Quick Guide.


Image: Icons representing 24/7 support, 24-month warranty, and lifetime tech support.