
1. Introduction
This manual provides instructions for the proper use and care of your 52HZ Barrel-Type Blood Pressure Monitor. This device is designed for home use to measure systolic and diastolic blood pressure, as well as pulse rate, on the upper arm. It features a barrel-type design for easy arm placement, a large LCD screen with a 3-color backlight for clear readings, and memory for two users.
2. Important Safety Information
- Consult your physician before using this device if you have any medical conditions.
- Do not use this device for diagnosis or treatment of any health problem or disease. Always consult a medical professional for diagnosis and treatment.
- Do not use the device on an injured arm or an arm undergoing medical treatment.
- Avoid using the device in a moving vehicle or on an airplane.
- Keep the device out of reach of children and pets.
- Use only the provided USB-C cable for charging.
3. Package Contents
Verify that all components are present in the package:
- 1 x 52HZ Barrel-Type Blood Pressure Monitor
- 1 x USB-C Charging Cable
- 1 x User Manual (this document)
4. Product Overview
Familiarize yourself with the components of your blood pressure monitor:
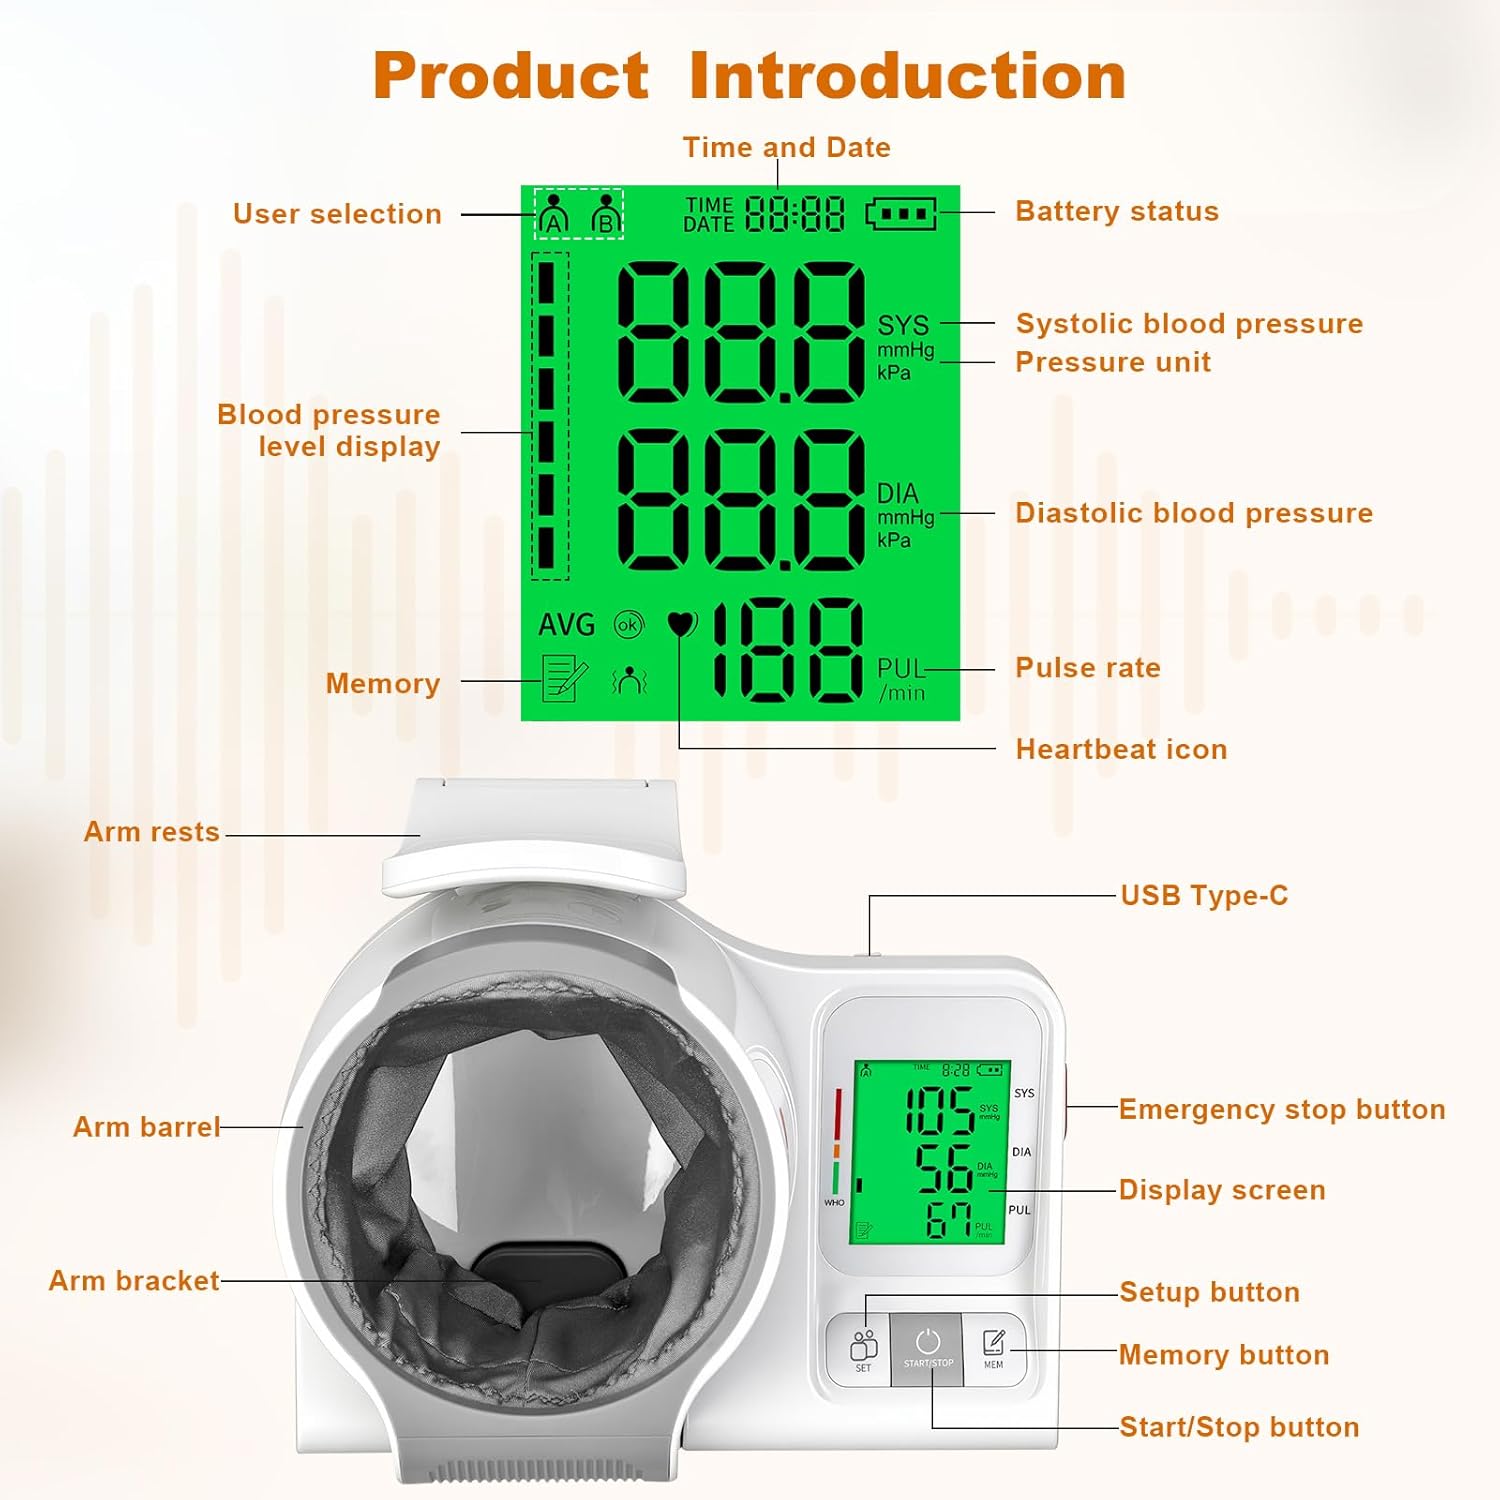
Figure 4.1: Product components and display indicators. This image illustrates the various parts of the blood pressure monitor, including the arm barrel, arm rests, display screen, control buttons (Setup, Memory, Start/Stop), USB-C port, and emergency stop button. The display shows indicators for user selection, time and date, battery status, blood pressure level, systolic and diastolic readings, pulse rate, and heartbeat icon.
- Arm Barrel: Where the upper arm is inserted for measurement.
- Arm Rests: Supports the arm during measurement.
- Elbow Pressure Switch: Activates measurement when the elbow is correctly positioned.
- Display Screen: Shows blood pressure readings, pulse rate, time, date, and other indicators.
- Start/Stop Button: Initiates and ends measurements.
- Setup Button: Used to enter and navigate settings.
- Memory Button: Accesses stored measurement data.
- USB-C Port: For charging the device.
- Emergency Stop Button: Immediately stops the measurement process.
5. Setup
5.1 Charging the Device
The monitor is equipped with a rechargeable 2000mAh battery. Before first use, ensure the device is fully charged.
- Locate the USB-C port on the side of the monitor.
- Connect the provided USB-C cable to the monitor and the other end to a compatible USB power adapter (not included).
- The battery indicator on the display will show charging status. A full charge typically takes a few hours.
- Disconnect the cable once fully charged.

Figure 5.1: USB-C charging port. The image highlights the USB-C port for convenient recharging of the device's internal battery.
5.2 Setting Time and Date
Accurate time and date settings are essential for tracking your measurements correctly.
- With the device off, press and hold the Setup button until the year starts flashing.
- Use the Memory button to adjust the year.
- Press the Setup button again to confirm and move to the next setting (month, day, hour, minute).
- Repeat steps 2 and 3 for each setting.
- Once all settings are confirmed, the device will exit setup mode.
Video 5.1: How to Set Time and Date. This video demonstrates the step-by-step process for adjusting the time and date settings on the blood pressure monitor, ensuring accurate record-keeping.
6. Operation
6.1 Proper Positioning for Measurement
Correct arm and body positioning is crucial for accurate readings.
- Sit comfortably with your back supported and feet flat on the floor.
- Place the monitor on a stable surface, such as a table, at heart level.
- Slide your bare upper arm into the barrel-type cuff. Ensure the cuff is snug but not overly tight.
- Rest your elbow on the designated elbow pressure switch to ensure proper arm placement and activate the measurement readiness.

Figure 6.1: Proper arm insertion and elbow placement. This image demonstrates how to correctly insert the arm into the barrel cuff and rest the elbow on the pressure switch for accurate measurement initiation.

Figure 6.2: Step-by-step guide to measuring blood pressure. This visual guide shows the process from folding up the arm support, inserting the arm and pressing the elbow switch, to pressing START for readings.
6.2 Taking a Measurement
Once properly positioned, taking a measurement is a one-touch process.
- Ensure you are calm and relaxed. Avoid talking or moving during the measurement.
- Press the Start/Stop button. The cuff will automatically inflate and then slowly deflate.
- The measurement will complete in approximately 30 seconds, and your systolic pressure, diastolic pressure, and pulse rate will be displayed on the screen.
- If you need to stop the measurement at any time, press the Emergency Stop button.
Video 6.1: How to Measure Blood Pressure. This video provides a visual guide on the complete process of taking a blood pressure measurement using the 52HZ monitor.
Video 6.2: Easy to Use 52HZ Blood Pressure Monitor. This video demonstrates the simplicity of operating the blood pressure monitor for quick and convenient readings.
6.3 Understanding Your Readings (3-Color Backlight)
The monitor features a 3-color backlight system to provide a quick visual indication of your blood pressure category based on WHO guidelines.
- Green Backlight: Indicates optimal or normal blood pressure.
- Orange Backlight: Indicates Grade 1-2 Hypertension (elevated blood pressure).
- Red Backlight: Indicates Severe Hypertension (high blood pressure).
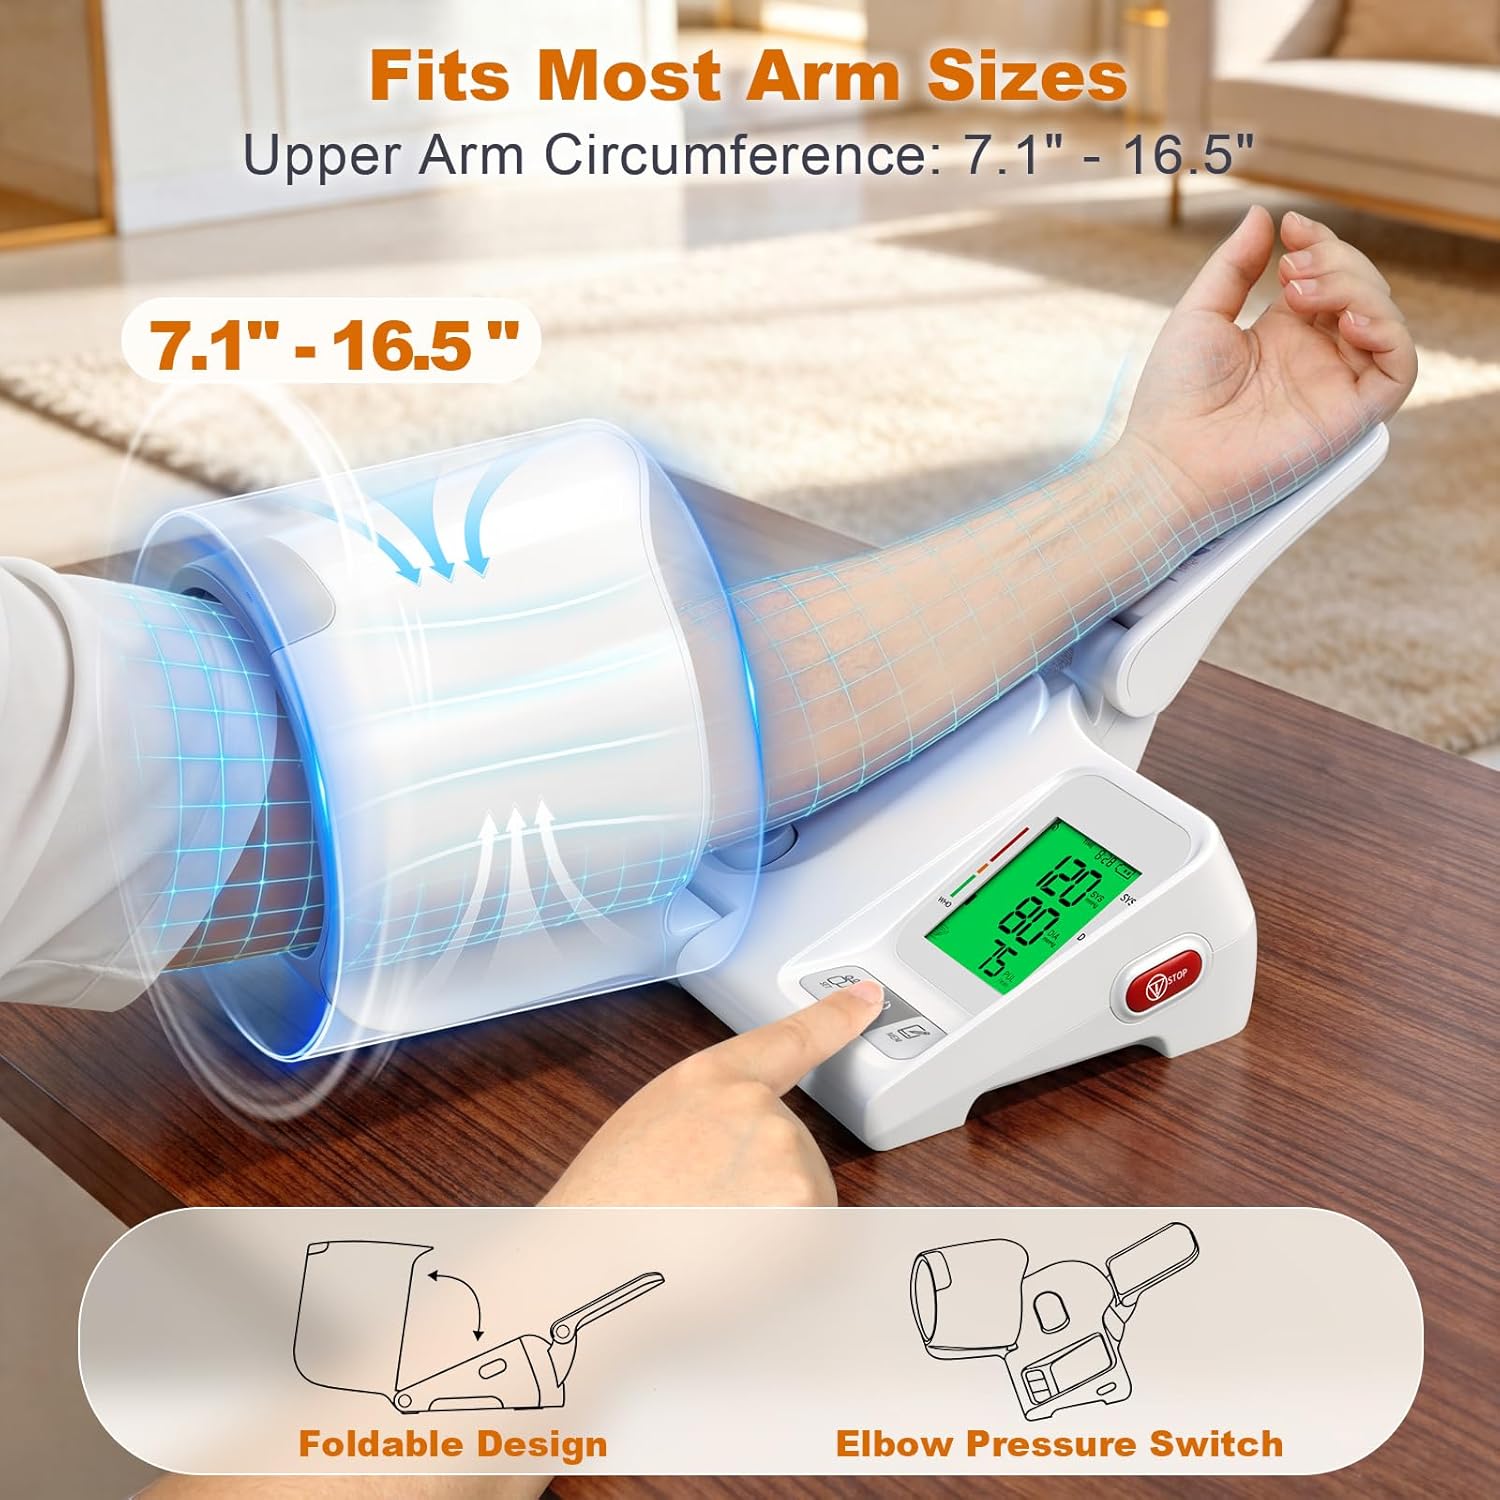
Figure 6.3: 3-Color Backlight Indicator. This image displays the monitor's screen showing different backlight colors (green, orange, red) corresponding to various blood pressure categories for easy interpretation.
6.4 Dual User Memory Function
The monitor supports two users, each with 99 memory slots, allowing for individual tracking of blood pressure trends.
- Before taking a measurement, ensure the correct user (User A or User B) is selected on the display. Use the Setup button to toggle between users if necessary.
- After a measurement, the reading will automatically be stored under the selected user's profile.
- To review past readings, press the Memory button. Use the Memory button to scroll through stored data.
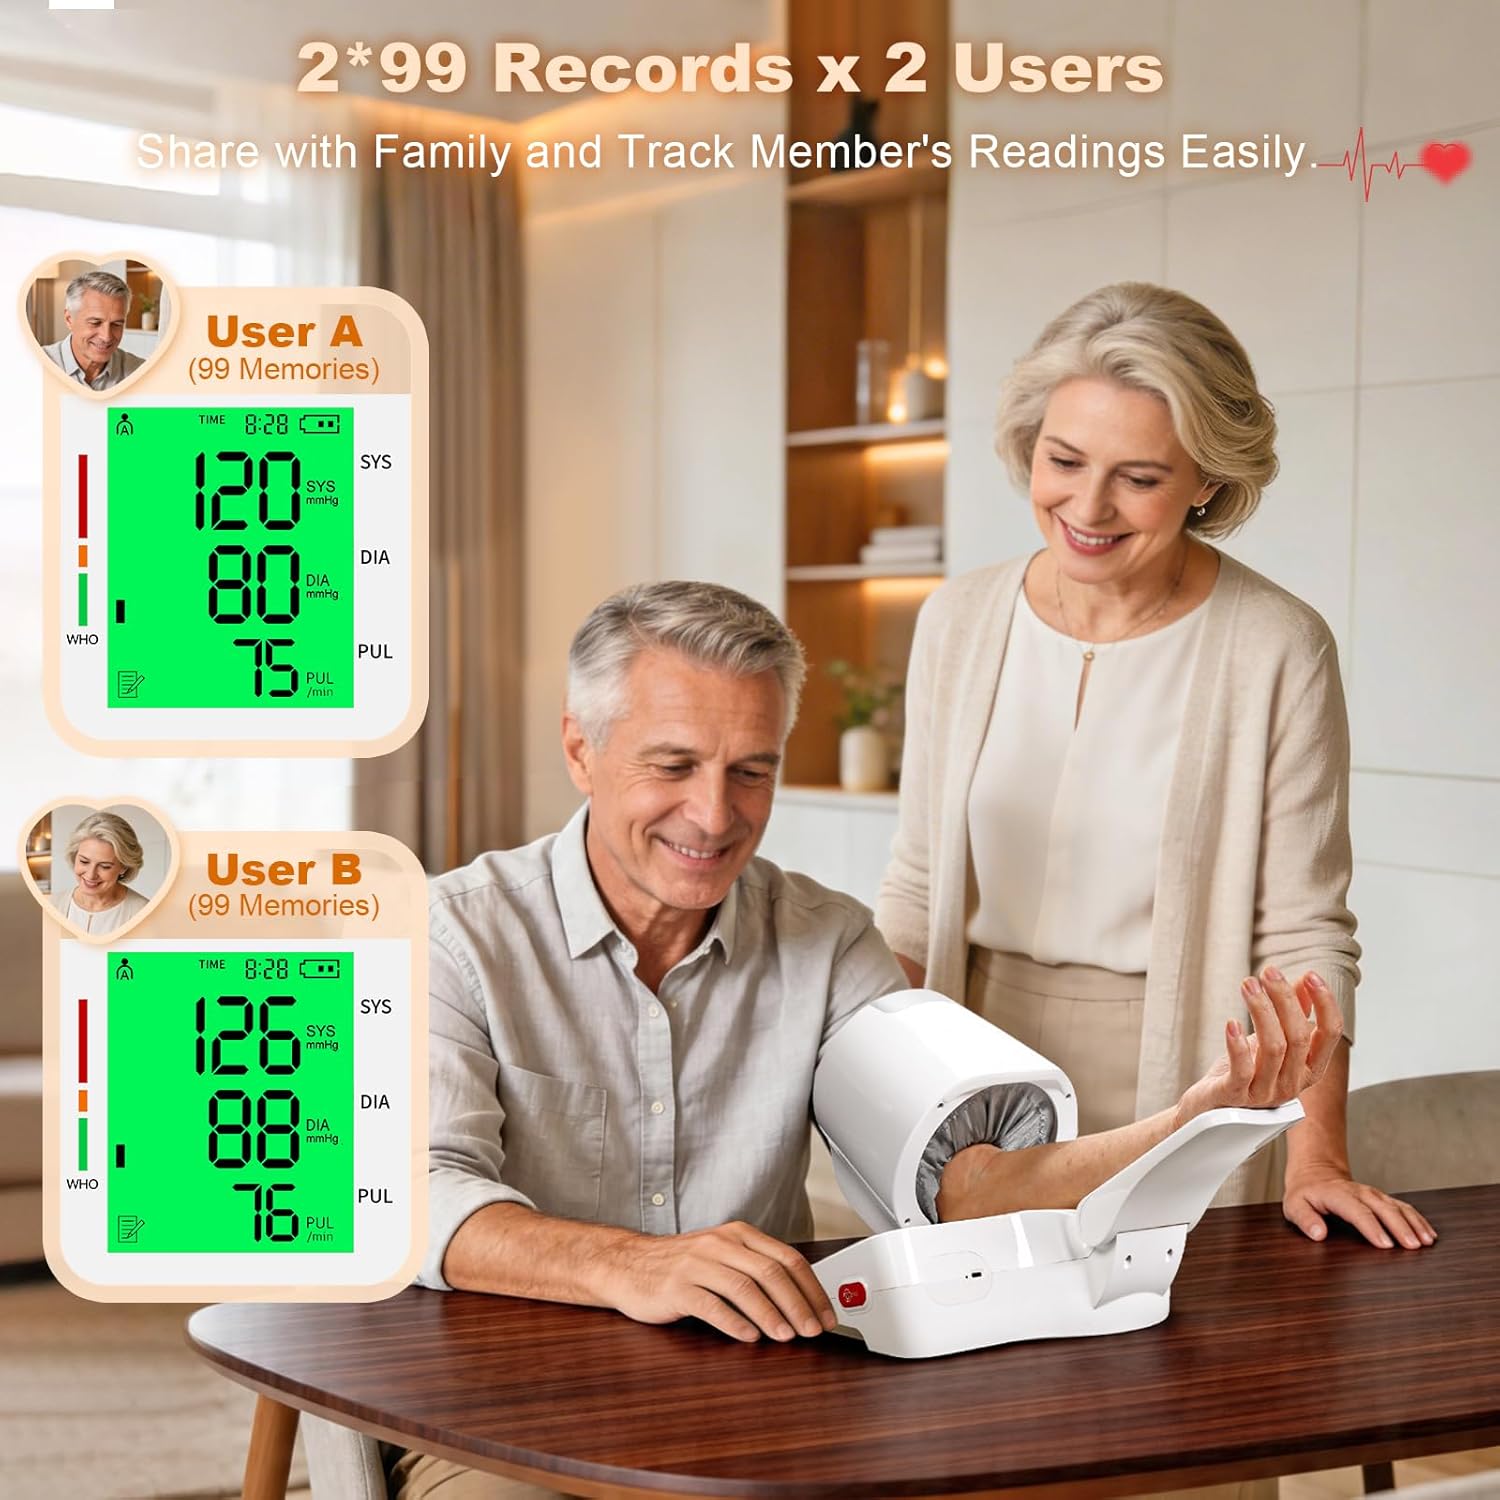
Figure 6.4: Dual User Memory. This image illustrates how the monitor stores separate readings for two different users, labeled User A and User B, each with 99 memory slots.
6.5 Tips for Accurate Measurement
- Sit quietly for at least 5 minutes before measuring.
- Measure before meals or medication.
- Wait at least 30 minutes after exercise or consuming coffee.
- Allow at least 3 minutes between consecutive measurements.
- Always measure at the same time of day for consistent tracking.

Figure 6.5: Accurate Measurement Tips. This image provides visual reminders for optimal conditions to ensure precise blood pressure readings.
7. Maintenance and Care
7.1 Cleaning
- Wipe the monitor and cuff with a soft, dry cloth.
- If necessary, use a cloth lightly dampened with water or a mild detergent. Do not use abrasive cleaners or immerse the device in water.
- Ensure no liquid enters the device casing.
7.2 Storage
- Store the device in a clean, dry place away from direct sunlight, extreme temperatures, and humidity.
- Avoid dropping the device or subjecting it to strong impacts.
8. Troubleshooting
If you encounter issues with your blood pressure monitor, refer to the following table for common problems and solutions.
| Problem | Possible Cause | Solution |
|---|---|---|
| Device does not turn on | Low battery or no charge. | Charge the device using the USB-C cable. |
| Inaccurate readings | Incorrect arm positioning, movement during measurement, or talking. | Ensure proper arm placement, remain still and silent during measurement. Refer to Section 6.1 and 6.5. |
| Cuff does not inflate or inflates incorrectly | Arm not properly inserted or elbow not activating pressure switch. | Re-insert arm and ensure elbow firmly presses the switch. |
| Error message on display | Various operational errors. | Turn off the device, wait a few minutes, and restart. If the error persists, contact customer support. |
9. Specifications
| Feature | Detail |
|---|---|
| Model Number | CH-S691L |
| Measurement Method | Oscillometric |
| Measurement Location | Upper Arm |
| Cuff Size Range | 7.1" – 16.5" (18 cm – 42 cm) |
| Measurement Accuracy | Pressure: ±3 mmHg; Pulse: ±5% of reading |
| Memory | 2 Users x 99 Readings |
| Display | Large LCD with 3-color backlight |
| Power Source | Rechargeable 2000mAh Battery (USB-C) |
| Product Dimensions | 11.14 x 9.6 x 9.6 inches |
| Item Weight | 4.4 Pounds |
10. Warranty and Support
For warranty information or technical support, please refer to the contact details provided on the product packaging or the official 52HZ website. Keep your purchase receipt as proof of purchase for warranty claims.