Introduction
This manual provides essential instructions for the safe and efficient operation, installation, and maintenance of your Speed Queen SF7007WG Stacked Washer and Gas Dryer Combo. Please read all instructions carefully before using the appliance to ensure proper function and to prevent injury or damage.
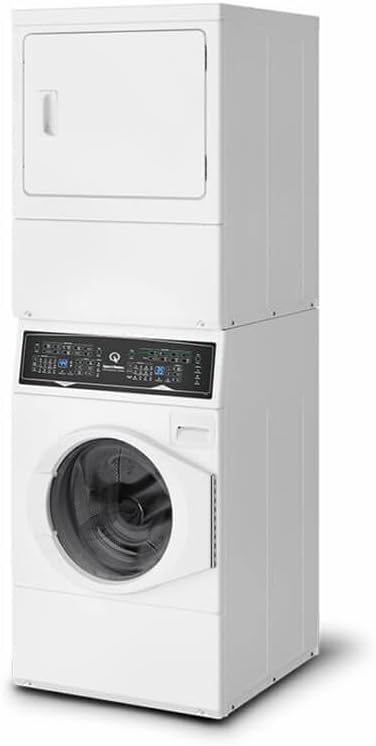
Image: Front view of the Speed Queen SF7007WG stacked washer and gas dryer combo, showing the compact, space-saving design with the dryer positioned above the washer.
Important Safety Instructions
WARNING: To reduce the risk of fire, electric shock, or injury to persons when using your appliance, follow basic precautions, including the following:
- Read all instructions before using the appliance.
- Do not wash or dry articles that have been previously cleaned in, washed in, soaked in, or spotted with gasoline, dry-cleaning solvents, or other flammable or explosive substances, as they emit vapors that could ignite or explode.
- Do not allow children to play on or in the appliance. Close supervision of children is necessary when the appliance is used near children.
- Do not reach into the appliance if the tub or drum is moving.
- Do not install or store this appliance where it will be exposed to the weather.
- Do not tamper with controls.
- Do not repair or replace any part of the appliance or attempt any servicing unless specifically recommended in the user-maintenance instructions or in published user-repair instructions that you understand and have the skills to carry out.
- Always disconnect the appliance from the power supply before attempting any service or cleaning.
Setup and Installation
Unpacking
Carefully remove all packaging materials, including any shipping bolts or restraints. Inspect the appliance for any shipping damage. Report any damage immediately to your dealer.
Location Requirements
Ensure the installation area has proper ventilation, a grounded electrical outlet, and appropriate water and gas connections. The floor must be level and capable of supporting the appliance's weight (approximately 417 pounds).
Leveling the Appliance
The appliance must be level to operate correctly and prevent excessive vibration. Use a level and adjust the leveling legs located at the bottom corners of the unit. Turn the legs clockwise to raise and counter-clockwise to lower. Ensure all four legs are firmly on the floor.
Connections
- Electrical: Connect the power cord to a grounded electrical outlet. Refer to local codes for specific requirements.
- Water: Connect the hot and cold water inlet hoses to the corresponding valves. Ensure connections are tight to prevent leaks.
- Gas: Gas connection must be performed by a qualified installer in accordance with local codes and ordinances. Ensure all gas connections are leak-tested before use.
- Drain: Securely attach the drain hose to a standpipe or laundry tub, ensuring it is properly vented to prevent siphoning.
Operating Instructions
The Speed Queen SF7007WG features separate control panels for the washer and dryer, located centrally for easy access.

Image: Detailed view of the Speed Queen SF7007WG control panel, showing separate sections for washer and dryer cycles, selections, and options with digital displays.
Washer Operation
- Load Laundry: Open the washer door and load items loosely into the drum. Do not overload.
- Add Detergent: Dispense appropriate detergent and fabric softener into the designated compartments in the dispenser drawer.
- Select Wash Cycle: Use the 'Wash Cycles' buttons on the left control panel to choose a cycle (e.g., Heavy Duty, Perm Press, Delicates).
- Adjust Selections/Options: Customize your wash with temperature, spin speed, soil level, and extra options as desired.
- Start Cycle: Press the 'Start' button to begin the wash cycle. The door will lock, and the cycle status will be displayed.
Dryer Operation
- Load Laundry: Transfer washed items from the washer to the dryer drum. Do not overload.
- Clean Lint Filter: Always clean the lint filter before each drying cycle. The filter is located inside the dryer door opening.
- Select Dry Cycle: Use the 'Dry Cycles' buttons on the right control panel to choose a cycle (e.g., Auto Dry, Timed Dry, Delicates).
- Adjust Selections/Options: Customize your dry with temperature, dryness level, and anti-wrinkle options as desired.
- Start Cycle: Press the 'Start' button to begin the dry cycle.
Maintenance
Cleaning the Lint Filter
The lint filter should be cleaned before or after every load to maintain drying efficiency and prevent fire hazards. Pull the filter out, remove lint, and reinsert.
Cleaning the Dispenser Drawer
Periodically remove and clean the detergent and fabric softener dispenser drawer to prevent residue buildup. Rinse with warm water and a soft brush, then replace.
Cleaning the Exterior
Wipe the exterior surfaces with a soft, damp cloth. Do not use abrasive cleaners or solvents that could damage the finish.
Washer Drum Cleaning
Run a 'Tub Clean' or 'Self Clean' cycle (if available) periodically, or use a washer cleaner product to prevent odors and residue buildup in the washer drum.
Troubleshooting
Before calling for service, review the following common issues and solutions:
| Problem | Possible Cause | Solution |
|---|---|---|
| Washer not starting | Door not closed, power issue, cycle not selected | Ensure door is latched, check power supply, select a cycle and press Start. |
| Dryer not heating | Gas supply off, lint filter clogged, wrong cycle selected | Check gas valve, clean lint filter, select a heat cycle. |
| Excessive vibration/noise | Uneven load, appliance not level, shipping bolts not removed | Redistribute laundry, level the appliance, ensure all shipping bolts are removed. |
| Water leaks | Loose hose connections, clogged drain hose | Tighten water inlet hoses, clear drain hose obstruction. |
Specifications
- Model Number: SF7007WG
- Product Dimensions (H x W x D): 79 x 29 x 33 inches
- Item Weight: 417 pounds
- Manufacturer: Speed Queen
- Power Source: Electric (Washer), Gas (Dryer)
Warranty and Customer Support
For warranty information, please refer to the warranty card included with your appliance or visit the official Speed Queen website. For technical assistance or service, please contact Speed Queen customer support directly. Have your model number (SF7007WG) and serial number ready when contacting support.
Customer Support: Refer to your purchase documentation or the manufacturer's website for current contact information.


