
1. Introduction
This manual provides comprehensive instructions for the installation, operation, maintenance, and troubleshooting of your Jingelsye 9.7" HD Touchscreen Car Radio, designed specifically for Ford Focus models from 2012 to 2018. Please read this manual thoroughly before installation and use to ensure proper functionality and to maximize your driving experience.

Image 1.1: Jingelsye Car Radio installed in a Ford Focus dashboard, demonstrating the integrated appearance and large touchscreen display.
2. Setup and Installation
The Jingelsye Car Radio is designed for a plug-and-play installation in compatible Ford Focus vehicles (2012-2018). No cutting or additional adapters are typically required. Ensure the vehicle's ignition is off and the battery is disconnected before beginning installation.
2.1 Package Contents
- Jingelsye 9.7" Car Radio Unit
- Power Wiring Harness (vehicle-specific)
- GPS Antenna
- Radio Antenna Adapter
- USB Cables (4-pin and 6-pin)
- RCA Cables (for audio/video output, subwoofer, etc.)
- Reversing Camera Input Cable
- External Microphone
- Backup Camera (if included in package)
2.2 Wiring Diagram
Refer to the following diagram for proper connection of all components. Ensure all connectors are securely fastened.
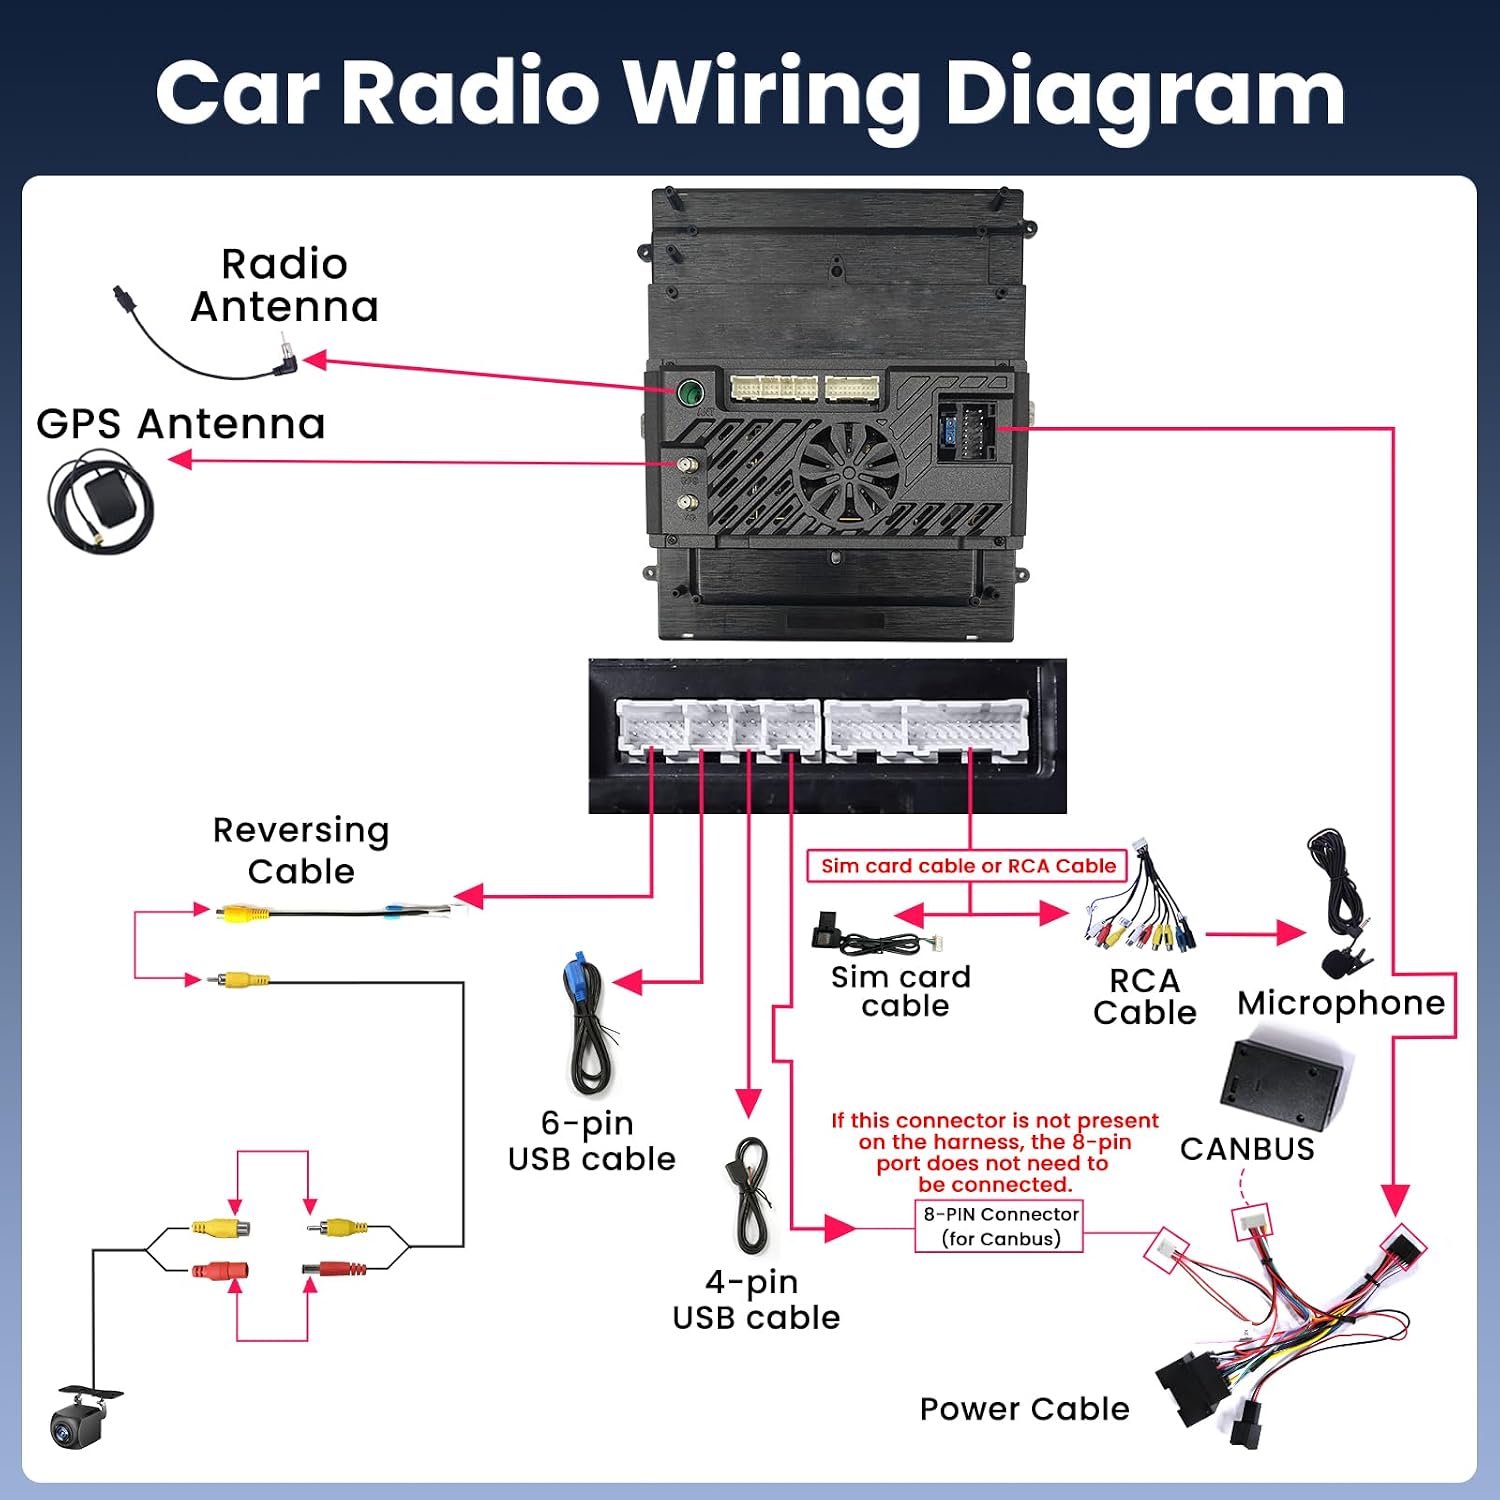
Image 2.1: Car Radio Wiring Diagram. This diagram illustrates the connections for the radio antenna, GPS antenna, reversing cable, USB cables, RCA cables, microphone, CANBUS, and the main power cable.
- Power Cable: Connects to the vehicle's main power harness.
- Radio Antenna: Connect the vehicle's radio antenna to the unit.
- GPS Antenna: Mount the GPS antenna in a location with a clear view of the sky (e.g., dashboard, A-pillar) and connect it to the unit.
- USB Cables: Connect the provided USB cables for external storage or device charging.
- RCA Cables: Use for external amplifiers, subwoofers, or auxiliary video inputs/outputs.
- Reversing Cable: Connect to the vehicle's reverse light signal for automatic camera activation.
- Microphone: Connect the external microphone for improved call quality.
- CANBUS: If your vehicle requires CANBUS integration for steering wheel controls or other vehicle data, connect the CANBUS module as shown. If the 8-pin port on the harness is not present, the 8-pin port does not need to be connected.
3. Operating Instructions
3.1 Power On/Off and Basic Navigation
After installation, reconnect the vehicle battery. The unit should power on with the vehicle's ignition. Use the touchscreen for all navigation and control. The intuitive Android 13 interface allows for easy access to applications and settings.
3.2 Wireless CarPlay & Android Auto
This unit supports wireless CarPlay and Android Auto for seamless smartphone integration. Ensure your phone's Bluetooth and Wi-Fi are enabled.
- On the car radio, open the "CarPlay" or "Android Auto" application.
- On your smartphone, search for the car radio's Bluetooth device and pair.
- Follow the on-screen prompts on both the car radio and your phone to establish the wireless connection.

Image 3.1: Wireless CarPlay and Android Auto interface, demonstrating seamless smartphone integration for navigation, music, and communication.
3.3 5G WiFi Connectivity
Connect the car radio to a Wi-Fi hotspot (e.g., from your smartphone or a dedicated car hotspot) to access online features, download apps, and receive real-time traffic updates for navigation.
- Go to "Settings" > "Network & Internet" > "Wi-Fi".
- Turn on Wi-Fi and select your desired network.
- Enter the password if prompted.
3.4 Bluetooth 5.0
Bluetooth 5.0 provides stable and fast connections for hands-free calling and audio streaming.
- Pairing: Go to "Settings" > "Connected devices" > "Pair new device" on the car radio. Enable Bluetooth on your phone and select the car radio from the list.
- Hands-Free Calling: Once paired, you can make and receive calls directly from the car radio's interface.
- Audio Streaming: Play music from your phone through the car's speakers via Bluetooth.
3.5 GPS Navigation
The unit features built-in GPS for precise navigation. Pre-installed map applications or downloadable alternatives can be used. Ensure the GPS antenna is properly installed for optimal signal reception.
3.6 Audio Features (FM/AM, EQ, HiFi, RDS)
Experience high-quality audio with the integrated FM/AM radio, 48-band equalizer, HiFi sound processing, and deep bass enhancement.
- FM/AM Radio: Access local radio stations. RDS (Radio Data System) provides station information and traffic announcements where available.
- Equalizer (EQ): Adjust audio frequencies to customize your sound profile. Navigate to the EQ settings in the audio menu to fine-tune bass, treble, and other sound parameters.
- HiFi Sound: Enjoy enhanced audio clarity and fidelity.

Image 3.2: Immersive Sound Experience. The car radio offers advanced audio controls, including a multi-band equalizer and sound field adjustments for optimal listening.
3.7 Backup Camera and Steering Wheel Controls
The unit supports a 1080P backup camera and integrates with your vehicle's original steering wheel controls for convenience.
- Backup Camera: When the vehicle is shifted into reverse, the display will automatically switch to the backup camera feed, providing a clear view of the area behind your vehicle.
- Steering Wheel Controls (SWC): Program the unit to respond to your vehicle's existing steering wheel buttons for volume, track changes, and call management. Refer to the unit's settings for SWC configuration.
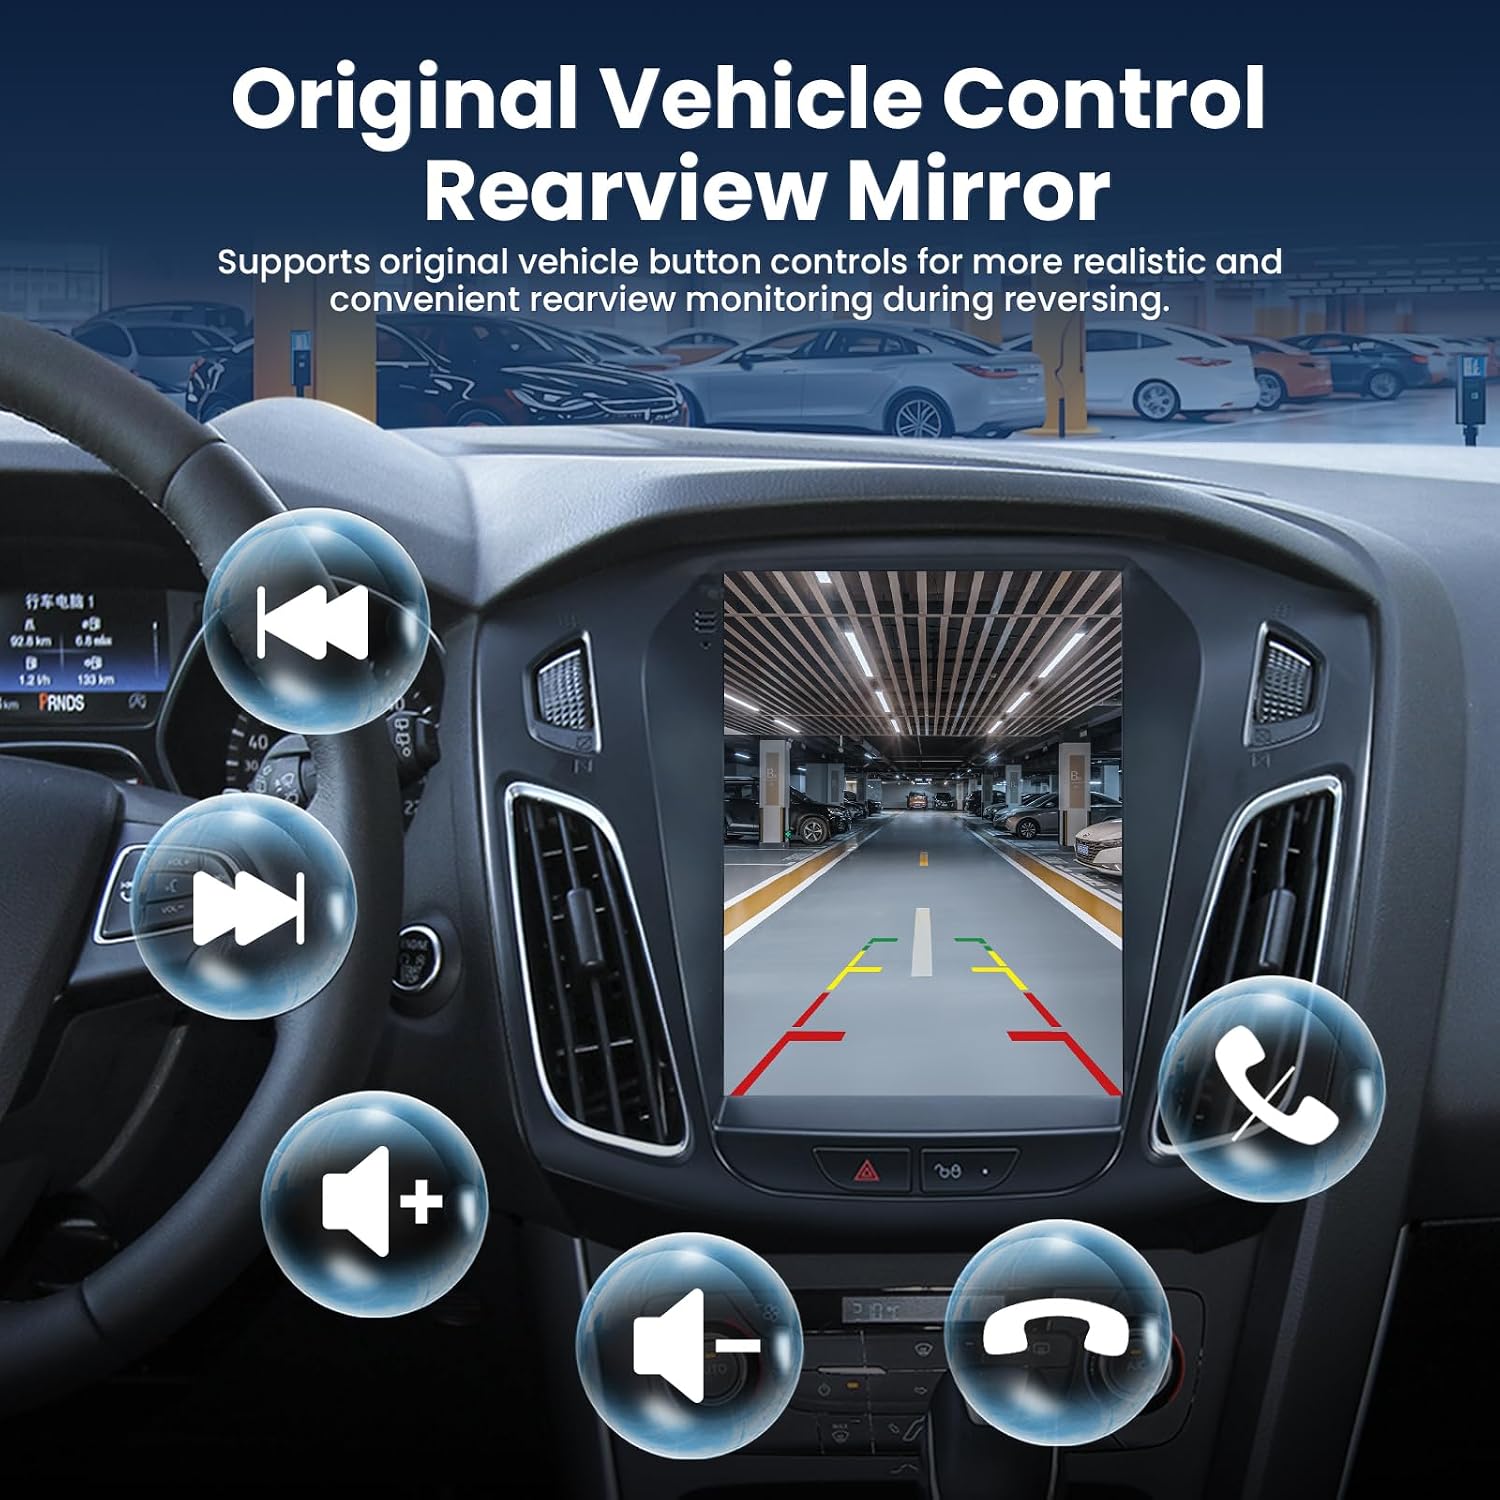
Image 3.3: Original Vehicle Control and Rearview Mirror. The unit integrates with vehicle controls and displays the backup camera feed for safe reversing.
3.8 Over-The-Air (OTA) Updates
The car radio supports OTA firmware updates to ensure your system always has the latest features and improvements. Connect to Wi-Fi and check for updates periodically in the system settings.

Image 3.4: A Smart Screen Featuring OTA. Regular Over-The-Air updates keep your car radio's firmware current with the latest enhancements.
4. Maintenance
- Screen Cleaning: Use a soft, lint-free cloth slightly dampened with water or a screen cleaner designed for electronics. Avoid abrasive materials or harsh chemicals.
- Software Updates: Regularly check for and install Over-The-Air (OTA) updates to ensure optimal performance and access to new features. (Refer to Section 3.8).
- General Care: Avoid exposing the unit to extreme temperatures, direct sunlight for prolonged periods, or excessive moisture.
5. Troubleshooting
If you encounter issues with your car radio, please refer to the following common troubleshooting steps:
| Problem | Possible Cause | Solution |
|---|---|---|
| Unit does not power on. | Incorrect wiring, blown fuse, vehicle battery disconnected. | Check all power connections, inspect vehicle fuses, ensure battery is connected and charged. |
| No sound. | Volume too low, mute activated, incorrect speaker wiring, amplifier issue. | Increase volume, check mute status, verify speaker connections, check external amplifier if used. |
| GPS signal weak or inaccurate. | GPS antenna improperly installed or obstructed. | Ensure GPS antenna is mounted in a clear, unobstructed location. Check antenna connection. |
| Bluetooth/CarPlay/Android Auto not connecting. | Bluetooth/Wi-Fi off, incorrect pairing, phone compatibility issue. | Ensure Bluetooth/Wi-Fi is enabled on both devices. Delete previous pairings and re-pair. Check phone compatibility. |
| Steering Wheel Controls not working. | CANBUS not connected, incorrect SWC configuration. | Verify CANBUS connection (if applicable). Reconfigure SWC settings in the unit's menu. |
| Backup camera not displaying. | Reversing cable not connected, camera power issue, faulty camera. | Check reversing cable connection to the unit and to the vehicle's reverse light signal. Ensure camera is powered. |
If the problem persists after attempting these solutions, please contact customer support or refer to the support section of this manual.
6. Specifications
| Feature | Detail |
|---|---|
| Brand | Jingelsye |
| Model | 8Core 4G+64G Car Radio |
| Compatible Vehicle | Ford Focus (2012-2018) |
| Screen Size | 9.7 Inches |
| Display Type | LCD, Capacitive Touchscreen (2.5D) |
| Operating System | Android 13 (supports iOS for CarPlay) |
| CPU | 8-Core |
| Memory Storage Capacity | 64 GB |
| Connectivity | Bluetooth 5.0, USB, Wi-Fi (5G support) |
| Special Features | Wireless CarPlay, Android Auto, GPS Navigation, FM/AM RDS, 48-Band EQ, HiFi Audio, 1080P Backup Camera Support, Split-screen, Mirror Link, OTA Updates |
| Audio Output Mode | Stereo |
| Supported Satellite Navigation System | GPS |
| Item Dimensions (L x W x H) | 34.3L x 12.7W x 38.6H centimeters |
| Item Weight | 4.87 Pounds |
| ASIN | B0GC7J6YFV |
| UPC | 754175629152 |
7. Warranty and Support
7.1 Product Warranty
For specific warranty details, please refer to the warranty information provided at the time of purchase or contact the seller directly. Standard product warranties typically cover manufacturing defects for a specified period from the date of purchase.
Extended warranty plans may be available for purchase separately. Please check your purchase records for details on any additional protection plans you may have acquired.
7.2 Customer Support
If you require technical assistance, have questions about installation, or need further troubleshooting beyond what is covered in this manual, please contact the seller through the platform where you purchased the product. Provide your order number and a detailed description of the issue to facilitate a quicker resolution.
For general inquiries about Jingelsye products, you may also visit the official Jingelsye brand page or website if available.