
1. Introduction
This manual provides detailed instructions for the PaiPaitek PD516U Dog Training Collar Replacement Remote. This remote is designed to offer a humane and effective method for dog training, utilizing ultrasonic sound, vibration, and audible tones. It is a replacement remote compatible with the PaiPaitek PD516U collar system.
Please read this manual thoroughly before using the device to ensure proper operation and to maximize its training effectiveness.
2. Product Overview
Familiarize yourself with the components and controls of your PaiPaitek PD516U replacement remote.
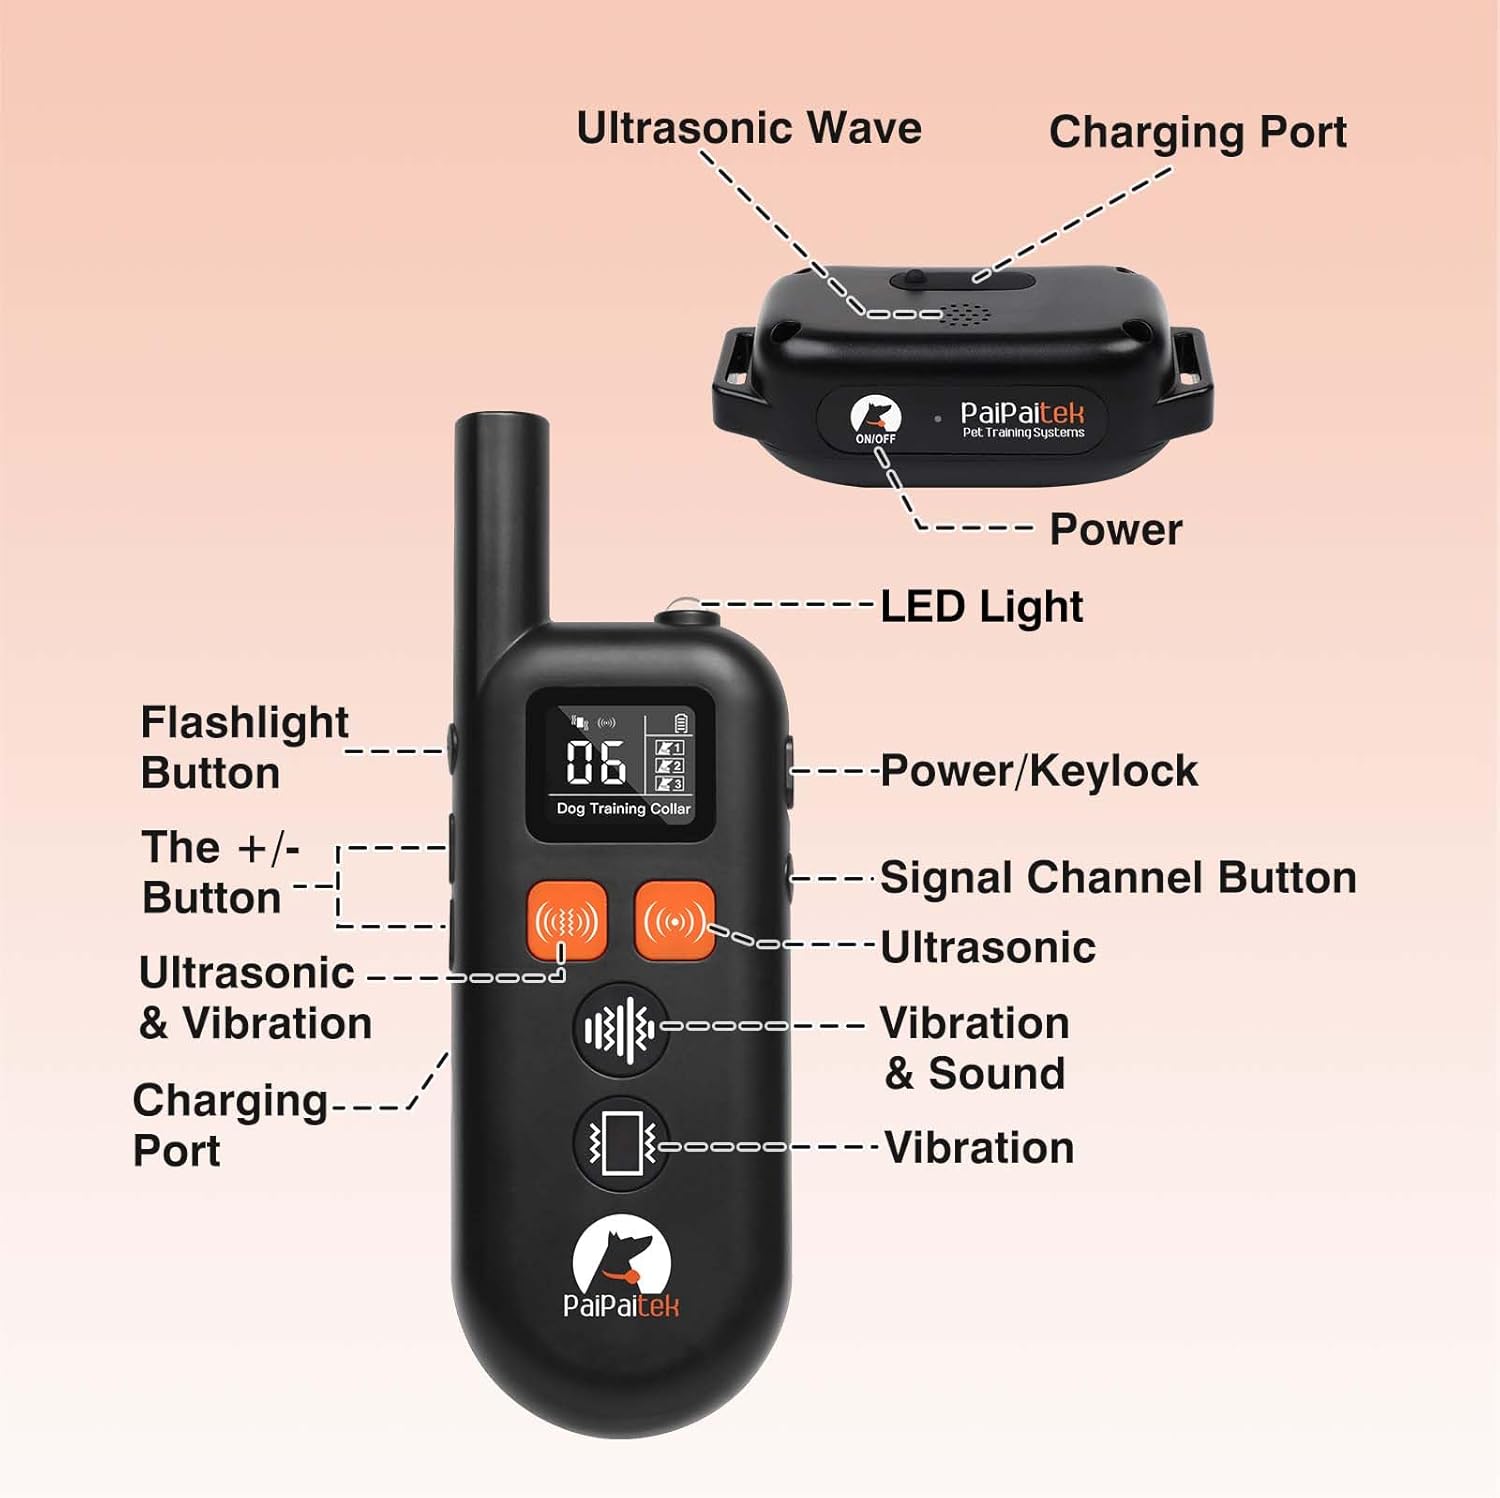
Figure 2.1: Remote Control Components
This diagram illustrates the various buttons and features of the PaiPaitek PD516U remote control, including the flashlight button, +/- buttons for level adjustment, ultrasonic and vibration buttons, power/keylock, signal channel button, and charging port.
- Flashlight Button: Activates the built-in LED flashlight for visibility in low-light conditions.
- +/- Buttons: Adjusts the intensity levels for ultrasonic and vibration modes, and cycles through tone options.
- Ultrasonic Button: Activates the ultrasonic correction mode.
- Vibration Button: Activates the vibration correction mode.
- Ultrasonic & Vibration Button: Activates a combined ultrasonic and vibration correction mode.
- Signal Channel Button: Switches between channels (Dog 1, Dog 2, or Dog 3) for multi-dog control.
- Power/Keylock Button: Turns the remote on/off and activates/deactivates the security keylock.
- Charging Port: Type-C port for recharging the remote's internal battery.
- Digital Display: Shows current channel, battery level, and selected intensity levels.

Figure 2.2: Remote Features in Use
This image highlights the security lock mechanism to prevent accidental button presses and the integrated flashlight for nighttime use, demonstrating the remote's practical design.
3. Setup
3.1 Charging the Remote
Before initial use, fully charge the remote control. A full charge takes approximately 2 hours.
- Locate the Type-C charging port on the remote.
- Connect the provided Type-C charging cable to the remote and to a USB power source (e.g., computer, power adapter, power bank).
- The battery indicator on the digital display will show charging status.
- Once fully charged, the indicator will show a full battery. Disconnect the charger.

Figure 3.1: Charging Process
This image illustrates how to charge the remote control using the Type-C charging cable, compatible with various USB power sources. The remote offers up to 20 days of working time on a single charge.
3.2 Pairing the Remote with a Collar
This remote is a replacement and must be paired with your existing PaiPaitek PD516U receiver collar(s). Ensure the collar is also charged and powered on.
- Turn on the remote control by pressing and holding the Power/Keylock button.
- Select the desired channel (Dog 1, Dog 2, or Dog 3) using the Signal Channel button.
- With the collar powered off, press and hold the collar's power button until its indicator light flashes rapidly.
- While the collar's light is flashing, press any training mode button (Ultrasonic, Vibration, or Ultrasonic & Vibration) on the remote.
- If pairing is successful, the collar's indicator light will stop flashing and remain solid, and the remote will emit a confirmation sound.
- Repeat for additional collars on different channels if you have multiple dogs.
4. Operating Instructions
4.1 Power On/Off and Keylock
- Power On: Press and hold the Power/Keylock button until the screen illuminates.
- Power Off: Press and hold the Power/Keylock button until the screen turns off.
- Keylock: Briefly press the Power/Keylock button to activate the security lock. This prevents accidental button presses. Press again to unlock.
4.2 Selecting a Dog Channel
The remote supports up to three collars. Use the Signal Channel button to switch between Dog 1, Dog 2, and Dog 3. Each channel retains its last-used settings.

Figure 4.1: Multi-Dog Control and Range
This image illustrates the remote's capability to control up to three individual collars (Dog 1, Dog 2, Dog 3) with separate settings, and highlights the effective remote range of up to 1100 yards (3300 feet).
4.3 Training Modes
The remote offers three humane training modes: Ultrasonic, Vibration, and Tone. These can be used individually or combined.

Figure 4.2: Available Training Modes
This diagram details the various safe and effective training modes: Ultrasonic (1-16 levels), Ultrasonic & Vibration (1-16 levels), Vibration (1-9 levels), and Vibration & Sound (1-9 levels), allowing for customized correction.
- Ultrasonic Mode: Press the Ultrasonic button. Use the +/- buttons to select from 16 intensity levels. This mode emits a high-frequency sound audible to dogs but generally not to humans.
- Vibration Mode: Press the Vibration button. Use the +/- buttons to select from 9 intensity levels. This mode delivers a gentle vibration to the collar.
- Ultrasonic & Vibration Mode: Press the Ultrasonic & Vibration button. Use the +/- buttons to select from 16 intensity levels. This mode combines both ultrasonic sound and vibration.
- Tone Mode: The tone is typically integrated with vibration. Press the Vibration & Sound button. Use the +/- buttons to select from 9 different tone options.
Always start with the lowest effective level and gradually increase if necessary. Observe your dog's reaction to determine the appropriate intensity.
4.4 Using the Flashlight
Press the Flashlight button to turn the built-in LED flashlight on or off. This feature is useful for training sessions in low-light conditions or for locating your dog at night.
5. Maintenance
5.1 Battery Care and Charging
- Recharge the remote when the battery indicator shows low power.
- Use only the provided Type-C charging cable.
- Avoid overcharging by disconnecting the charger once the battery is full.
- For optimal battery life, avoid storing the remote in extreme temperatures.
5.2 Cleaning
- Wipe the remote with a soft, damp cloth to remove dirt or debris.
- Do not use harsh chemicals or abrasive cleaners.
- Ensure the charging port cover is securely closed to prevent moisture ingress.
6. Troubleshooting
If you encounter issues with your PaiPaitek PD516U replacement remote, refer to the following common problems and solutions:
| Problem | Possible Cause | Solution |
|---|---|---|
| Remote not turning on. | Low battery. | Charge the remote for at least 2 hours. |
| Remote not controlling the collar. | Not paired, incorrect channel, or collar is off/low battery. | Ensure the collar is on and charged. Re-pair the remote with the collar (see Section 3.2). Verify the correct channel is selected on the remote. |
| Short operating range. | Environmental interference, low battery on remote or collar. | Ensure both devices are fully charged. Avoid areas with strong electromagnetic interference. Ensure no large obstacles are between the remote and collar. |
| Training modes not working. | Incorrect level selected, collar not receiving signal, or collar malfunction. | Increase the intensity level. Check pairing and channel selection. Ensure the collar is functioning correctly. |
| Accidental button presses. | Keylock not activated. | Activate the security keylock by briefly pressing the Power/Keylock button. |
If the problem persists after trying these solutions, please contact customer support.
7. Specifications
| Model Name | PD516U Remote |
| Brand | PaiPaitek |
| Training Modes | Ultrasonic (16 levels), Vibration (9 levels), Tone (9 options), Ultrasonic & Vibration (16 levels) |
| Channels | 3 (for controlling up to 3 collars) |
| Range | Up to 1100 yards (3300 feet) |
| Battery Life (Remote) | Up to 20 days (480 hours) working time |
| Charging Time | Approx. 2 hours (Type-C fast charging) |
| Special Features | Security lock, Built-in flashlight |
| Item Weight | 8 ounces |
| Dimensions (LxWxH) | 1.1 x 0.24 x 0.1 inches |
| Material | Metal |
8. Warranty and Support
For warranty information or technical support, please refer to the original product packaging or contact PaiPaitek customer service directly. Contact details can typically be found on the manufacturer's website or through your purchase platform.
Please retain your proof of purchase for any warranty claims.


