1. Safety Information
Please read all safety instructions carefully before installation and operation.
- The air conditioner must be installed by professional personnel to ensure proper function and safety.
- Pay close attention to the installation position of both indoor and outdoor units to ensure normal use and facilitate future maintenance.
- For units using refrigerants R32 or R454B, which are combustible gases, ensure both indoor and outdoor units have adequate ventilation. Strictly prohibit the operation of open flames in the installation location. Refer to the unit installation manual for detailed information.
- For units using refrigerants R410A, R32, or R454B, a gas leakage detection operation must be performed after connecting the indoor and outdoor pipes to ensure the refrigeration system is free of gas leakage.
- For R410A, R32, or R454B units, the system must be vacuumed to ensure no air remains inside.
- Ensure that the indoor and outdoor connection wires and power supply are connected correctly and reliably.
- If the indoor and outdoor connection pipe exceeds the standard length, additional refrigerant may be required. The specific quantity depends on the refrigerant type (R410A, R32, or R454B) and model. Consult the service manual for details.
2. Product Overview
The OYLUS Mini Split Air Conditioner provides efficient cooling and heating for year-round comfort. This 12000 BTU system is designed for spaces up to 750 sq. ft. and features smart controls and energy-saving technology.
Key Features:
- Year-Round Performance: Operates efficiently from -4°F to 122°F, with reliable heating down to -13°F thanks to a crankcase heater and high-efficiency compressor.
- Wide-Coverage 4D Airflow: Features 4D auto-swing louvers (vertical and horizontal) and 8 adjustable fan speeds for even air circulation.
- Smart Control System: Manage functions via remote or smartphone with WiFi connectivity. Includes iFeel mode, LED display off for sleep, 24-hour timer, and safety lock.
- High-temp Self-Cleaning: Easily removable and washable filter. Indoor unit activates a 131°F (55°C) self-cleaning cycle.
- Energy-Efficient Inverter: Uses eco-friendly R454B refrigerant and inverter technology, reducing energy consumption by up to 30% annually in ECO mode. SEER2 20.0, HSPF2 9.5.
- Ultra-Quiet Operation: Noise levels as low as 27dB in sleep mode, up to 40dB at higher settings.
Product Components:
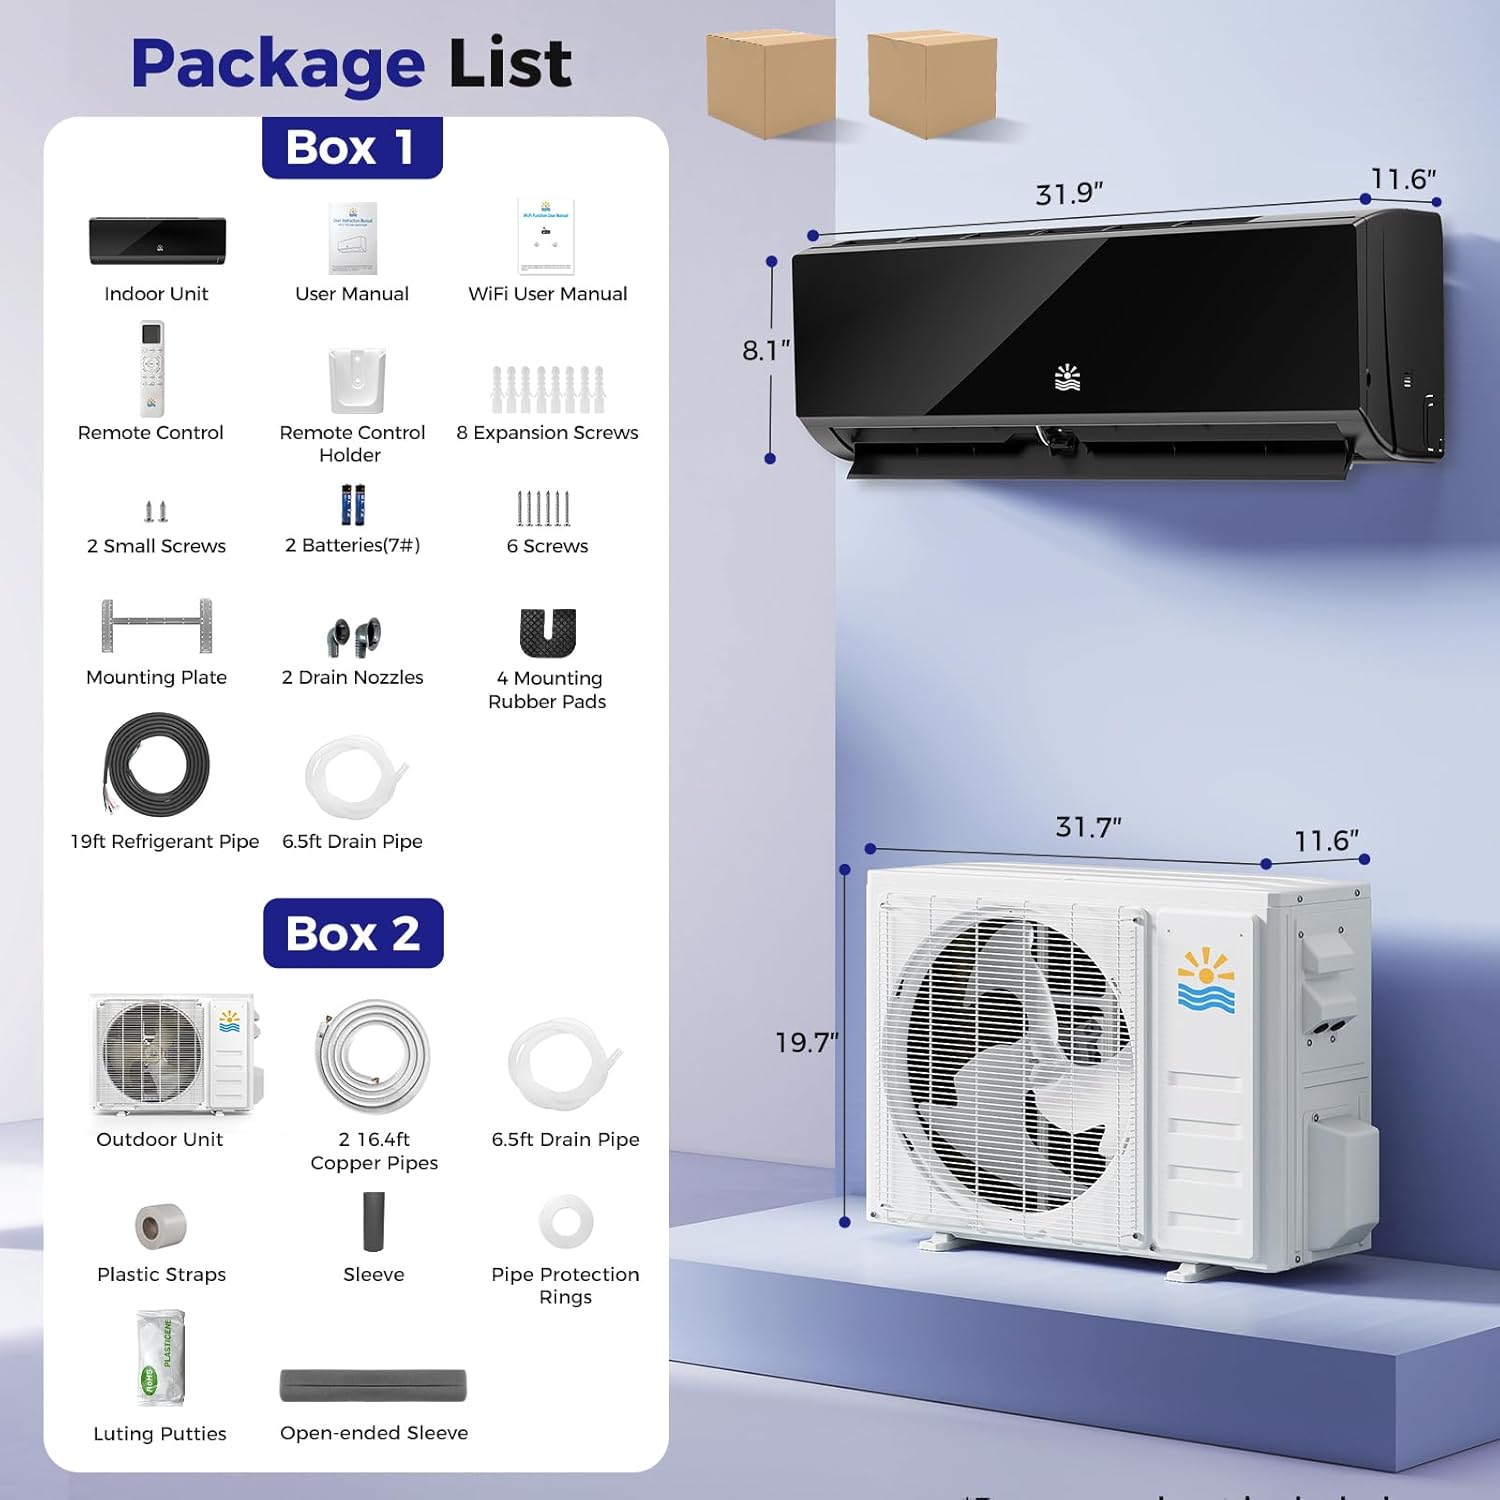
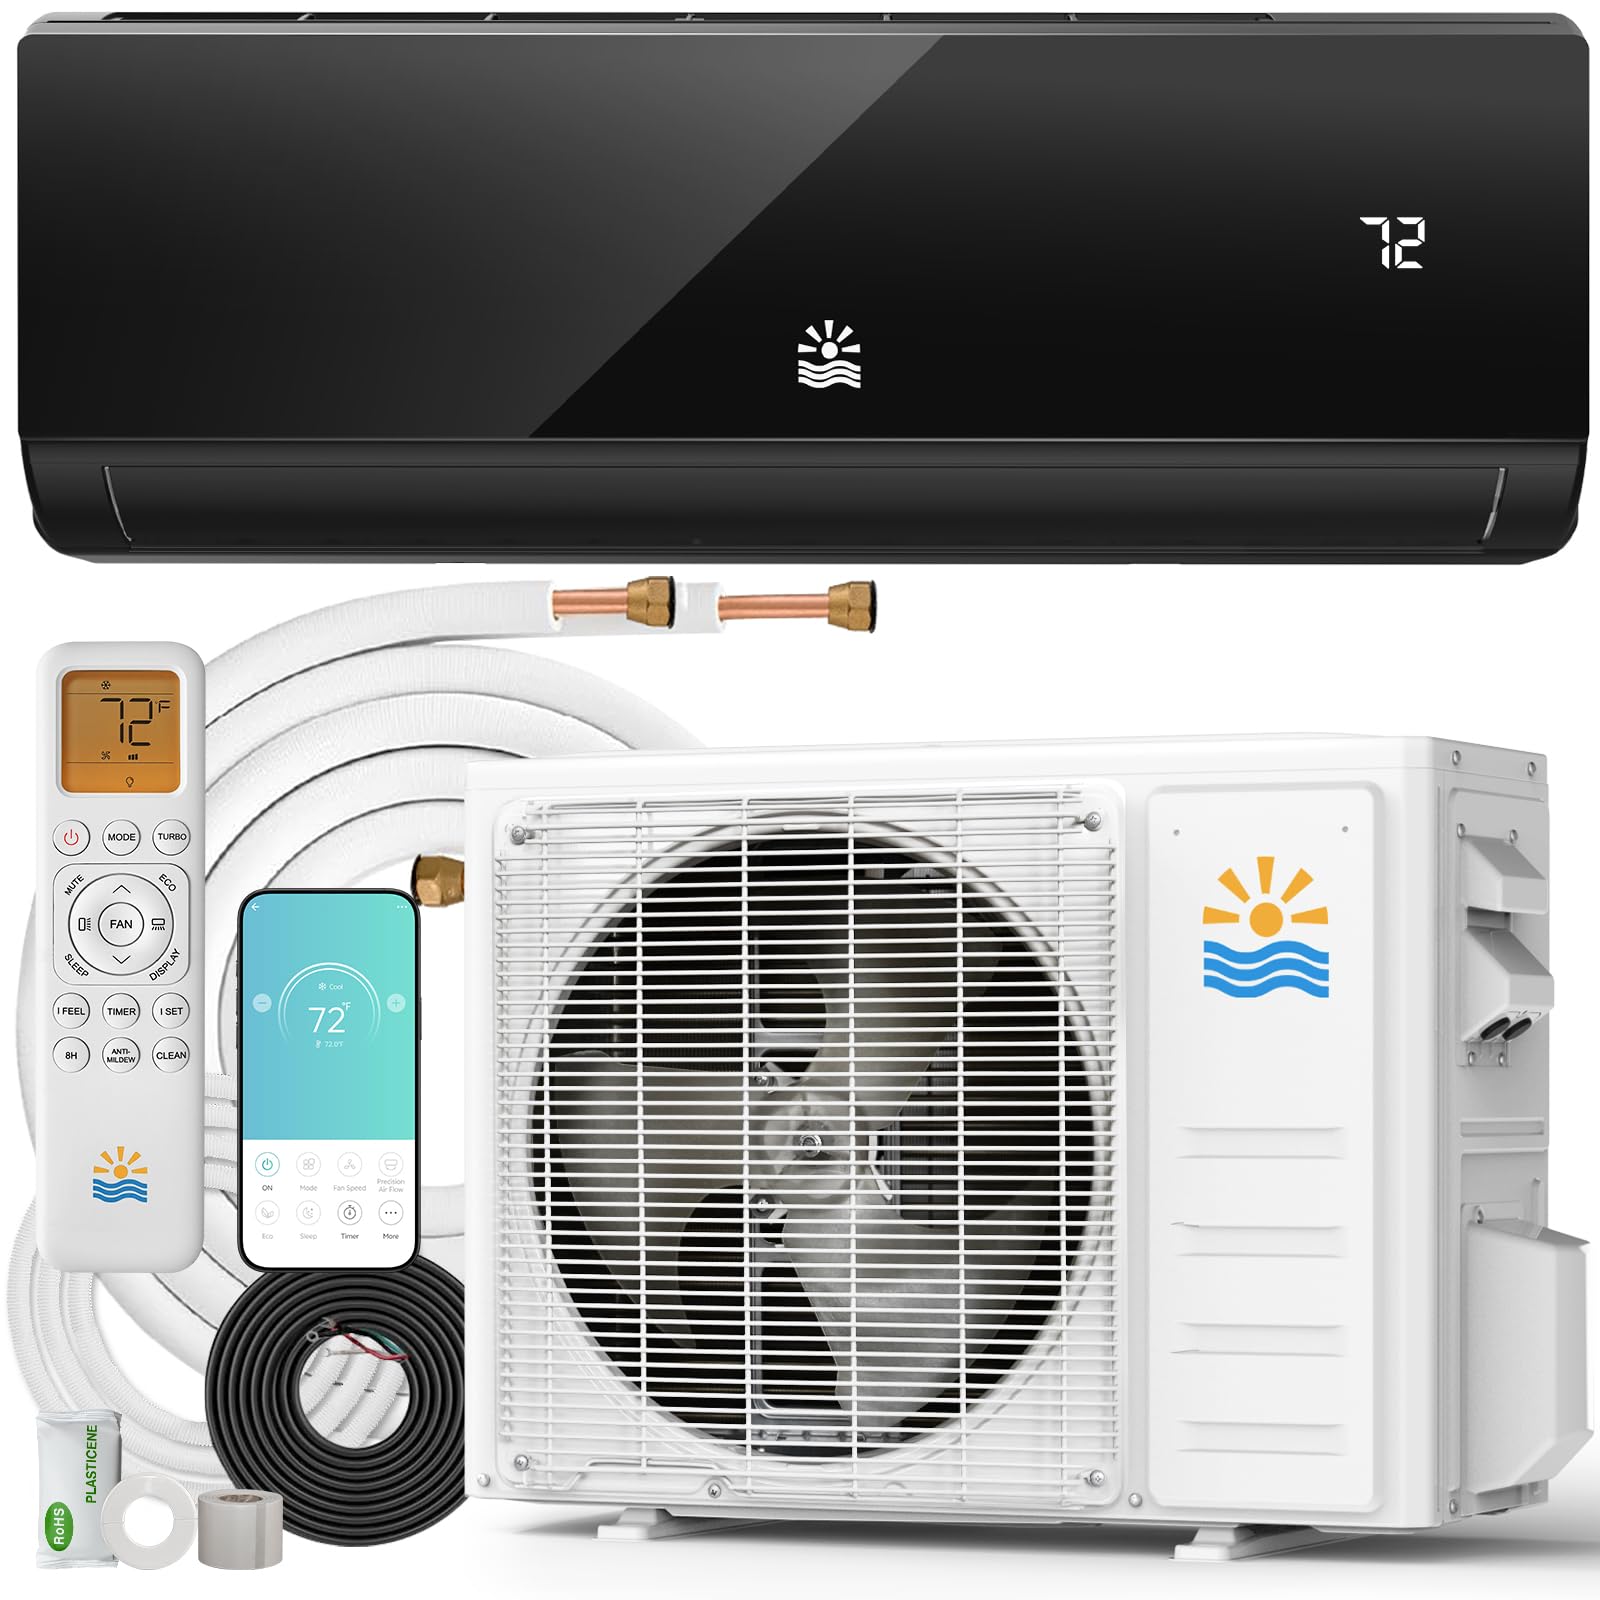
Includes indoor unit, outdoor unit, user manual, WiFi user manual, remote control, mounting plate, refrigerant pipe, drain pipe, and various screws and accessories.
The OYLUS Mini Split AC provides both quick cooling (down to 61°F) and quick heating (up to 88°F).
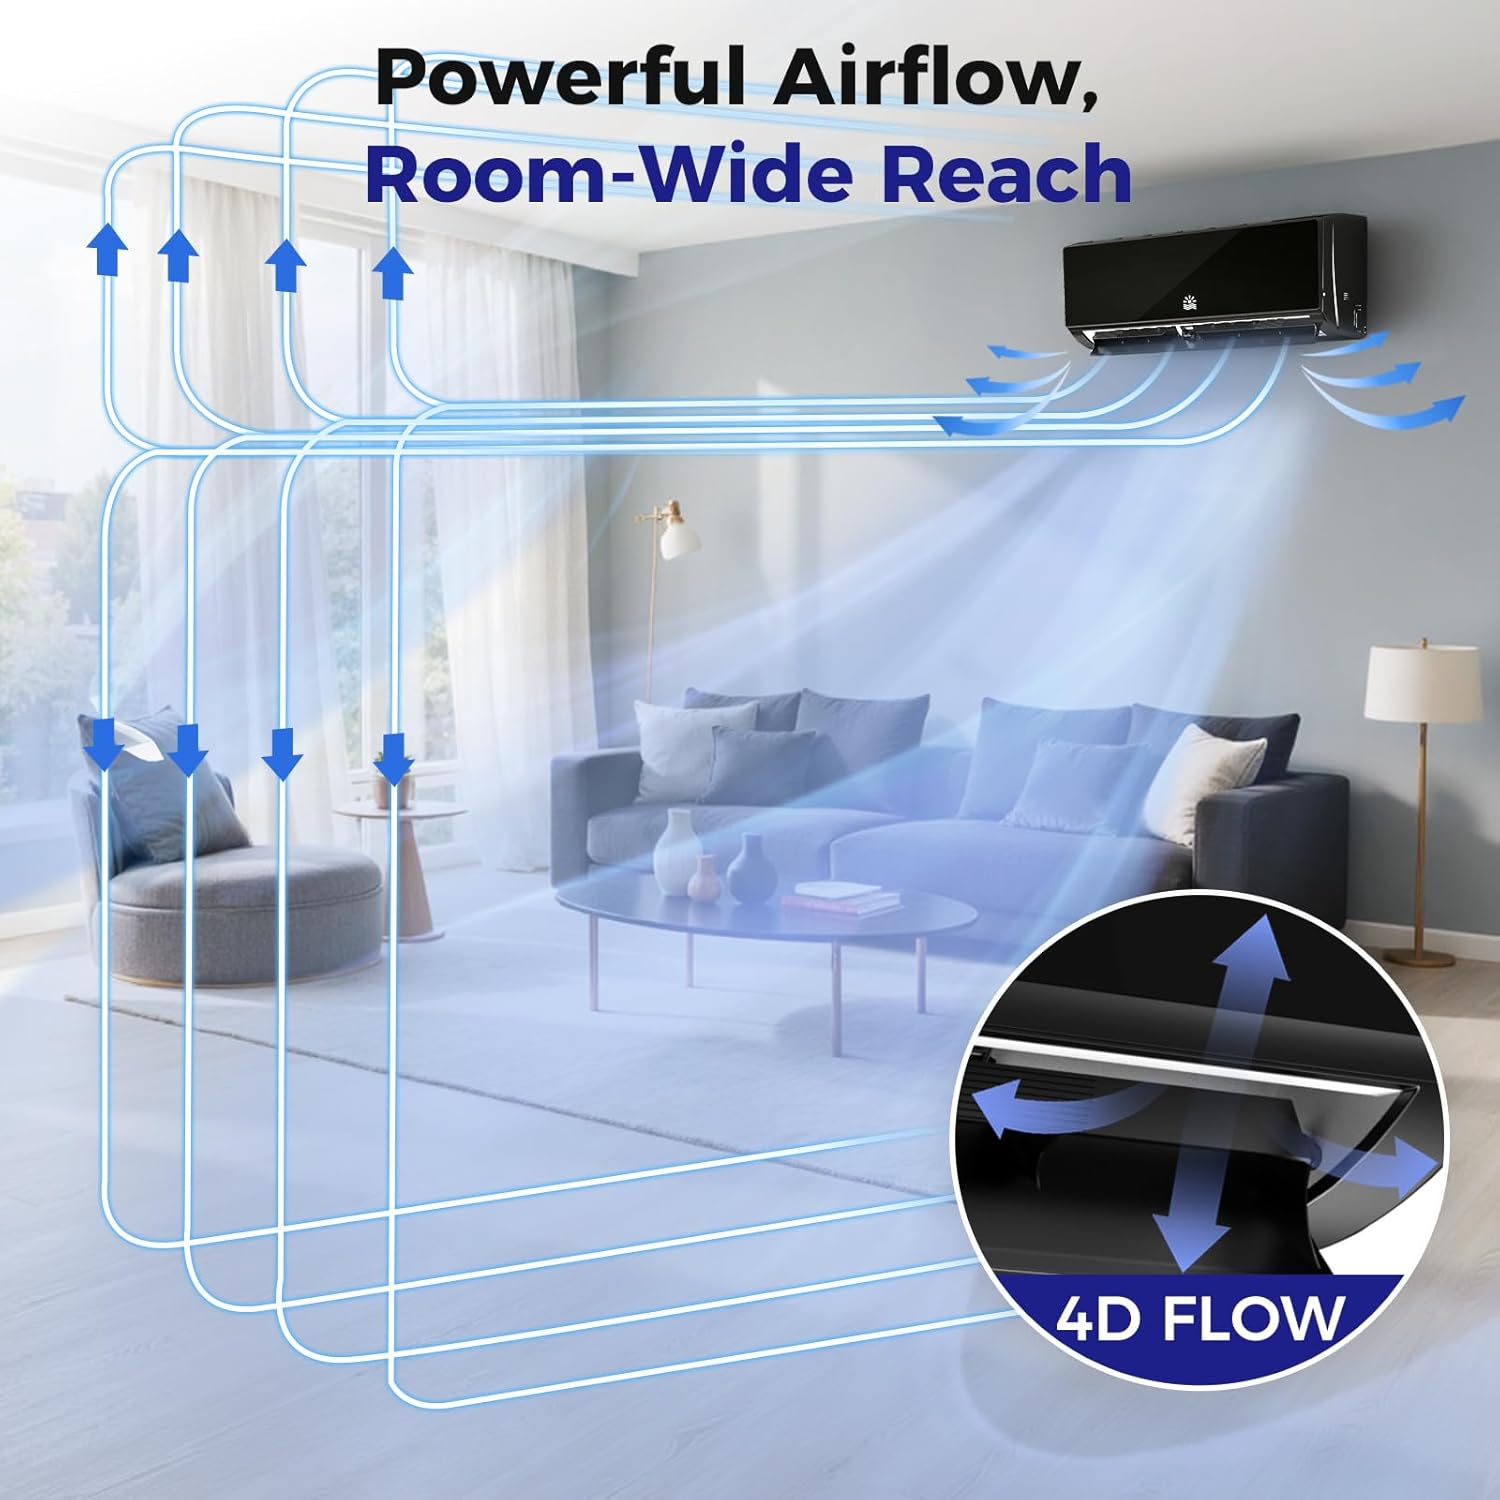
The unit circulates air widely with 4D auto-swing louvers for room-wide reach.

Cooling, Heating, Dry, Fan, and Auto modes for all seasons.
3. Installation
Proper installation is crucial for the optimal performance and longevity of your OYLUS Mini Split AC. It is highly recommended that installation be performed by professional, qualified personnel.
3.1 Indoor Unit Installation
- Check Unit Status: Before installation, inspect both indoor and outdoor units for any broken parts. Verify that the indoor cross-fan operates correctly and the remote controller functions normally. If the cross-fan does not operate, check and adjust it first.
- Check for Gas Flow: Verify if there is gas flow from the connector. If no gas is coming out, check the evaporator for any leakage.
- Connect Wiring: Unfix the electric box cover and connect the indoor and outdoor unit connection wires. Double-check the marks on the wires to ensure correct and reliable wiring connection.
- Piping Direction and Case Cutting: Based on the installation location, decide the piping direction and perform any necessary face frame case cutting. It is essential to clean and smooth the case gap to prevent damage to the pipes.
- Adjust Connection Pipes: Adjust the connection pipes, paying attention to the alignment of the horn. Control the strength of the wrench to prevent nut rupture. Ensure no gas leakage after pipes connection.
- Connect Drainage Pipe: Connect the drainage pipe. It must be sealed with electrical tape to ensure no water leakage.
- Wrap Pipes and Wiring: Wrap the refrigerant pipes, drainage hose, and wiring together. Note that pipe connectors need to be retained for later leak detection.
- Install Wall Plate: Install the wall plate securely. Ensure the plate is strong enough to hold the indoor unit.
- Route Pipes Through Wall: Pass the pipes through the wall hole and firmly fix the indoor unit on the mounting plate.
3.2 Outdoor Unit Installation
- Fix Outdoor Unit: Fix the outdoor unit on the mounting bracket. It is suggested to use rubbers on the feet to decrease possible vibration and noise.
- Open Refrigerant Pipes Cover: Open the refrigerant pipes cover.
- Connect Electrical Control Box: Open the electrical control box. Route the indoor and outdoor connection cable to the left hole of the cover, and the power cord to the right hole. Connect the indoor and outdoor connection wires to the electric terminal, paying attention to the marks of 1, 2, 3, and ground on the wires. They must correspond one-to-one with the markings on the terminal.
- Connect Power Supply: Connect the power supply cable to the electric terminal. Ensure all wire connections are correct and reliable. Please ensure the AC unit has a separate leakage breaker.
- Check Outdoor Unit Status: Check the status of the outdoor unit after installation.
3.3 Vacuum and Leakage Detection
- Connect Vacuum Pump: First, connect one hose from the manifold low pressure gauge to the outdoor unit service port on the three-way valve. Second, connect the manifold gauge to the vacuum pump. Then, connect the vacuum pump to the power supply.
- Vacuum System: Switch on the vacuum pump and open the gauge low pressure valve. For split AC, normally vacuum the unit for at least 15 minutes until the vacuum gauge is maintained at -14.5 psi. For R32 or R454B units, based on the length of connection pipes, it is suggested to vacuum the unit for around 15 to 30 minutes when pump capacity is 4-4.5 CFM.
- Check for Leaks (Pressure Hold): Close the low pressure valve on the manifold gauge first, then switch off the vacuum pump. Hold the pressure for 5 minutes. Make sure that the rebound of the compound gauge pointer does not exceed 0.73 psi. If the pointer rebounds more than 0.73 psi, you need to check and repair the leakage point, which is most likely from the pipe connector.
- Open Valves: Open the outdoor unit low pressure valve counterclockwise for 1/4 turn with a hexagonal wrench to let a little refrigerant fill the system. Close the low pressure valve after 5 seconds. Check all pipe connectors of the indoor and outdoor unit for leaks. If there is gas leakage, please repair and tighten the pipe connection.
- Seal Wall Hole: Until no gas leakage is found, clean the connectors, wrap the indoor connector pipes, and seal the wall hole with sealing cement.
- Remove Pressure Hose: Keep the gauge at positive pressure and quickly remove the pressure hose from the outdoor unit service valve.
- Fully Open Valves: Fully open the outdoor unit low pressure and high pressure valves with a hexagonal wrench.
- Reinstall Protective Caps: Reinstall the protective caps of the service port, low pressure, and high pressure valves of the outdoor unit. Reinstall the valves cover.
Video 3.1: Easy Mini Split Setup: HVAC Pro Tips to Install Unit Quickly
This video provides a comprehensive guide to installing the mini split AC unit, covering indoor and outdoor unit setup, wiring, and leak detection procedures.
4. Operation
Your OYLUS Mini Split AC/Heating System is designed for user-friendly operation with multiple modes and smart control options.
4.1 Control Options
- Remote Control: All functions can be managed through the included remote control.
- Smartphone App (WiFi Enabled): Connect your unit to WiFi and manage all functions via your smartphone, offering flexible control both at home and remotely.
4.2 Operating Modes & Features
- Cooling & Heating: Provides quick cooling down to 61°F and heating up to 88°F.
- 4D Airflow: Auto-swing louvers move vertically and horizontally to circulate air evenly.
- Adjustable Fan Speeds: Choose from 8 adjustable fan speeds to adapt to various room layouts and comfort preferences.
- iFeel Mode: Localized temperature sensing for precise comfort around your body.
- Sleep Mode: Reduces noise levels to as low as 27dB for undisturbed sleep. The LED display can be turned off.
- ECO Mode: Reduces energy consumption by up to 30% annually.
- 24-Hour Timer: Program the unit to turn on or off at specific times.
- Safety Lock: Prevents unintended changes to settings.

Control your AC with the remote or the SmartLife-SmartHome app.

13 major modes and 8 speed modes for customized comfort.
Video 4.1: 20 and 21 SEER2 Mini Split AC Unit - Fast Cooling & Heating
This video highlights the fast cooling and heating capabilities of the OYLUS mini split AC unit, demonstrating its efficiency and performance.
Video 4.2: Oylus Mini Split Ac/Heating System
A general overview video showcasing the features and benefits of the OYLUS Mini Split AC/Heating System, including its smart control and quiet operation.
5. Maintenance
Regular maintenance ensures the efficiency and longevity of your OYLUS Mini Split AC unit.
- Filter Cleaning: The unit features an easily removable and washable filter for simple maintenance. Regular cleaning of the filter is recommended.
- High-Temperature Self-Cleaning: The indoor unit can activate a 131°F (55°C) high-temperature self-cleaning cycle to help maintain fresh, well-conditioned airflow.
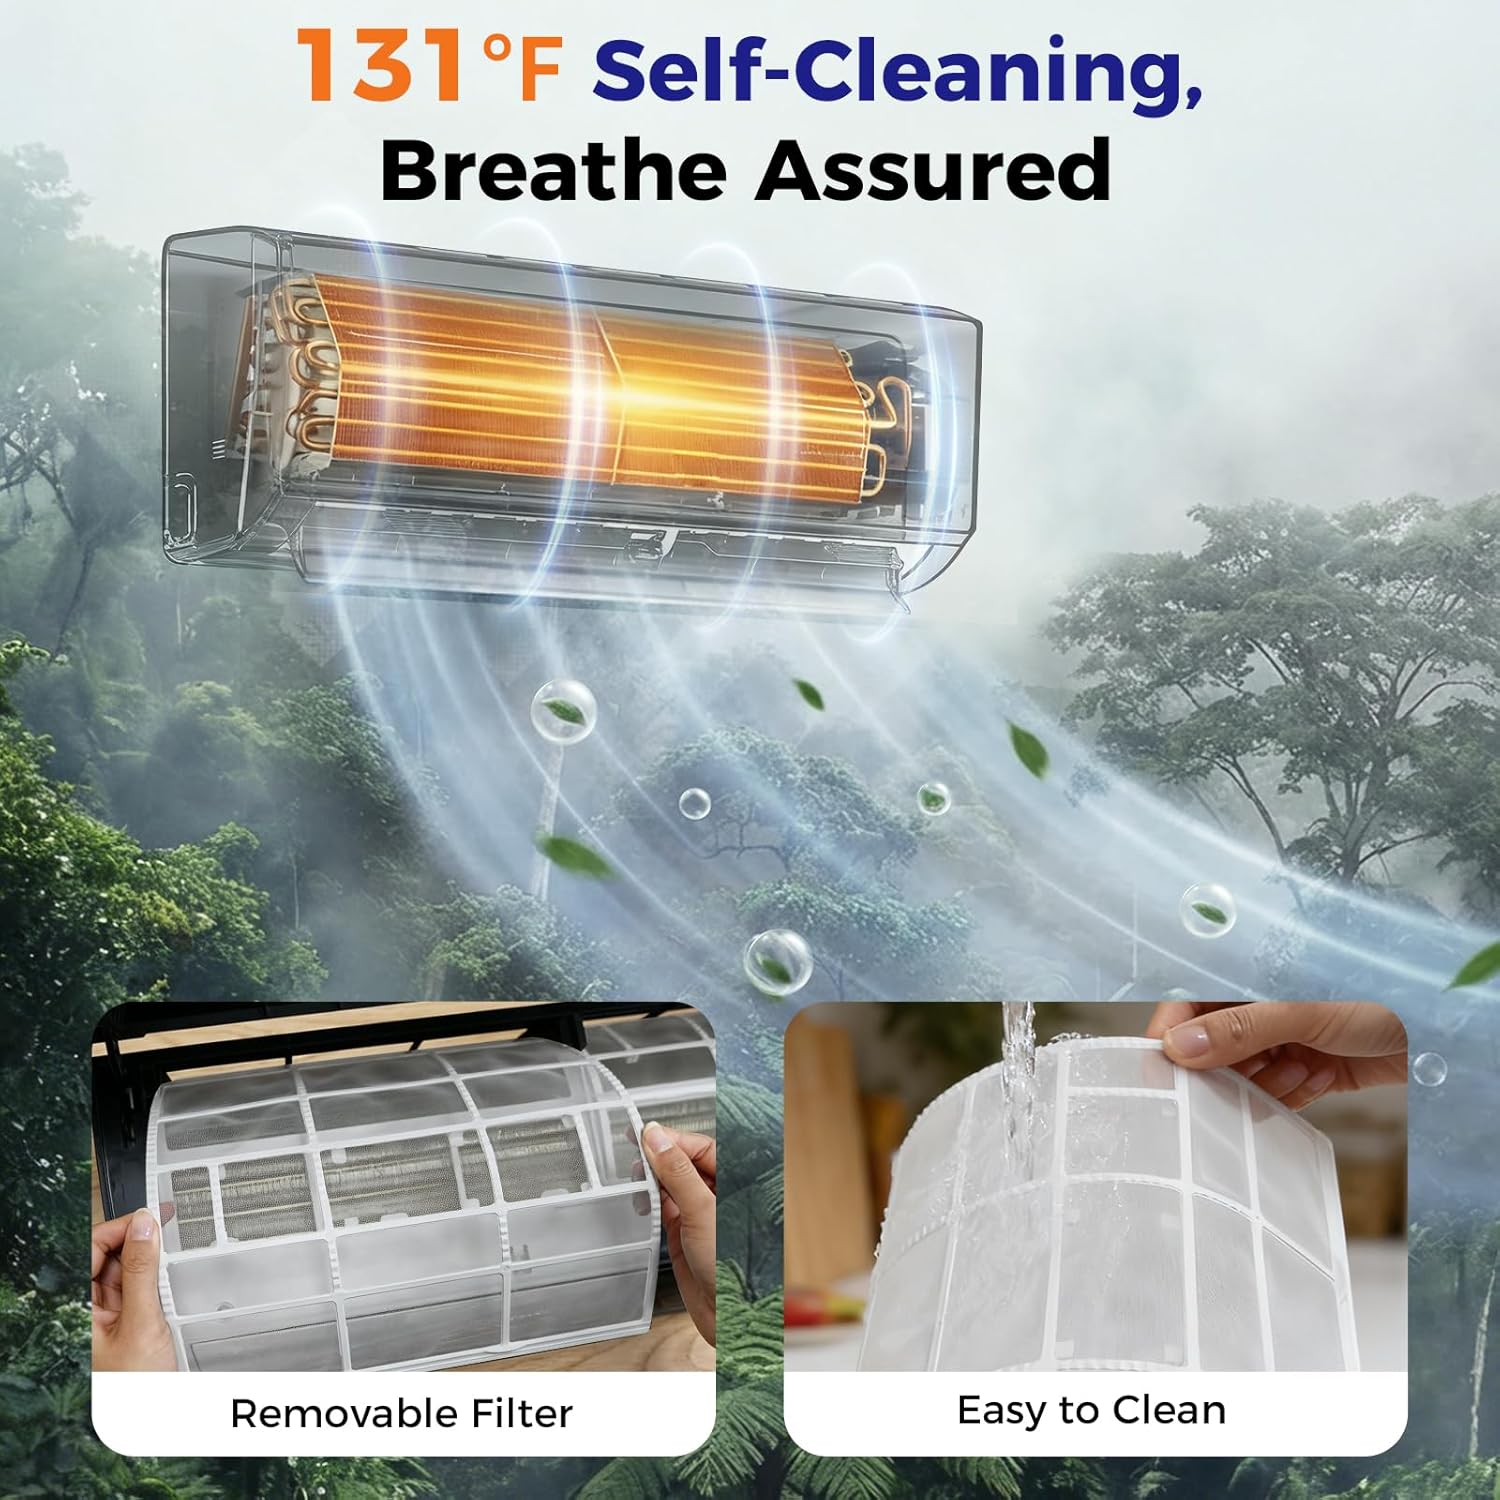
The unit offers a 131°F self-cleaning function and features easily removable and washable filters for effortless upkeep.
6. Troubleshooting
This section provides guidance on common issues you might encounter with your OYLUS Mini Split AC unit.
- Gas Leakage: If the vacuum test indicates a pressure rebound exceeding 0.73 psi, there might be a gas leakage, most commonly from the pipe connectors. Inspect and tighten all pipe connections. If the issue persists, contact professional service.
- Fluorine Leak Protection: The unit is equipped with a smart sensor that will alert you to potential refrigerant issues, indicating a possible fluorine leak. Address these alerts promptly by contacting a qualified technician.

Smart sensors detect potential refrigerant issues and provide alerts.
7. Specifications
| Feature | Specification |
|---|---|
| Brand Name | OYLUS |
| Model Info | OAS-01_12K-115V_SEER20 |
| Item Weight | 21.1 pounds |
| Product Dimensions | 31.9 x 8.1 x 11.6 inches |
| Capacity | 4800 Cubic Feet (12000 British Thermal Units) |
| Noise Level | 27 Decibels (in sleep mode) |
| Installation Type | Split System |
| Form Factor | Mini-Split |
| Special Features | 4 Way Swing, Auto Clean, Fast Cooling, Heating & Cooling Function, Sleep Mode |
| Color | Black |
| Voltage | 115 Volts |
| Wattage | 1050 watts |
| Material Type | Metal, Plastic |
| Seasonal Energy Efficiency Ratio (SEER2) | 20 |
| Refrigerant | R454B |
| Included Components | Connecting Pipe |

The unit boasts a SEER2 of 20.0 and HSPF2 of 9.5, contributing to up to 30% energy savings.
8. Warranty & Support
OYLUS is committed to providing high-quality products and excellent customer service.
- Quality Protection: Enjoy 360° quality protection for your product.
- After-Sales Support: Benefit from hassle-free after-sales support.
- Rapid Response System: Access a 24/7 rapid response system for any inquiries or issues.
For specific warranty details or to contact support, please refer to the warranty card included with your product or visit the official OYLUS website.


